Amazon Redshift is a fast, fully managed cloud data warehouse that makes it simple and cost-effective to analyze all your data using standard SQL and your existing business intelligence (BI) tools. Amazon Redshift uses SQL to analyze structured and semi-structured data across data warehouses, operational databases, and data lakes, using AWS designed hardware and machine learning (ML) to deliver the best price-performance at any scale.
Customers have reached out to us with a need to migrate their Amazon Redshift clusters from one AWS Region to another. Some of the common reasons include provisioning their clusters geographically closer to their user base to improve latency, for cost-optimization purposes by deploying their clusters in a Region where the pricing is lower, or for migrating clusters to a Region where the rest of their deployments are. This post provides a step-by-step approach to migrate your Amazon Redshift cluster to another Region using the snapshot functionality.
Overview of solution
This solution uses the cross-Region snapshot feature of Amazon Redshift to perform inter-Region migration. The idea is to take multiple manual snapshots of your Amazon Redshift cluster before the cutover deadline to ensure minimal data loss and to migrate the cluster to another Region within the defined maintenance window. You should plan for the maintenance window to be during a period of low or no write activity to minimize downtime. The time taken to copy over the snapshots depends on the size of the snapshot. Before the migration, it’s a good idea to estimate how much time it takes to copy over snapshots to the target Region by testing with similar or larger size datasets in your staging environments. This can help with your planning process.
After you copy the snapshots to the target Region, you can restore the latest snapshot to create a new Amazon Redshift cluster. Snapshots are incremental by nature and track changes to the cluster since the previous snapshot. The copy time is relative to the amount of data that has changed since the last snapshot.
When a snapshot is copied to another Region, it can also act as a standalone, which means that even if only the latest snapshot is copied to the target Region, the restored Amazon Redshift cluster still has all the data. For more information, refer to Amazon Redshift snapshots. Cross-Region snapshot functionality can also be useful for setting up disaster recovery for your Amazon Redshift cluster.
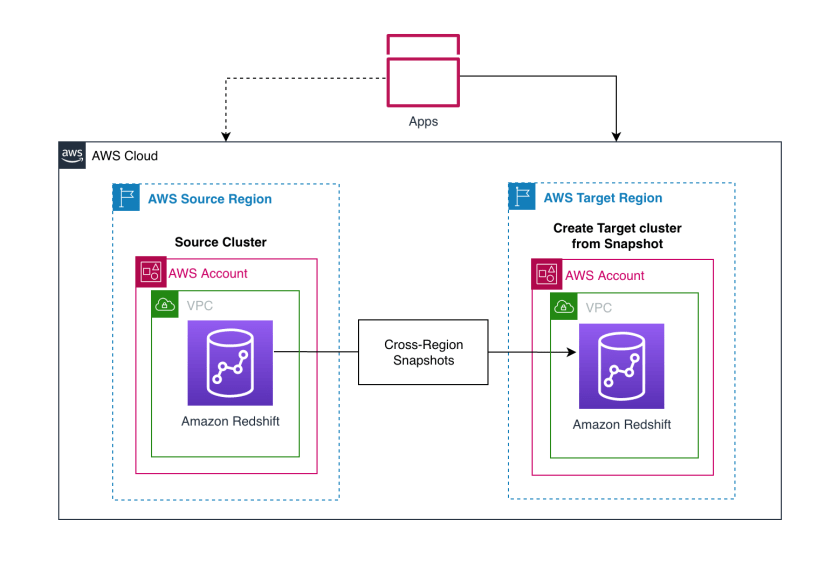
The following diagram illustrates the architecture for cross-Region migration within the same AWS account.
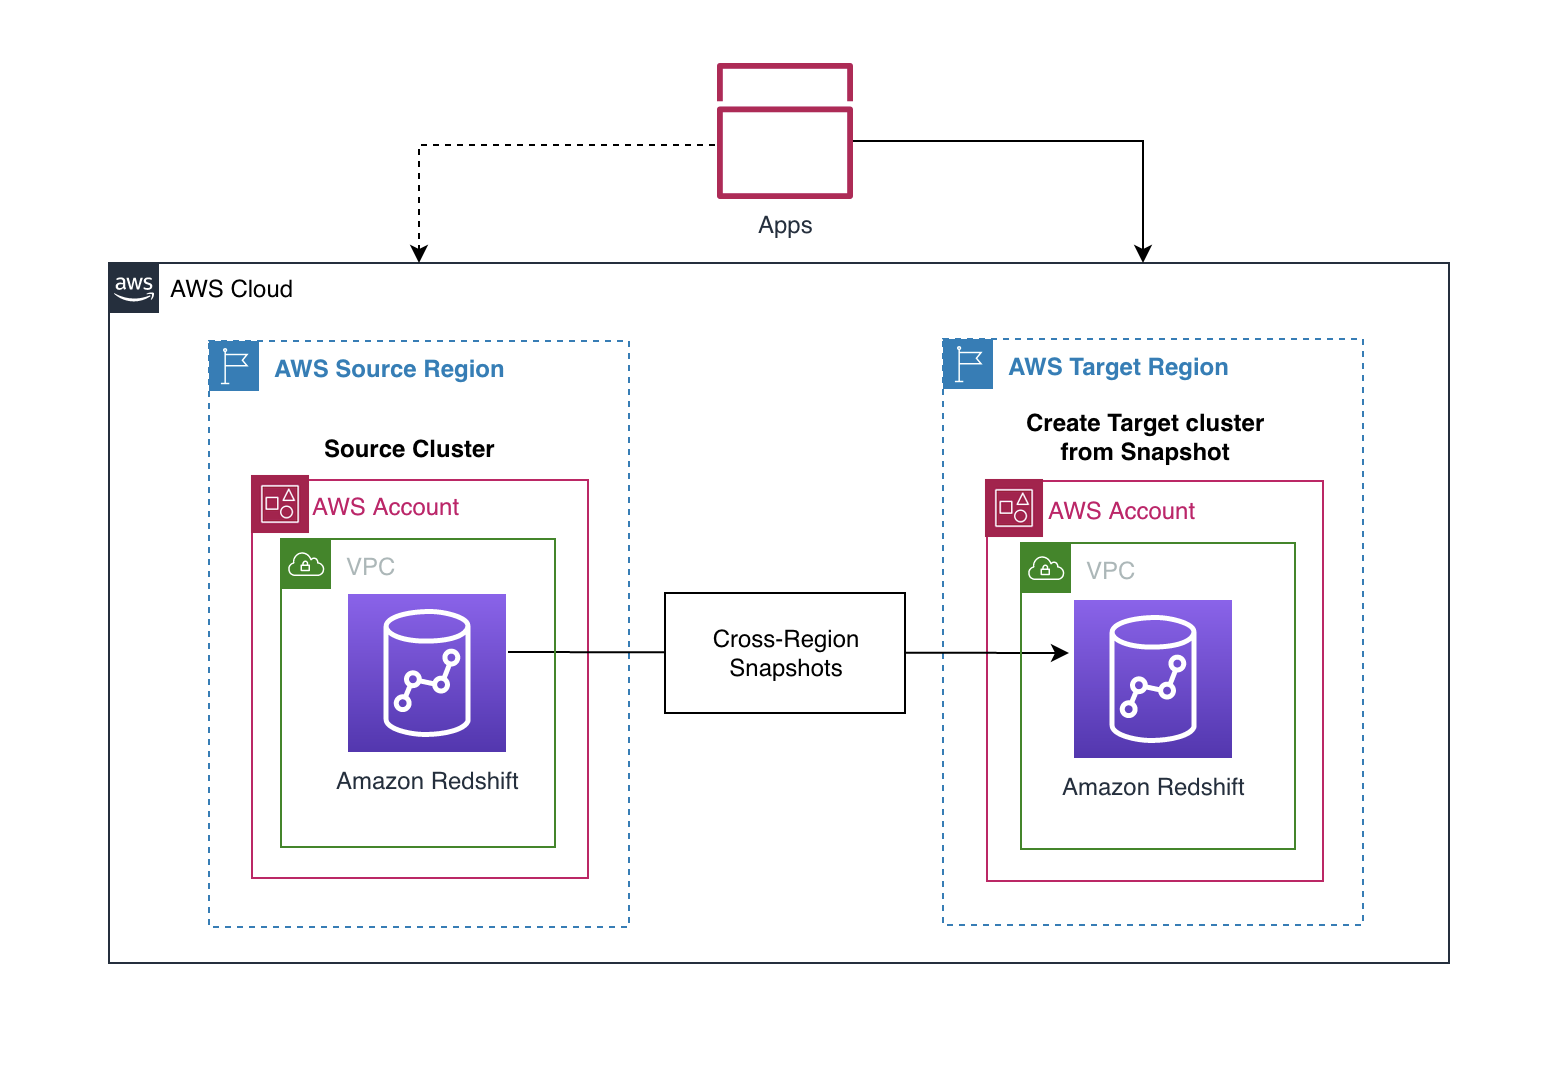
The solution includes the following steps:
- Configure cross-Region snapshots of the source Amazon Redshift cluster before the cutover deadline.
- Restore the latest snapshots to create a new Amazon Redshift cluster in the target Region.
- Point your applications to the new Amazon Redshift cluster.
For encrypted snapshots, there is an additional step of creating a new encryption key and performing a snapshot grant before you can copy the snapshot to the target Region.
Prerequisites
For the migration process, select a maintenance window during when there is low write activity, and be aware of the RTO and RPO requirements of the organization.
The following steps walk you through setting up an Amazon Redshift cluster in the source Region and populating it with a sample dataset. For this post, we use US West (Oregon) as the source Region and US East (N. Virginia) as the target Region. If you already have a source Amazon Redshift cluster, you can skip these prerequisite steps.
Create an Amazon Redshift cluster in the source Region
To create your cluster in the source Region, complete the following steps:
- Open the Amazon Redshift console in your source Region.
- Choose Clusters in the navigation pane and choose Clusters again on the menu.
- Choose Create cluster.
- For Cluster identifier, enter
redshift-cluster-source. - Select Production for cluster use.
This option allows you to select specific instance types and load the sample data of your choice. Note that you are charged for Amazon Redshift instances and storage for the entire time until you delete the cluster. For more information about pricing, see Amazon Redshift pricing.
- For Node type, choose your preferred node type.
- For Number of nodes, enter the number of nodes to use.
For this post, we use four dc2.large instances.
- Under Database configurations, enter a user name and password for the cluster.
As a best practice, change the default user name to a custom user name (for this post, mydataadmin) and follow the password guidelines.
To load the sample data from an external Amazon Simple Storage Service (Amazon S3) bucket to the source cluster, you need to create an AWS Identity and Access Management (IAM) role.
- Under Cluster permissions, on the Manage IAM roles drop-down menu, choose Create IAM role.
- Select Any S3 bucket and choose Create IAM role as default.
- For Additional configurations, turn Use defaults off.
- In the Network and security section, choose a VPC and cluster subnet group.
For more information about creating a cluster, refer to Creating a cluster in a VPC.
- Expand Database configurations.
We recommend using custom values instead of the defaults.
- For Database name, enter
stagingdb. - For Database port, enter 7839.
- For Encryption, select Disabled.
We enable encryption in a later step.
- Leave the other options as default and choose Create cluster.
- When the cluster is available, enable audit logging on the cluster.
Audit logging records information about connections and user activities in your database. This is useful for security as well as troubleshooting purposes.
To meet security best practices, you also create a new Amazon Redshift parameter group.
- Choose Configurations and Workload management to create your parameter group.
- Make sure that the parameters
require_sslandenable_user_activity_loggingare set to true. - On the Properties tab, choose the Edit menu in the Database configurations section and choose Edit parameter group.
- Associate the newly created parameter group to the Amazon Redshift cluster.
If this change prompts you to reboot, choose Reboot.
Load the sample dataset in the source Amazon Redshift cluster
When the cluster is ready, it’s time to load the sample dataset from the S3 bucket s3://redshift-immersionday-labs/data/. The following tables are part of the dataset:
- REGION (5 rows)
- NATION (25 rows)
- CUSTOMER (15 million rows)
- ORDERS (76 million rows)
- PART (20 million rows)
- SUPPLIER (1 million rows)
- LINEITEM (600 million rows)
- PARTSUPPLIER (80 million rows)
It’s a best practice for the Amazon Redshift cluster to access the S3 bucket via VPC gateway endpoints in order to enhance data loading performance, because the traffic flows through the AWS network, avoiding the internet.
Before we can load our data into Amazon S3, we need to enable a VPC endpoint via Amazon Virtual Private Cloud (Amazon VPC).
- On the Amazon VPC console, choose Endpoints.
- Choose Create endpoint.
- For Name tag, enter
redshift-s3-vpc-endpoint. - For Service category, select AWS services.
- Search for
S3and select the Gateway type endpoint. - Choose the same VPC where your cluster is provisioned and select the route table.
- Leave everything else as default and choose Create endpoint.
Wait for the Gateway endpoint status to change to Available.
Next, you enable enhanced VPC routing.
- Open the Amazon Redshift console in the source Region.
- Choose your source cluster.
- On the Properties tab, in the Network and security settings section, choose Edit.
- For Enhanced VPC routing, select Enabled.
- Choose Save changes.
Wait for the cluster status to change to Available.
You need to create tables in order to load the sample data into the cluster. We recommend using the Amazon Redshift web-based query editor.
- On the Amazon Redshift console, choose Editor in the navigation pane and choose Query editor.
You can also use the new query editor V2.
- Choose Connect to database.
- Select Create new connection.
- Enter the database name and user name.
- Choose Connect.
For this post, we use the TPC data example from the Amazon Redshift Immersion Labs.
- Navigate to the Data Loading section of the Immersion Day Labs.
- Follow the instructions in the Create Tables section to create the tables in your source cluster.
- After you create the tables, follow the instructions in Loading Data section to load the data into the cluster.
Loading the data took approximately 17 minutes in the US West (Oregon) Region. This may vary depending on the Region and network bandwidth at that point in time.
After the data is loaded successfully into the source cluster, you can query it to make sure that you see the data in all the tables.
- Choose a table (right-click) and choose Preview data.
- Drop the
customertable using the queryDROP TABLE customer;.
We add the table back later to demonstrate incremental changes.
You can check the storage size to verify the size of the data loaded.
- Choose Clusters in the navigation pane.
- Choose your source cluster.
- Verify the storage size in the General information section, under Storage used.
Your source Amazon Redshift cluster is now loaded with a sample dataset and is ready to use.
Configure cross-Region snapshots in the source Region
To perform inter-Region migration, the first step is to configure cross-Region snapshots. The cross-Region snapshot feature enables you to copy over snapshots automatically to another Region.
- Open the Amazon Redshift console in the source Region.
- Select your Amazon Redshift cluster.
- On the Actions menu, choose Configure cross-region snapshot.
- For Copy snapshots, select Yes.
- For Destination Region, choose your target Region (for this post,
us-east-1). - Configure the manual snapshot retention period according to your requirements.
- Choose Save.
After the cross-Region snapshot feature is configured, any subsequent automated or manual snapshots are automatically copied to the target Region.
- To create a manual snapshot, choose Clusters in the navigation pane and choose Snapshots.
- Choose Create snapshot.
- For Cluster identifier, choose
redshift-cluster-source. - Adjust the snapshot retention period based on your requirements.
- Choose Create snapshot.

- CRISP DETAIL, CLEAR DISPLAY: Enjoy binge-watching...
- PRO SHOTS WITH EASE: Brilliant sunrises, awesome...
- CHARGE UP AND CHARGE ON: Always be ready for an...
- POWERFUL 5G PERFORMANCE: Do what you love most —...
- NEW LOOK, ADDED DURABILITY: Galaxy A54 5G is...

- Free 6 months of Google One and 3 months of...
- Pure Performance: The OnePlus 12 is powered by the...
- Brilliant Display: The OnePlus 12 has a stunning...
- Powered by Trinity Engine: The OnePlus 12's...
- Powerful, Versatile Camera: Explore the new 4th...
The idea is to take multiple snapshots until the cutover deadline so as to capture as much data as possible for minimal data loss based on your RTO and RPO requirements. The first snapshot creation took about 4 minutes for 28.9 GB of data, but subsequent snapshots are incremental in nature.
This snapshot gets automatically copied to the target Region from the source Region. You can open the Amazon Redshift console in the target Region to verify the copy.
As shown in the following screenshot, the snapshot of size 28.9 GB took around 44 minutes to get copied to the target Region because it’s the first snapshot containing all the data in the cluster. Depending on the Regions involved and the amount of data to copy, a cross-Region snapshot copy may take hours to complete.
Let’s now simulate incremental changes being made to the source cluster.
- Open the Amazon Redshift console in the source Region and open the query editor.
- Create a new table called
customerin the cluster using the following query:create table customer ( C_CUSTKEY bigint NOT NULL, C_NAME varchar(25), C_ADDRESS varchar(40), C_NATIONKEY bigint, C_PHONE varchar(15), C_ACCTBAL decimal(18,4), C_MKTSEGMENT varchar(10), C_COMMENT varchar(117)) diststyle all; - Load data into the
customertable using the following command:copy customer from 's3://redshift-immersionday-labs/data/customer/customer.tbl.' iam_role default region 'us-west-2' lzop delimiter '|' COMPUPDATE PRESET; - To create a manual snapshot containing incremental data, choose Clusters in the navigation pane, then choose Snapshots.
- Provide the necessary information and choose Create snapshot.
Because the cross-Region snapshot functionality is enabled, this incremental snapshot is automatically copied to the target Region. In the following example, the snapshot took approximately 11 minutes to copy to the target Region from the source Region. This time varies from Region to Region and is based on the amount of data being copied.
Restore snapshots to same or higher instance types in the target Region
When the latest snapshot is successfully copied to the target Region, you can restore the snapshot.
- Open the Amazon Redshift console in the target Region.
- On the Snapshots page, select your snapshot.
- On the Restore from snapshot menu, choose Restore to a provisioned cluster.
- For Cluster identifier, enter
redshift-cluster-target. - For Node type¸ you can use the same instance type or upgrade to a higher instance type.
- For Number of nodes, choose the number of nodes you need.
If you choose to upgrade your instance to RA3, refer to Upgrading to RA3 node types to determine the number of nodes you need.
For this post, we still use four nodes of the dc2.large instance type.
- Under Database configurations, for Database name¸ enter
stagingdb. - Leave the rest of the settings as default (or modify them per your requirements) and choose Restore cluster from snapshot.
A new Amazon Redshift cluster gets provisioned from the snapshot in the target Region.
Follow the same security best practices that you applied to the source cluster for the target cluster.
Point your applications to the new Amazon Redshift cluster
When the target cluster is available, configure your applications to connect to the new target Amazon Redshift endpoints. New clusters have a different Domain Name System (DNS) endpoint. This means that you must update all clients to refer to the new endpoint.
Inter-Region migration steps for encrypted data
If the data in your Amazon Redshift cluster is encrypted, you need to perform additional steps in your inter-Region migration. If data encryption is already enabled, you can skip to the steps for snapshot copy grant.
Enable data encryption in the source Amazon Redshift cluster
To enable data encryption in the source cluster, we use Amazon Key Management Service (AWS KMS).
- Open the AWS KMS console in the source Region.
- Create a KMS key called
redshift-source-key. - Enable key rotation.
- On the Amazon Redshift console (still in the source Region), select your cluster.
- If a cross-Region snapshot is enabled, choose Configure cross-region snapshot on the Actions menu.
- Select No and choose Save.
- On the Properties tab, in the Database configurations section, choose the Edit menu and choose Edit encryption.
- Select Use AWS Key Management Service (AWS KMS).
- Select Use key from current account and choose the key you created.
- Choose Save changes.
The time taken to encrypt the data is based on the amount of data present in the cluster.
If the data is encrypted, any subsequent snapshots are also automatically encrypted.
Snapshot copy grant
When you copy the encrypted snapshots to the target Region, the existing KMS key in the source Region doesn’t work in the target Region because KMS keys are specific to the Region where they’re created. You need to create another KMS key in the target Region and grant it access.
- Open the AWS KMS console in the target Region.
- If you don’t already have a KMS key to use, create a key called
redshift-target-key. - Enable key rotation.
- Open the Amazon Redshift console in the source Region.
- Select the cluster and on the Actions menu, choose Configure cross-region snapshot.
- For Copy snapshots, select Yes.
- For Choose a snapshot copy grant, choose Create new grant.
- For Snapshot copy grant name, enter
redshift-target-grant. - For KMS key ID, choose the key that you created for the grant.
If you don’t specify a key ID, the grant applies to your default key.
- Choose Save.
Any subsequent snapshots copied to the target Region are now encrypted with the key created in the target Region.
- After the snapshot is copied to the target Region, restore the cluster from the encrypted snapshot, following the steps from earlier in this post.
For more details on the encryption process, refer to Copying AWS KMS–encrypted snapshots to another AWS Region.
After you restore from the encrypted snapshot, the restored cluster is automatically encrypted with the key you created in the target Region.

- 【Octa-Core CPU + 128GB Expandable TF Card】...
- 【6.8 HD+ Android 13.0】 This is an Android Cell...
- 【Dual SIM and Global Band 5G Phone】The machine...
- 【6800mAh Long lasting battery】With the 6800mAh...
- 【Business Services】The main additional...

- 【Dimensity 9000 CPU + 128GB Expandable TF...
- 【6.8 HD+ Android 13.0】 This is an Android Cell...
- 【Dual SIM and Global Band 5G Phone】Dual SIM &...
- 【6800mAh Long lasting battery】The I15 Pro MAX...
- 【Business Services】The main additional...

- 🥇【6.8" HD Unlocked Android Phones】Please...
- 💗【Octa-Core CPU+ 256GB Storage】U24 Ultra...
- 💗【Support Global Band 5G Dual SIM】U24 Ultra...
- 💗【80MP Professional Photography】The U24...
- 💗【6800mAh Long Lasting Battery】With the...
Make sure that your applications point to the new cluster endpoint when the cluster is available.
Clean up
If you created any Amazon Redshift clusters or snapshots for testing purposes, you can delete these resources to avoid incurring any future charges.
For instructions on deleting the snapshots, refer to Deleting manual snapshots.
For instructions on deleting the Amazon Redshift cluster, refer to Deleting a cluster.
Conclusion
This post showed how to migrate your Amazon Redshift cluster to another Region using the cross-Region snapshot functionality. Amazon Redshift migration requires some prior planning depending on the Regions involved and the amount of data to copy over. Snapshot creation and copying may take a significant amount of time. The first snapshot contains all the data in the cluster and therefore it may take longer, but subsequent snapshots contain incremental changes and may take less time depending on the changes made. It’s a good idea to estimate how much time the snapshot copy takes by performing some tests in your staging environments with snapshots of a similar size or slightly larger than the ones in the production environment so you can plan for minimal data loss and meet RTO and RPO requirements.
For further details about the Amazon Redshift snapshot functionality, refer to Working with Snapshots.
About the Author
Sindhura Palakodety is a Solutions Architect at Amazon Web Services. She is passionate about helping customers build enterprise-scale Well-Architected solutions on the AWS platform and specializes in Containers and Data Analytics domains.
https://aws.amazon.com/blogs/big-data/migrate-your-amazon-redshift-cluster-to-another-aws-region/