
Customers today want to focus more on their core business model and less on the underlying infrastructure and operational burden. As customers migrate to the AWS Cloud, they’re realizing the benefits of being able to innovate faster on their own applications by relying on AWS to handle big data platforms, operations, and automation.
Source: Run and debug Apache Spark applications on AWS with Amazon EMR on Amazon EKS
Many of AWS’s customers have migrated their big data workloads from on premises to Amazon Elastic Compute Cloud (Amazon EC2) and Amazon EMR, and process large amounts of data to get insights from it in a secure and cost-effective manner.
If you’re using open-source Apache Spark on Amazon Elastic Kubernetes Service (Amazon EKS) clusters to run your big data workloads, you may want to use Amazon EMR to eliminate the heavy lifting of installing and managing your frameworks and integrations with other AWS services.
In this post, we discuss how to run and debug Apache Spark applications with Amazon EMR on Amazon EKS.
Benefits of using Amazon EMR on EKS
Amazon EMR on EKS is primarily beneficial for two key audiences:
- Users that are self-managing open-source applications on Amazon EKS – You can get the benefits of Amazon EMR by having the ability to use the latest fully managed versions of open-source big data analytics frameworks and optimized EMR runtime for Spark with two times faster performance than open-source Apache Spark. You can take advantage of the integrated developer experience for data scientists and developers with Amazon EMR Studio, and a fully managed persistent application user interface (Spark History Server) for simplified logging, monitoring, and debugging. Amazon EMR also provides native integrations with AWS services including Amazon CloudWatch, Amazon Simple Storage Service (Amazon S3), the AWS Glue Data Catalog, AWS Step Functions, and Amazon Managed Workflows for Apache Airflow (Amazon MWAA).
- Existing Amazon EMR users – You can use Amazon EMR on EKS to improve resource utilization by simplifying infrastructure management and consolidating your Amazon EMR applications to run alongside other container-based applications on shared Amazon EKS clusters. You can also centrally manage infrastructure using familiar Kubernetes tools. Additionally, this provides the advantage of running different versions and configurations of the same runtime on a single Amazon EKS cluster with separation of compute, which is no longer tied to a specific analytics framework, version, or configuration.
With Amazon EMR on EKS, you can now let your teams focus on developing big data applications on Spark as rapidly as possible in a highly reliable, available, secure, and cost-efficient manner.
The following diagram shows a high-level representation of Amazon EMR on EKS. The architecture loosely coupled applications to the infrastructure that they run on. When you submit a job to Amazon EMR, your job definition contains all of its application-specific parameters. Amazon EMR uses these parameters to instruct Amazon EKS about which pods and containers to deploy. Amazon EKS then brings online the computing resources from Amazon EC2 and AWS Fargate required to run the job. With this loose coupling of services, you can run multiple, securely isolated jobs simultaneously.
Solution overview
In this post, we guide you through a step-by-step process of deploying an Amazon EMR on EKS cluster and then walk you through various options and techniques for troubleshooting your Apache Spark jobs.
We then show you how to run a Spark application on that cluster using NOAA Global Historical Climatology Network Daily (GHCN-D). This job reads weather data, joins it with weather station data, and produces an output dataset in Apache Parquet format that contains the details of precipitation readings for the US for 2011.
We also look at various options to monitor the Spark jobs and view the logs.
The following diagram illustrates our high-level architecture.

The solution contains the following deployment steps:
- Install and configure the prerequisites, including the AWS Command Line Interface (AWS CLI) kubectl, and eksctl.
- Provision the Amazon EKS cluster using an AWS CloudFormation stack.
- Configure the AWS CLI tools and create credentials and permissions.
- Provision compute and set up an EMR virtual cluster on Amazon EKS.
- Create the Amazon EMR Spark application.
- Run the Spark application.
Prerequisites
Before you get started, complete the following prerequisites:
- Install the AWS CLI v2.
- Install kubectl.
- Install eksctl.
Provision the Amazon EKS cluster using AWS CloudFormation
This post uses two CloudFormation stacks. You can download the CloudFormation templates we reference in this post from a public S3 bucket, or you can launch them directly from this post. AWS Identity and Access Management (IAM) roles are also provisioned as part of this step. For more information about the IAM permissions required to provision and manage an Amazon EKS cluster, see Using service-linked roles for Amazon EKS.
The CloudFormation template eks_cluster.yaml creates the following resources in your preferred AWS account and Region:
- Network resources (one VPC, three public and three private subnets, and two security groups)
- One S3 bucket required to store data and artifacts to run the Spark job
- An Amazon EKS cluster with managed node groups with m5.2xlarge EC2 instances (configurable in the provided CloudFormation template)
For instructions on creating a stack, see Creating a stack on the AWS CloudFormation console.
- Choose Launch Stack to launch the stack via the AWS CloudFormation console.

The default parameter values are already populated for your convenience. Proceed with CloudFormation stack creation after verifying these values.
- For Stack name, enter
emr-on-eks-stack. - For ClusterName, enter
eks-cluster. - For EKSVersion, enter
1.19. - For JobexecutionRoleName, enter
eksjobexecutionrole.

CloudFormation stack creation should take 10–15 minutes. Make sure the stack is complete by verifying the status as CREATE_COMPLETE.
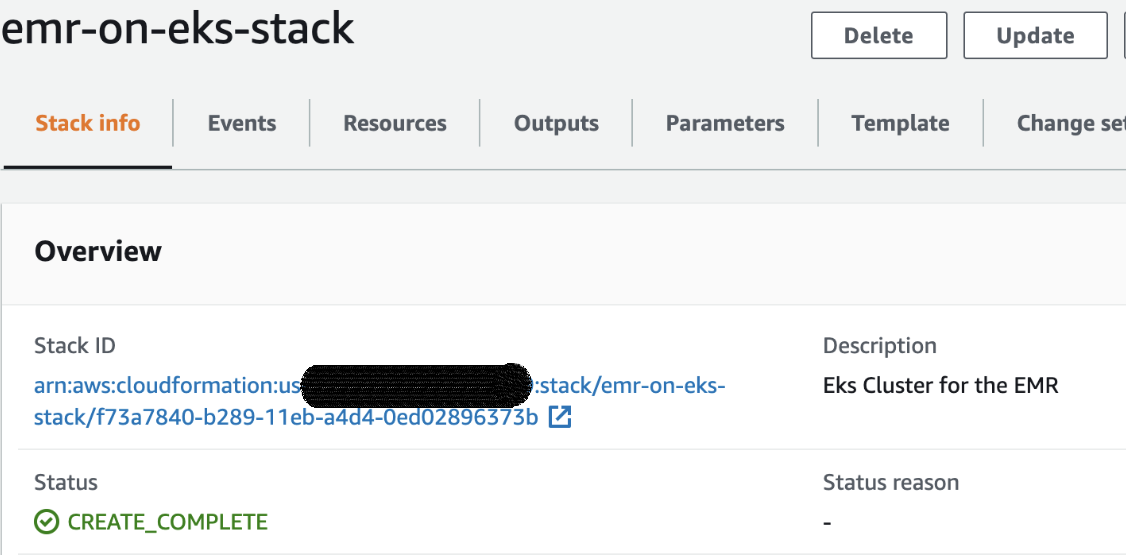
Additionally, you can verify that the Amazon EKS cluster was created using the following command, which displays the details of the cluster and shows the status as ACTIVE:
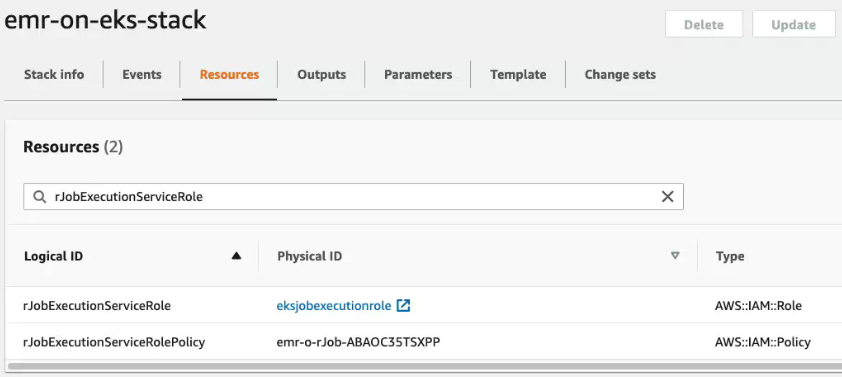
aws eks describe-cluster --name eks-clusterNote the S3 bucket name (oS3BucketName) and the job execution role (rJobExecutionServiceRole) from the stack.
- We upload our artifacts (PySpark script) and data into the S3 bucket.

Configure the AWS CLI tools and create credentials and permissions
To configure the AWS CLI tools, credentials, and permissions, complete the following steps:
- Configure kubectl to use the Amazon EKS cluster (the kubectl and eksctl commands need to run with the same AWS profile used when deploying the CloudFormation templates):
aws eks --region <<Your AWS Region>> update-kubeconfig --name eks-cluster - Create a dedicated namespace for running Apache Spark jobs using Amazon EMR on EKS:
kubectl create namespace emroneks - To enable Amazon EMS on EKS to access the namespace we created, we have to create a Kubernetes role and Kubernetes user, and map the Kubernetes user to the Amazon EMR on EKS linked role:
eksctl create iamidentitymapping --cluster eks-cluster --namespace emroneks --service-name "emr-containers"
To use IAM roles for service accounts, an IAM OIDC provider must exist for your cluster.
- Create an IAM OIDC identity provider for the Amazon EKS cluster:
eksctl utils associate-iam-oidc-provider --cluster eks-cluster –approveWhen you use IAM roles for service accounts to run jobs on a Kubernetes namespace, an administrator must create a trust relationship between the job execution role and the identity of the Amazon EMR managed service account.
- The following command updates the trust relationship of the job execution role (refer to the preceding screenshot of the CloudFormation stack):
aws emr-containers update-role-trust-policy \
  --cluster-name eks-cluster \
  --namespace emroneks \
  --role-name eksjobexecutionrole
Provision compute and set up an EMR virtual cluster on Amazon EKS
For the minimum IAM permissions required to manage and submit jobs on the Amazon EMR on EKS cluster, see Grant users access to Amazon EMR on EKS. The roles are provisioned as part of this step.
Use the second CloudFormation template (emr_virtual_cluster.yaml) to create the following resources in the same preferred AWS account and Region:
- Amazon EMR virtual cluster
- Amazon EKS managed node groups
- Choose Launch Stack to launch the stack via the AWS CloudFormation console.
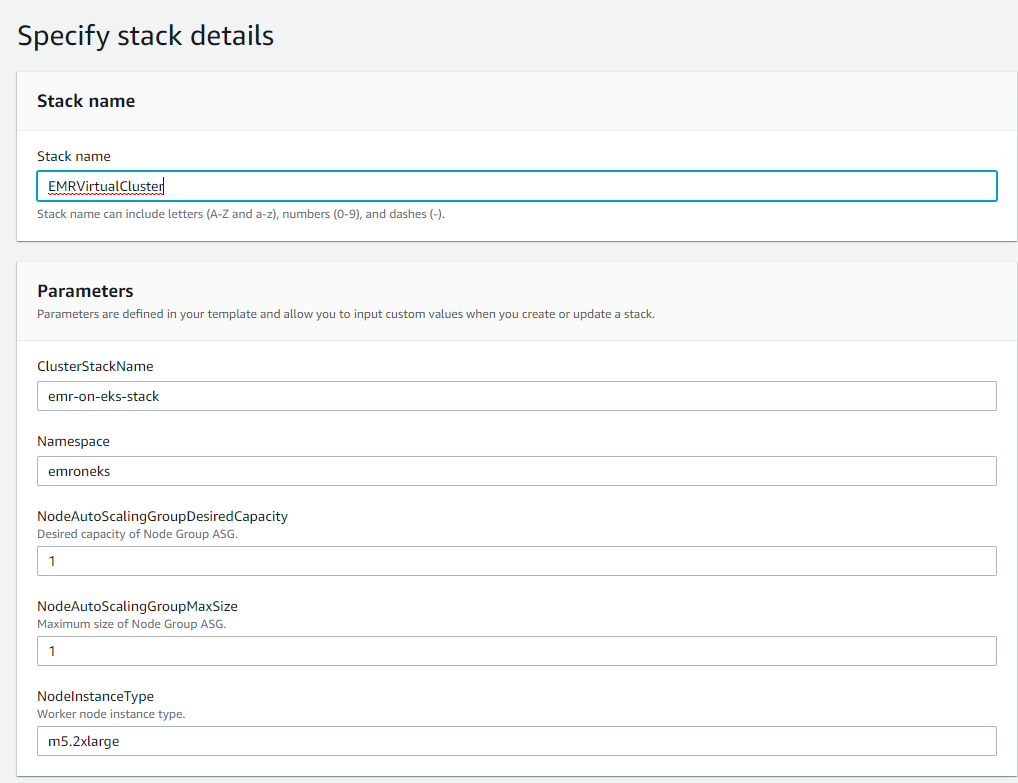
The default values are already populated for your convenience. Proceed with stack creation after verifying these values.
- For Stack name, enter
EMRvirtualcluster. - For ClusterStackName, enter
emr-on-eks-stack. - For Namespace, enter
emroneks. - For NodeAutoscalinggroupDesiredCapacity, enter
1. - For NodeAutoScalingGroupMaxSize, enter
1. - For NodeInstanceType, enter
m5.2xlarge.
Stack creation should take 10–15 minutes. Make sure the stack is complete by verifying the status as CREATE_COMPLETE.
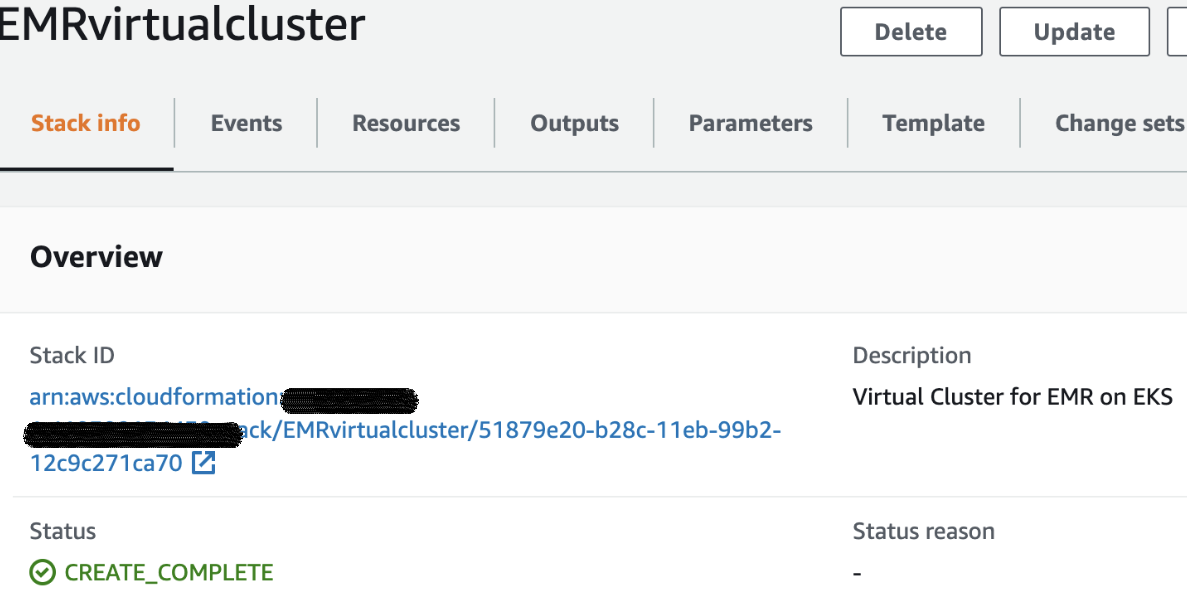
Note the oEMRvirtualclusterID value as the output of the stack. We use this virtualclusterID to submit our Spark application.
Additionally, you can verify that the node groups are set up correctly using the following commands:
aws eks list-nodegroups --cluster-name eks-clusterYou receive the following result:
{
    "nodegroups": [
        "emr-virtual-cluster-NodeGroup"
    ]
}
You can verify the details of the nodes with the following command (use the node group name from the preceding command):
aws eks describe-nodegroup --cluster-name eks-cluster --nodegroup-name emr-virtual-cluster-NodeGroupThis lists the details of all the nodes provisioned, the instance type, and subnet associations, among other details.
You’re now ready to create and run a Spark application on the cluster.
Create an Amazon EMR Spark application
To create the PySpark job, perform the following steps:
- Copy the NOAA Open data registry 2011 Weather Station data and the Weather Station Lookup data and save the files under the
s3://<<Your S3 Bucket>>/noaa/csv.gz/prefix.- To copy the 2011 Weather Station data, use the following AWS CLI command:
aws s3 cp s3://noaa-ghcn-pds/csv.gz/2011.csv.gz s3://<<Your S3 Bucket>>/noaa/csv.gz/2011.csv.gz - To copy the Weather Station Lookup data, use the following AWS CLI command:
aws s3 cp s3://noaa-ghcn-pds/ghcnd-stations.txt s3://<<Your S3 Bucket>>/noaa/ghcnd-stations.txt
- To copy the 2011 Weather Station data, use the following AWS CLI command:
You can find the value for <<Your S3 Bucket>> in the oS3Bucketname key on the Outputs tab for the emr-on-eks-stack CloudFormation stack.
- Download the PySpark script and upload it under
s3://<<Your S3 Bucket>>/scripts/.
Run the Spark application
We run the Spark job using the AWS CLI. The parameters for the job (virtual cluster ID, script location, parameters) are mentioned in the JSON file.
- Save the following JSON template as
jobparameters.jsonin a local folder (for example,/path/to/jobparameters.json):
{
  "name": "emr-on-eks-spark-job",
  "virtualClusterId": "<virtualclusterid>",
  "executionRoleArn": "arn:aws:iam::<<Your AWS Account Number>>:role/eksjobexecutionrole",
  "releaseLabel": "emr-6.2.0-latest",
  "jobDriver": {
    "sparkSubmitJobDriver": {
      "entryPoint": "s3://<<Your S3 Bucket>>/scripts/etl.py",
          "entryPointArguments": ["s3://<<Your S3 Bucket>>/"],
       "sparkSubmitParameters": "--conf spark.executor.instances=2 --conf spark.executor.memory=2G --conf spark.driver.memory=2G --conf spark.executor.cores=4"
    }
  },
  "configurationOverrides": {
    "applicationConfiguration": [
      {
        "classification": "spark-defaults",
        "properties": {
"spark.scheduler.minRegisteredResourcesRatio": "0.8",
          "spark.scheduler.maxRegisteredResourcesWaitingTime": "300s" }
      }
    ],
    "monitoringConfiguration": {
      "cloudWatchMonitoringConfiguration": {
        "logGroupName": "/emr-containers/jobs",
        "logStreamNamePrefix": "emreksblog"
      },
      "s3MonitoringConfiguration": {
        "logUri": "s3://<<Your S3 Bucket>>/joblogs"
      }
    }
  }
}
The configurationOverrides section is optional and can be used to backport any Spark configurations that are set for jobs running in Amazon EMR on EC2. The Spark job runs successfully without any additional configuration changes.
- Modify the following keys in your JSON file (
/path/to/jobparameters.json):- virtualClusterId – The ID of the EMR cluster on Amazon EKS. You can get this by looking at the
oEMRvirtualclusterIDoutput from the CloudFormation template or by running the following code:aws emr-containers list-virtual-clusters \ --state RUNNING \ --query 'virtualClusters[?containerProvider.info.eksInfo.namespace==`emroneks`]' - executionRoleArn – The ARN of the role created in the CloudFormation template. Replace <<Your AWS Account Number>> with the AWS account number you deploy this stack in.
- entryPoint – The value of the path to the ETL script S3 bucket provisioned in the CloudFormation stack (for example,
s3://<<Your S3 Bucket>>/scripts/etl.py). - entryPointArguments – The Spark job accepts one argument—the S3 bucket name where the data files are stored (
s3://<<Your S3 Bucket>>/). - logUri – The path were the controller logs, Spark driver, and executor logs are written into. Enter it as
s3://<<Your S3 Bucket>>/ joblogs. - cloudWatchMonitoringConfiguration – The CloudWatch log group details where logs are published. Enter the value for
logGroupNameas/emr-containers/jobsandlogStreamNamePrefixasemreksblog.
- virtualClusterId – The ID of the EMR cluster on Amazon EKS. You can get this by looking at the
You can change the sparkSubmitParameters parameter in the preceding JSON as per your needs, but your node groups must have the right capacity to accommodate the combination of Spark executors, memory, and cores that you define in sparkSubmitParameters. The preceding configuration works for the cluster we provisioned through the CloudFormation template without any changes.
- Submit the job with the following AWS CLI command:
aws emr-containers start-job-run --cli-input-json file://path/to/jobparameters.json
This returns a response with the job ID, which we can use to track the status of the job:
{
    "id": "00000002ucgkgj546u1",
    "name": "emr-on-eks-spark-job",
    "arn": "arn:aws:emr-containers:region:accountID:/virtualclusters/mdeljhfj0ejq5iprtzchljuh1/jobruns/00000002ucgkgj546u1",
    "virtualClusterId": "mdeljhfj0ejq5iprtzchljuh1"
}
You can get the status of a job by running the following command:
aws emr-containers describe-job-run --id <your job run id> --virtual-cluster-id <<your virtualcluster id>> You can observe the status change from SUBMITTED to RUNNING to COMPLETED or FAILED.
{
    "jobRun": {
        "id": "00000002ucgkstiadcs",
        "name": "emr-on-eks-spark-job",
        "virtualClusterId": "mdeljhfj0ejq5iprtzchljuh1",
        "arn": "arn:aws:emr-containers:<<region>>:<<Your AWS Account Number>>:/virtualclusters/mdeljhfj0ejq5iprtzchljuh1/jobruns/00000002ucgkstiadcs",
        "state": "SUBMITTED",
        "clientToken": "52203410-3e55-4294-a548-dc9212d10b37",


{
    "jobRun": {
        "id": "00000002ucgkstiadcs",
        "name": "emr-on-eks-spark-job",
        "virtualClusterId": "mdeljhfj0ejq5iprtzchljuh1",
        "arn": "arn:aws:emr-containers:<<region>>: :<<Your AWS Account Number>>:/virtualclusters/mdeljhfj0ejq5iprtzchljuh1/jobruns/00000002ucgkstiadcs",
        "state": "RUNNING",
        "clientToken": "52203410-3e55-4294-a548-dc9212d10b37",

{
    "jobRun": {
        "id": "00000002ucgkstiadcs",
        "name": "emr-on-eks-spark-job",
        "virtualClusterId": "mdeljhfj0ejq5iprtzchljuh1",
        "arn": "arn:aws:emr-containers:<<region>>: :<<Your AWS Account Number>>:/virtualclusters/mdeljhfj0ejq5iprtzchljuh1/jobruns/00000002ucgkstiadcs",
        "state": "COMPLETED",
        "clientToken": "52203410-3e55-4294-a548-dc9212d10b37",
When the job state changes to COMPLETED, you can see a prefix in your S3 bucket called noaaparquet with a dataset created within the prefix.
If the job status reaches the FAILED state, you can troubleshoot by going through the details found in the CloudWatch logs or the logs written into Amazon S3. For details on how to access and use those logs, refer to the following debugging section.
Occasionally, you may notice that the job is stuck in SUBMITTED status for a long time. This could be due to the fact that the Amazon EKS cluster is running other jobs and doesn’t have available capacity. When the existing job is complete, your job changes to the RUNNING state.
Another scenario could be that you set the driver and executor memory requirements in your Spark configuration (jobparameters.json) to more than what is available. Consider adjusting the spark.executor.memory and spark.driver.memory values based on the instance type in your node group. See the following code:
{
  "name": "emr-on-eks-spark-job",
  "virtualClusterId": "<virtualclusterid>",
  "executionRoleArn": "arn:aws:iam::<<Your AWS Account Number>>:role/eksjobexecutionrole",
  "releaseLabel": "emr-6.2.0-latest",
  "jobDriver": {
    "sparkSubmitJobDriver": {
      "entryPoint": "s3://<<Your S3 Bucket>>/scripts/etl.py",
          "entryPointArguments": ["s3://<<Your S3 Bucket>>/"],
       "sparkSubmitParameters": "--conf spark.executor.instances=2 --conf spark.executor.memory=2G --conf spark.driver.memory=2G --conf spark.executor.cores=4"
If your job is stuck or failing due to insufficient capacity, consider increasing the number of nodes in your node group or setting up the Amazon EKS Cluster Autoscaler. Refer to the debugging section for additional details from the Kubernetes dashboard.
For additional information on Amazon EMR on EKS fundamentals, refer to the appendix at the end of this post.
Debug your Spark application
Amazon EMR on EKS provides multiple options to debug and view the logs of the Spark application.
For issues specific to Spark applications, use Spark History Server, CloudWatch logs, or logs on Amazon S3, which we discuss in this section.
For troubleshooting issues, such as your jobs aren’t starting (job status in SUBMITTED state) or issues with Spark drivers, start with Kubernetes dashboard or kubectl CLI commands, discussed in detail in this section.
Spark History Server

- CRISP DETAIL, CLEAR DISPLAY: Enjoy binge-watching...
- PRO SHOTS WITH EASE: Brilliant sunrises, awesome...
- CHARGE UP AND CHARGE ON: Always be ready for an...
- POWERFUL 5G PERFORMANCE: Do what you love most —...
- NEW LOOK, ADDED DURABILITY: Galaxy A54 5G is...

- Free 6 months of Google One and 3 months of...
- Pure Performance: The OnePlus 12 is powered by the...
- Brilliant Display: The OnePlus 12 has a stunning...
- Powered by Trinity Engine: The OnePlus 12's...
- Powerful, Versatile Camera: Explore the new 4th...
Last update on 2024-04-05 / Affiliate links / Images from Amazon Product Advertising API
Spark History Server provides an elaborate web UI that allows us to inspect various components of our applications. It offers details on memory usage, jobs, stages, and tasks, as well as event timelines, logs, and various metrics and statistics both at the Spark driver level and for individual executors. It shows collected metrics and the state of the program, revealing clues about possible performance bottlenecks that you can utilize for tuning and optimizing the application. You can look at the Spark History Server (in the Spark UI) from the Amazon EMR console to see the driver and executor logs, as long as you have Amazon S3 logging enabled (which we enabled as part of the job submission JSON payload). The Spark UI is available even after the job is complete and the cluster is stopped. For more information on troubleshooting, see How do I troubleshoot a failed Spark step in Amazon EMR?
The following screenshots show the Spark UI of the job submitted on the cluster.
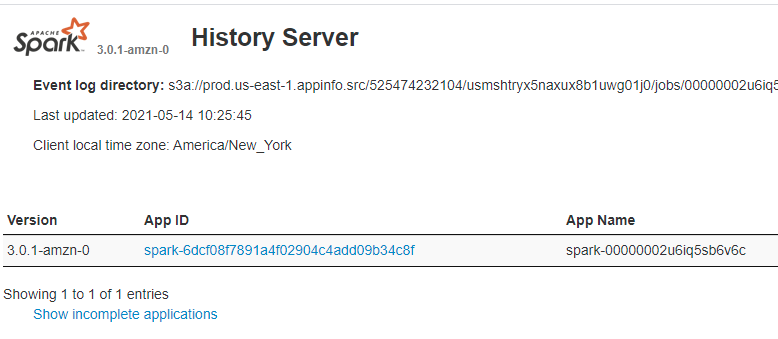

Choose a specific app ID to see the details of the Spark SQL and stages that ran. This helps you see the explain plan of the query and rows processed by each stage to narrow down any bottlenecks in your process.
If you don’t see the Spark UI link enabled or you see an error message “Unable to launch application UI,” verify the parameter s3MonitoringConfiguration in the jobparameters.json to ensure that a valid S3 path is provided. Additionally, ensure that the job execution role has appropriate permissions to access the S3 bucket. This was defined in the CloudFormation template that you deployed earlier. See the following code:
"monitoringConfiguration": {
      "cloudWatchMonitoringConfiguration": {
        "logGroupName": "/emr-containers/jobs",
        "logStreamNamePrefix": "emreksblog"
      },
      "s3MonitoringConfiguration": {
        "logUri": "s3://<<Your S3 Bucket>>/joblogs"
      }
    }
To increase the logging level of the Spark application to DEBUG, update the spark-log4j configuration. For instructions, see Change Log level for Spark application on EMR on EKS.
CloudWatch logs
In the preceding jobparameters.json, the log group name was /emr-containers/jobs and the prefix was emrjobs. You can access logs via the CloudWatch console for this prefix.
The path for various types of logs available in CloudWatch are as follows:
- Controller logs –
logGroup/logStreamPrefix/virtual-cluster-id/jobs/job-id/containers/pod-name/(stderr/stdout) - Driver logs –
logGroup/logStreamPrefix/virtual-cluster-id/jobs/job-id/containers/spark-application-id/spark-job-id-driver/(stderrstdout) - Executor logs – l
ogGroup/logStreamPrefix/virtual-cluster-id/jobs/job-id/containers/spark-application-id/executor-pod-name/(stderr/stdout)
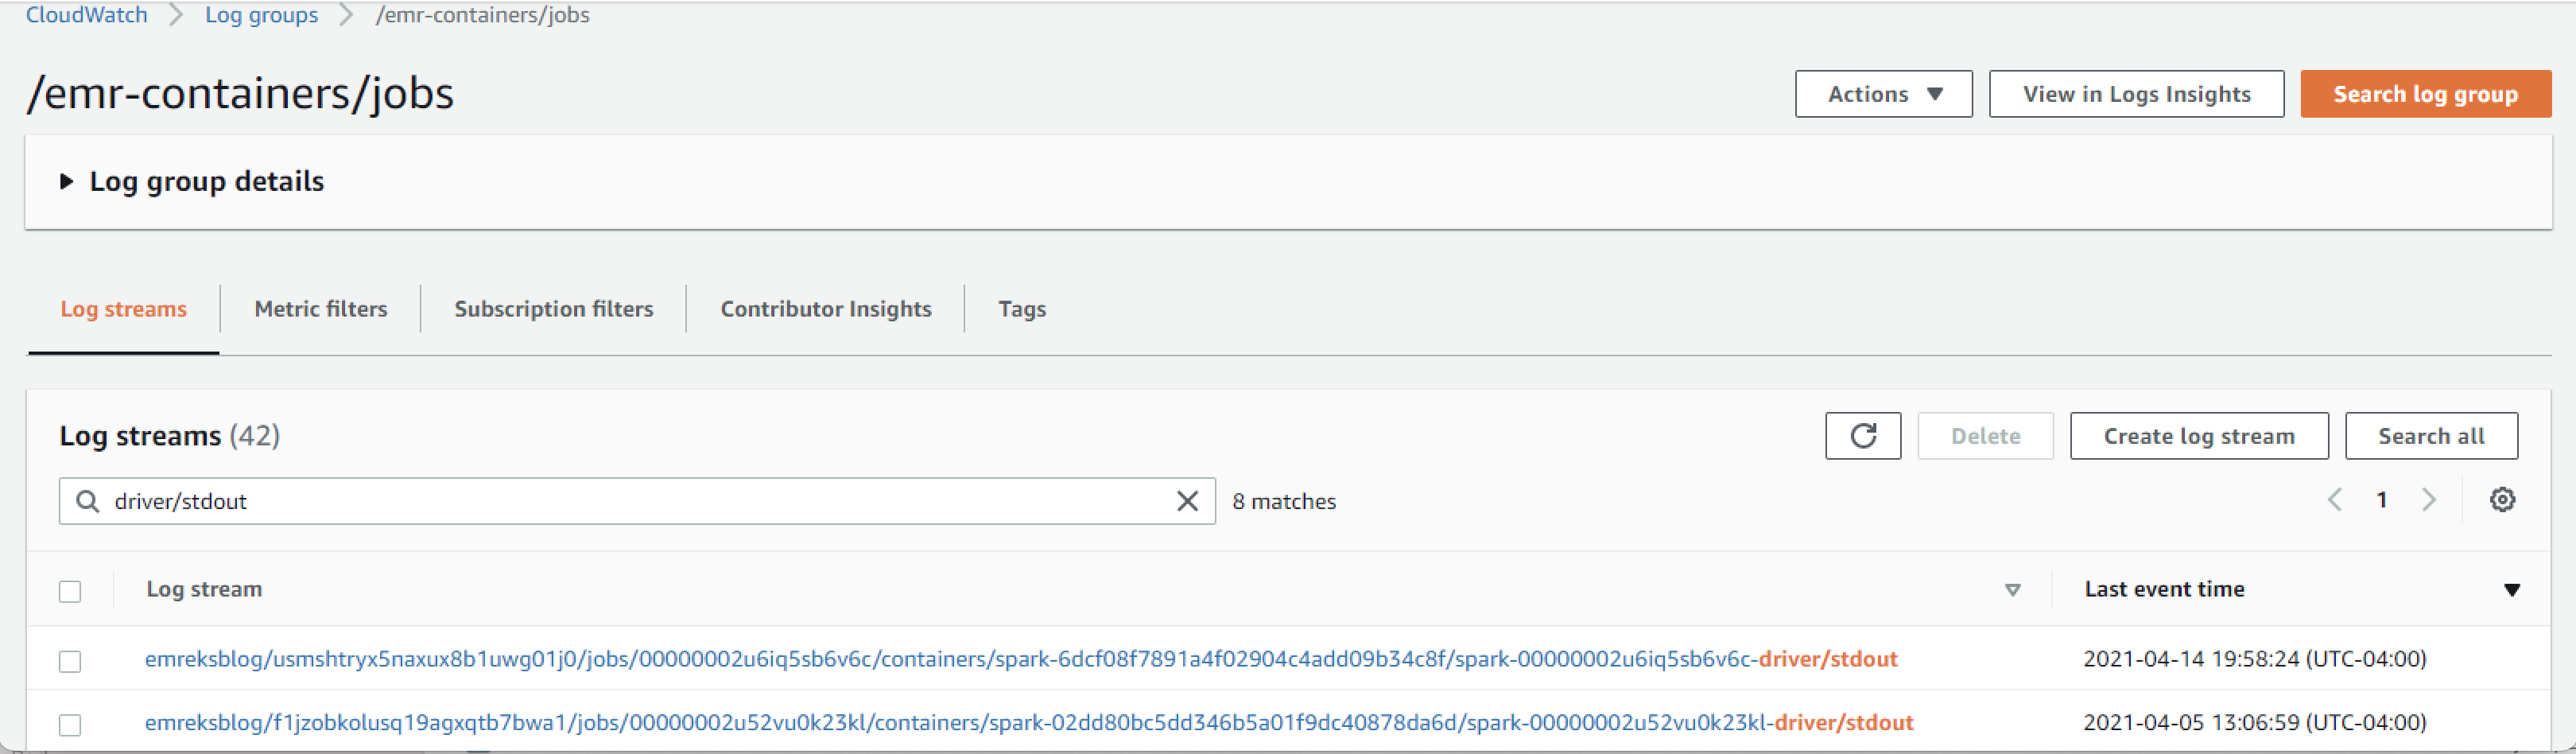
In the jobparameters.json configuration, logGroup is set as /emr-containers/jobs and logStreamPrefix is set as emreksblog.
Here you can retrieve the Spark driver and executor logs to view additional details and stack trace of any error messages when your Spark job has failed.
You can filter the CloudWatch log stream by driver/stdout to see the output and driver/stderr to see details of errors from your Spark job.

The following are some common scenarios to verify in case the logs aren’t available in CloudWatch:
- Ensure that the log group parameter is defined in
jobparameters.jsonunder monitoringConfiguration (refer to the JSON file for the details of parameters):"monitoringConfiguration": { "cloudWatchMonitoringConfiguration": { "logGroupName": "/emr-containers/jobs", "logStreamNamePrefix": "emreksblog" }, - Ensure that the service role associated with the Amazon EMR on EKS cluster has access to write to the CloudWatch log group. The CloudFormation template you deployed has the policy associated with the IAM role to grant appropriate permissions to allow access to write to the log groups. For additional IAM policy examples, see Using identity-based policies (IAM policies) for CloudWatch Logs.
Amazon S3 logs
In the configuration, the log path is listed as S3://<Your S3 bucket>/joblogs under the corresponding job ID.
You can go to S3 bucket you specified to check the logs. Your log data is sent to the following Amazon S3 locations depending on the types of logs:
- Controller logs –
S3://<Your S3 bucket>//joblogs/virtual-cluster-id/jobs/job-id/containers/pod-name/(stderr.gz/stdout.gz) - Driver logs –
S3://<Your S3 bucket>//joblogs/virtual-cluster-id/jobs/job-id/containers/spark-application-id/spark-job-id-driver/(stderr.gz/stdout.gz) - Executor logs –
S3://<Your S3 bucket>//joblogs/virtual-cluster-id/jobs/job-id/containers/spark-application-id/executor-pod-name/(stderr.gz/stdout.gz)
Here you can retrieve the Spark driver and executor logs to view additional details and stack trace of any error messages when your Spark job has failed.

Kubernetes dashboard
You can view and monitor the online logs of a running Spark job in a Kubernetes dashboard. The dashboard provides information on the state of Kubernetes resources in your cluster and any errors that may have occurred while the job is running. The logs are only accessible through the Kubernetes dashboard while the cluster is running the job. The dashboard is a useful way to quickly identify any issue with the job while it’s running and the logs are getting written.
For details on how to deploy, set up, and view the dashboard, see Tutorial: Deploy the Kubernetes Dashboard (web UI). After you deploy the Kubernetes dashboard and launch it, complete the following steps to see the details of your job run:
- Choose the right namespace that was registered with the EMR virtual cluster for the Amazon EKS cluster.
- Choose Pods in the navigation pane to see all the running pods.
- Choose the additional options icon (three vertical dots) to open logs for each pod.
The following screenshot shows the Spark driver that was spawned when the Spark job was submitted to the EMR virtual cluster.

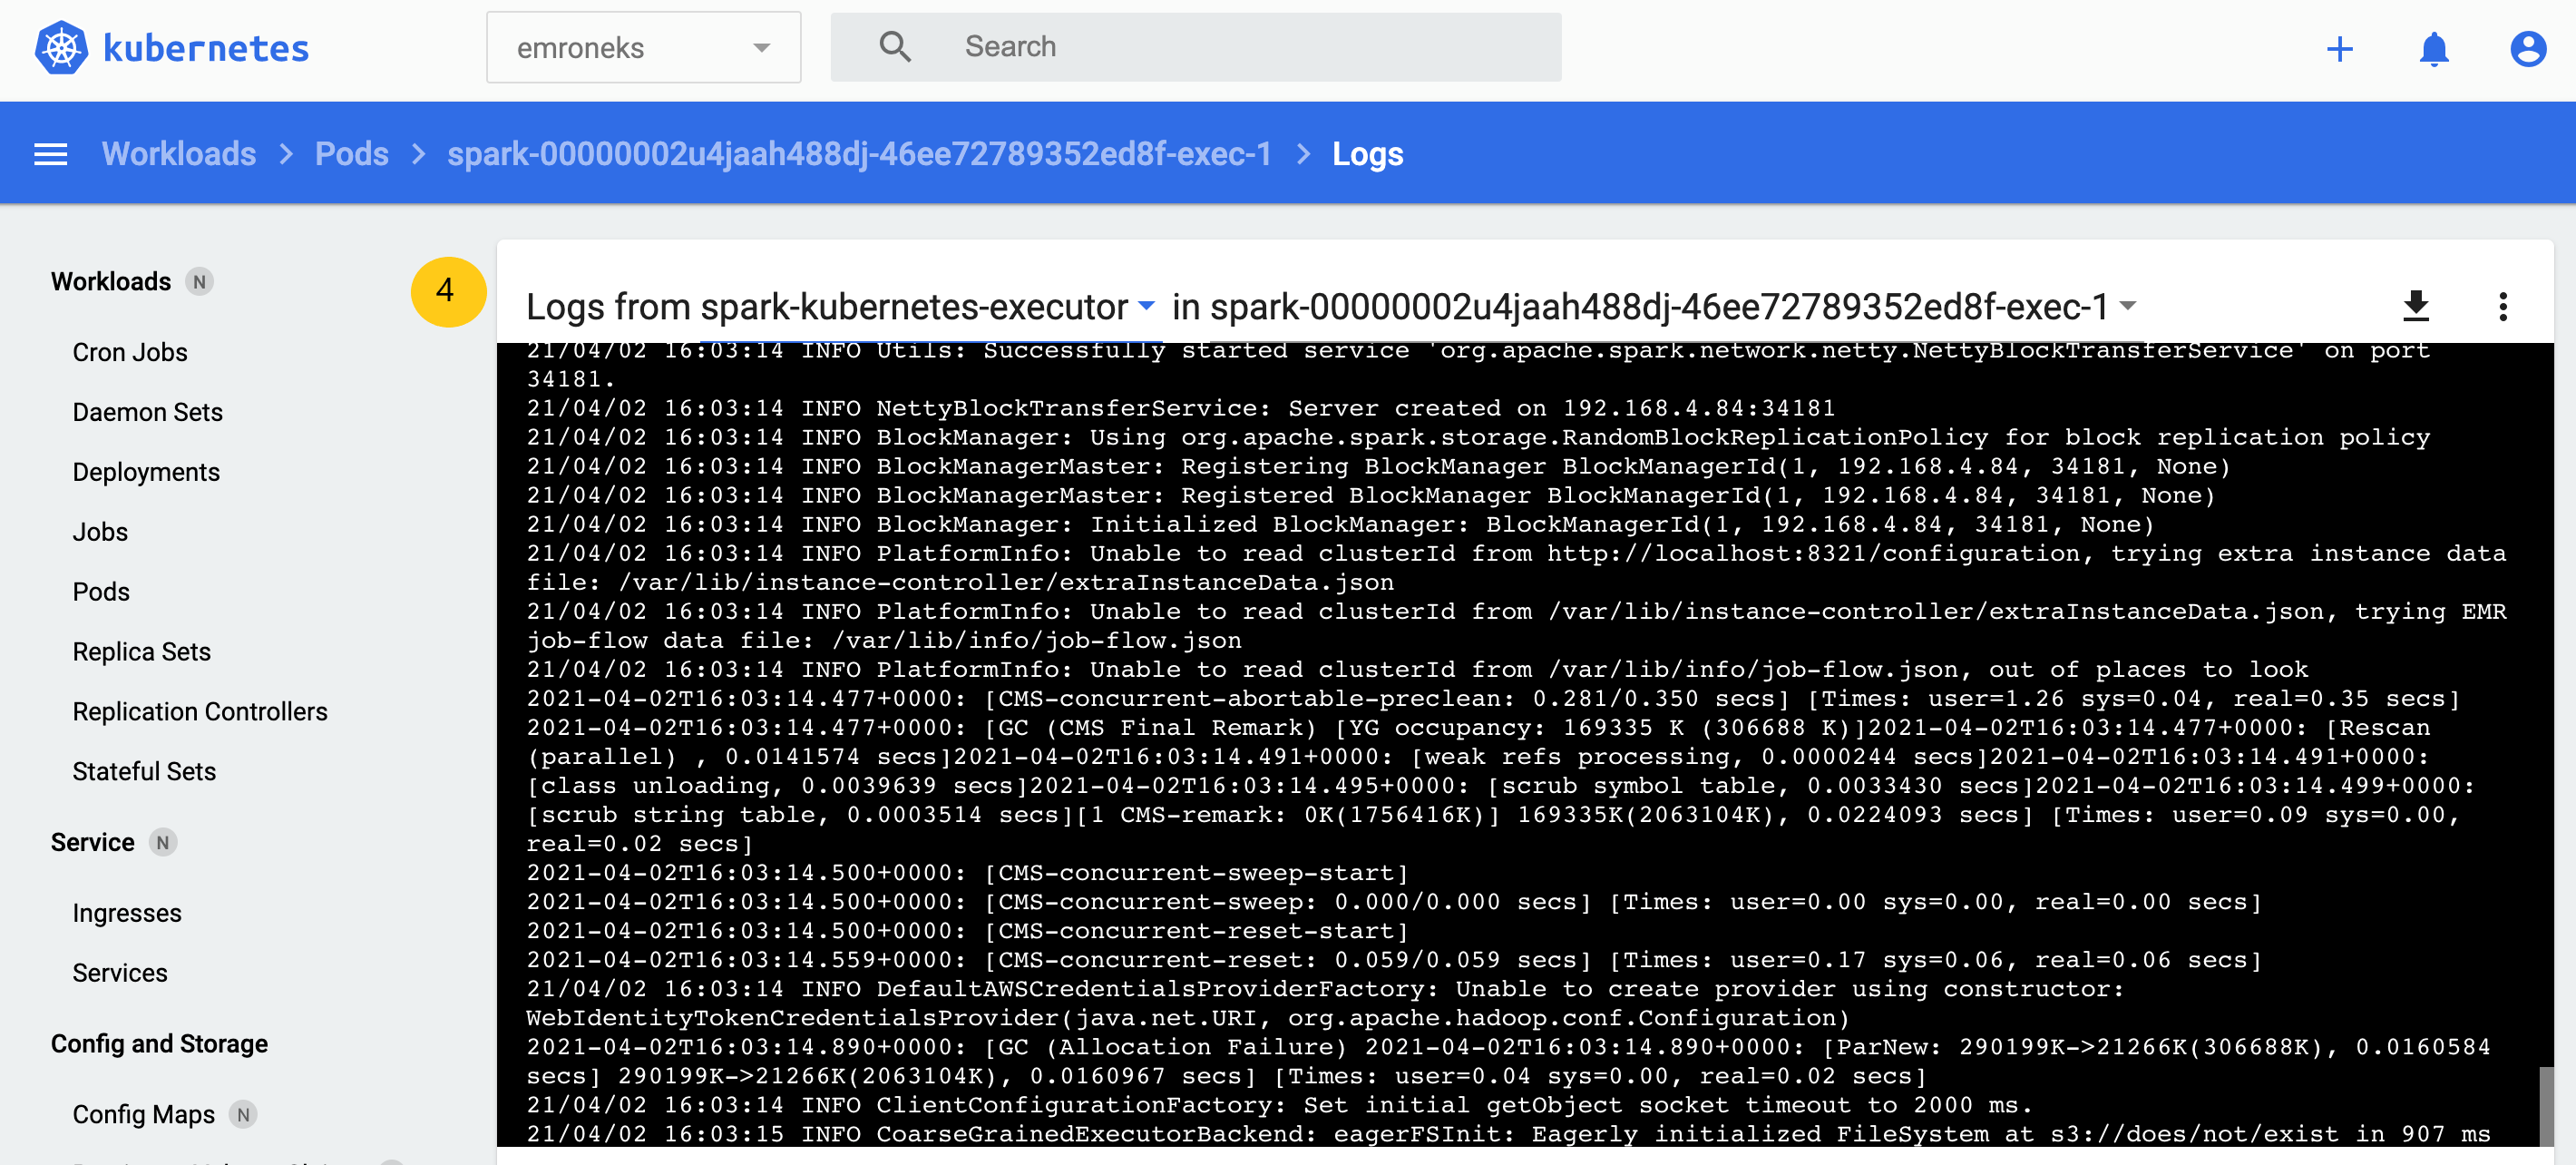
- Choose the
spark-kubernetes-executorcontainer log to see the running online logs of your Spark job.
The following screenshots show the running log of the Spark application while it’s running on the EMR virtual cluster.

- Choose Pods to see the CPU and memory consumption of the individual POD running the application.
The following screenshots the CPU and memory usage of the Spark application for the duration of the job. This helps determine if you have provisioned adequate capacity for your jobs.


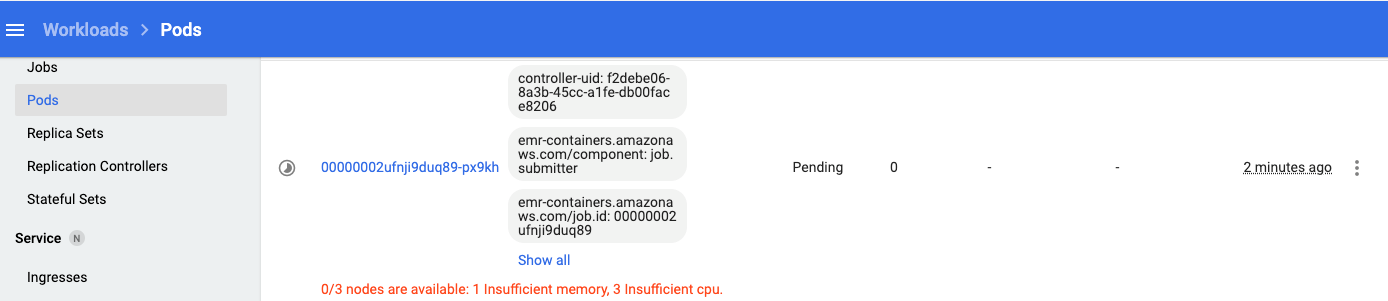
In case of insufficient capacity with memory or CPU, you see the following error. You can choose the pod to see additional details.
Kubernetes CLI
You can view Spark driver and Spark executer logs using the Kubernetes CLI (kubectl). Logs are accessible through the Kubernetes CLI while the cluster is running the job.
- Get the name of the Spark driver and Spark executor pods in the
emroneksnamespace:
kubectl get pods -n emroneksYou see multiple pods for the Spark driver and executors that are currently running.
Original Post>
- Use the pod name for the driver to see the driver logs:
kubectl logs <Spark driver pod name> -n emroneks -c spark-kubernetes-driver - Use the pod name for the executors to see the executor logs:
kubectl logs <Spark executor pod name> -n emroneks -c spark-kubernetes-executor
For more issues and resolutions when running jobs on Amazon EMR on EKS, see Common errors when running jobs.
Clean up
When you’re done using this solution, you should delete the following CloudFormation stacks, via the CloudFormation console, to avoid incurring any further charges:
EMRvirtualclusteremr-on-eks-stack
Conclusion
This post describes how you can run your existing Apache Spark workloads on Amazon EMR on EKS. The use case demonstrates setting up the infrastructure, and running and monitoring your Spark job. We also showed you various options and techniques to debug and troubleshoot your jobs.
Appendix: Explaining the solution
In this solution, we first built an Amazon EKS cluster using a CloudFormation template and registered it with Amazon EMR. Then we submitted a Spark job using the AWS CLI on the EMR virtual cluster on Amazon EKS. Let’s look at some of the important concepts related to running a Spark job on Amazon EMR on EKS.
Kubernetes namespaces

- 【Octa-Core CPU + 128GB Expandable TF Card】...
- 【6.8 HD+ Android 13.0】 This is an Android Cell...
- 【Dual SIM and Global Band 5G Phone】The machine...
- 【6800mAh Long lasting battery】With the 6800mAh...
- 【Business Services】The main additional...

- 【Dimensity 9000 CPU + 128GB Expandable TF...
- 【6.8 HD+ Android 13.0】 This is an Android Cell...
- 【Dual SIM and Global Band 5G Phone】Dual SIM &...
- 【6800mAh Long lasting battery】The I15 Pro MAX...
- 【Business Services】The main additional...

- 🥇【6.8" HD Unlocked Android Phones】Please...
- 💗【Octa-Core CPU+ 256GB Storage】U24 Ultra...
- 💗【Support Global Band 5G Dual SIM】U24 Ultra...
- 💗【80MP Professional Photography】The U24...
- 💗【6800mAh Long Lasting Battery】With the...
Last update on 2024-04-05 / Affiliate links / Images from Amazon Product Advertising API
Amazon EKS uses Kubernetes namespaces to divide cluster resources between multiple users and applications. These namespaces are the foundation for multi-tenant environments. A Kubernetes namespace can have both Amazon EC2 and Fargate as the compute provider. Fargate selection for pods can be done using user-defined Fargate profiles. This flexibility provides different performance and cost options for the Spark jobs to run on. In this post, we provisioned an Amazon EKS cluster with node groups containing an m5.2x large EC2 instance.
Virtual cluster
A virtual cluster is a Kubernetes namespace that Amazon EMR is registered with. Amazon EMR uses virtual clusters to run jobs and host endpoints. Multiple virtual clusters can be backed by the same physical cluster, and each virtual cluster maps to one namespace on an Amazon EKS cluster.
Job run
A job run is a unit of work, such as a Spark JAR (Scala or Java application), PySpark script, or SparkSQL query, that you submit to Amazon EMR on EKS. One job can have multiple job runs. When you submit a job run, it should include the following information:
- A virtual cluster where the job should run
- A job name to identify the job
- The execution role, which is a scoped IAM role that runs the job (in a Kubernetes service account), is used to run the pod, and allows you to specify which resources can be accessed by the job
- The Amazon EMR release label that specifies the version of Amazon EMR Spark to use
- The artifacts to use when submitting your job, such as
spark-submitparameters
Amazon EMR containers
An Amazon EMR container is the API name for Amazon EMR on EKS. The emr-containers prefix is used in the following scenarios:
- In the AWS CLI commands for Amazon EMR on EKS. For example,
aws emr-containers start-job-run. - Before IAM policy actions for Amazon EMR on EKS. For example,
"Action": [ "emr-containers:StartJobRun"]. For more information, see Policy actions for Amazon EMR on EKS. - In Amazon EMR on EKS service endpoints. For example,
emr-containers.us-east-1.amazonaws.com.
In the solution overview, we went step by step through how we used above resources to create the Amazon EMR on EKS cluster and run a Spark job. For further details on these concepts, see Concepts.
About the Authors

Dipankar Kushari is a Senior Analytics Solutions Architect with AWS, helping customers build analytics platform and solutions. He has a keen interest in distributed computing. Dipankar enjoys spending time playing chess and watching old Hollywood movies.

Ashok Padmanabhan is a big data consultant with AWS Professional Services, helping customers build big data and analytics platform and solutions. When not building and designing data lakes, Ashok enjoys spending time at beaches near his home in Florida.

Gaurav Gundal is a DevOps consultant with AWS Professional Services, helping customers build solutions on the customer platform. When not building, designing, or developing solutions, Gaurav spends time with his family, plays guitar, and enjoys traveling to different places.

Naveen Madhire is a Big Data Architect with AWS Professional Services, helping customers create data lake solutions on AWS. Outside of work, he loves playing video games and watching crime series on TV.