
Many customers use AWS Glue workflows to build and orchestrate their ETL (extract-transform-load) pipelines directly in the AWS Glue console using the visual tool to author workflows. This can be time consuming, harder to version control, and error prone due to manual configurations, when compared to managing your workflows as code.
Source: Original Postress-this.php?">Field Notes: How to Build an AWS Glue Workflow using the AWS Cloud Development Kit
To improve your operational excellence, consider deploying the entire AWS Glue ETL pipeline using the AWS Cloud Development Kit (AWS CDK).
In this blog post, you will learn how to build an AWS Glue workflow using Amazon Simple Storage Service (Amazon S3), various components of AWS Glue, AWS Secrets Manager, Amazon Redshift, and the AWS CDK.
Architecture overview
In this architecture, you will use the AWS CDK to deploy your data sources, ETL scripts, AWS Glue workflow components, and an Amazon Redshift cluster for analyzing the transformed data.
Figure 1. AWS Glue workflow architecture
It is common for customers to pre-aggregate data before sending it downstream to analytical engines, like Amazon Redshift, because table joins and aggregations are computationally expensive. The AWS Glue workflow will join COVID-19 case data, and COVID-19 hiring data together on their date columns in order to run correlation analysis on the final dataset. The datasets may seem arbitrary, but we wanted to offer a way to better understand the impacts COVID-19 had on jobs in the United States. The takeaway here is to use this as a blueprint for automating the deployment of data analytic pipelines for the data of interest to your business.
After the AWS CDK application is deployed, it will begin creating all of the resources required to build the complete workflow. When it completes, the components in the architecture will be created, and the AWS Glue workflow will be ready to start. In this blog post, you start workflows manually, but they can be configured to start on a scheduled time or from a workflow trigger.
The workflow is programmed to dynamically pull the raw data from the Registry of Open Data on AWS where you can find the Covid-19 case data and the Hiring Data respectively.
Prerequisites
This blog post uses an AWS CDK stack written in TypeScript and AWS Glue jobs written in Python. Follow the instructions in the AWS CDK Getting Started guide to set up your environment, before you proceed to deployment.
In addition to setting up your environment, you need to clone the Git repository, which contains the AWS CDK scripts and Python ETL scripts used by AWS Glue. The ETL scripts will be deployed to Amazon S3 by the AWS CDK stack as assets, and referenced by the AWS Glue jobs as part of the AWS Glue Workflow.
You should have the following prerequisites:
- Create and activate a new AWS account for the installation.
- Use AWS Cloud9, or configure your own computer or Amazon Elastic Compute Cloud (Amazon EC2) instance to deploy the stack. By using AWS Cloud9, you can quickly deploy a preconfigured development environment that already has many of the prerequisites installed.
- AWS Cloud9
- Your own computer or EC2 instance
- Install the AWS Command Line Interface and configure it to point to your AWS account.
- Use a named profile to access your AWS account.
- Install the AWS CDK.
- Install TypeScript and Python3.
- Clone the Git repository – https://github.com/aws-samples/glue-workflow-aws-cdk
- Install third-party packages using a package manager of your choice.
Deployment
After you have cloned the repository, navigate to the glue-cdk-blog/lib folder and open the blog-glue-workflow-stack.ts file. This is the AWS CDK script used to deploy all necessary resources to build your AWS Glue workflow. The blog-redshift-vpc-stack.ts contains the necessary resources to deploy the Amazon Redshift cluster, connections, and permissions. The glue-cdk-blog/lib/assets folder also contains the AWS Glue job scripts. These files are uploaded to Amazon S3 by the AWS CDK when you bootstrap.
You won’t review the individual lines of code in the script in this blog post, but if you are unfamiliar with any of the AWS CDK level 1 or level 2 constructs used in the sample, you can review what each construct does with the AWS CDK documentation. Familiarize yourself with the script you cloned and anticipate what resources will be deployed. Then, deploy both stacks and verify your initial findings.
After your environment is configured, and the packages and modules installed, deploy the AWS CDK stack and assets in two commands.
- Bootstrap the AWS CDK stack to create an S3 bucket in the predefined account that will contain the assets.
cdk bootstrap
- Deploy the AWS CDK stacks.
cdk deploy --all
Verify that both of these commands have completed successfully, and remediate any failures returned. Upon successful completion, you’re ready to start the AWS Glue workflow that was just created. You can find the AWS CDK commands reference in the AWS CDK Toolkit commands documentation, and help with Troubleshooting common AWS CDK issues you may encounter.
Walkthrough

- Purposeful Design: Travel with ease and look great...
- Ready-to-Go Performance: The Aspire 3 is...
- Visibly Stunning: Experience sharp details and...
- Internal Specifications: 8GB LPDDR5 Onboard...
- The HD front-facing camera uses Acer’s TNR...

- 【14" HD Display】14.0-inch diagonal, HD (1366 x...
- 【Processor & Graphics】Intel Celeron N4120, 4...
- 【RAM & Storage】8GB high-bandwidth DDR4 Memory...
- 【Ports】1 x USB 3.1 Type-C ports, 2 x USB 3.1...
- 【Windows 11 Home in S mode】You may switch to...
Last update on 2024-04-05 / Affiliate links / Images from Amazon Product Advertising API
Prior to initiating the AWS Glue workflow, explore the resources the AWS CDK stacks just deployed to your account.
- Log in to the AWS Management Console and the AWS CDK account.
- Navigate to Amazon S3 in the AWS console (you should see an S3 bucket with the name prefix of cdktoolkit-stagingbucket-xxxxxxxxxxxx).
- Review the objects stored in the bucket in the assets folder. These are the .py files used by your AWS Glue jobs. They were uploaded to the bucket when you issued the AWS CDK bootstrap command, and referenced within the AWS CDK script as the scripts to use for the AWS Glue jobs. When retrieving data from multiple sources, you cannot always control the naming convention of the sourced files. To solve this and create better standardization, you will use a job within the AWS Glue workflow to copy these scripts to another folder and rename them with a more meaningful name.
- Navigate to Amazon Redshift in the AWS console and verify your new cluster. You can use the Amazon Redshift Query Editor within the console to connect to the cluster and see that you have an empty database called db-covid-hiring. The Amazon Redshift cluster and networking resources were created by the redshift_vpc_stack which are listed here:
- VPC, subnet and security group for Amazon Redshift
- Secrets Manager secret
- AWS Glue connection and S3 endpoint
- Amazon Redshift cluster
- Navigate to AWS Glue in the AWS console and review the following new resources created by the workflow_stack CDK stack:
- Two crawlers to crawl the data in S3
- Three AWS Glue jobs used within the AWS Glue workflow
- Five triggers to initiate AWS Glue jobs and crawlers
- One AWS Glue workflow to manage the ETL orchestration
- All of these resources could have been deployed within a single stack, but this is intended to be a simple example on how to share resources across multiple stacks. The AWS Identity and Access Management (IAM) role that AWS Glue uses to run the ETL jobs in the workflow_stack, is also used by Secrets Manager for Amazon Redshift in the redshift_vpc_stack. Inspect the /bin/blog-glue-workflow-stack.ts file to further understand cross stack resource sharing.
By performing these steps, you have deployed all of the AWS Glue resources necessary to perform common ETL tasks. You then combined the resources to create an orchestration of tasks using an AWS Glue workflow. All of this was done using IaC with AWS CDK. Your workflow should look like Figure 2.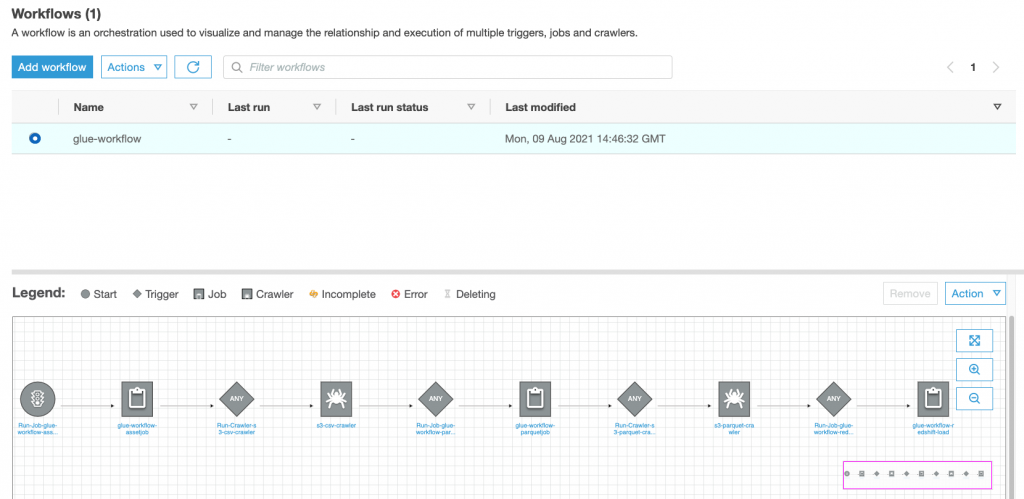
Figure 2. AWS Glue console showing the workflow created by the CDK
As mentioned earlier, you could have started your workflow using a scheduled cron trigger, but you initiated the workflow manually so you had time to review the resources the workflow_stack CDK deployed, prior to initiation of the workflow. Now that you have reviewed the resources, validate your workflow by initiating it and verifying it runs successfully.
- From within the AWS Glue console, select Workflows under ETL.
- Select the workflow named glue-workflow, and then select Run from the actions listbox.
- You can verify the status of the workflow by viewing the run details under the History tab.
- Your job will take approximately 15 minutes to successfully complete, and your history should look like Figure 3.
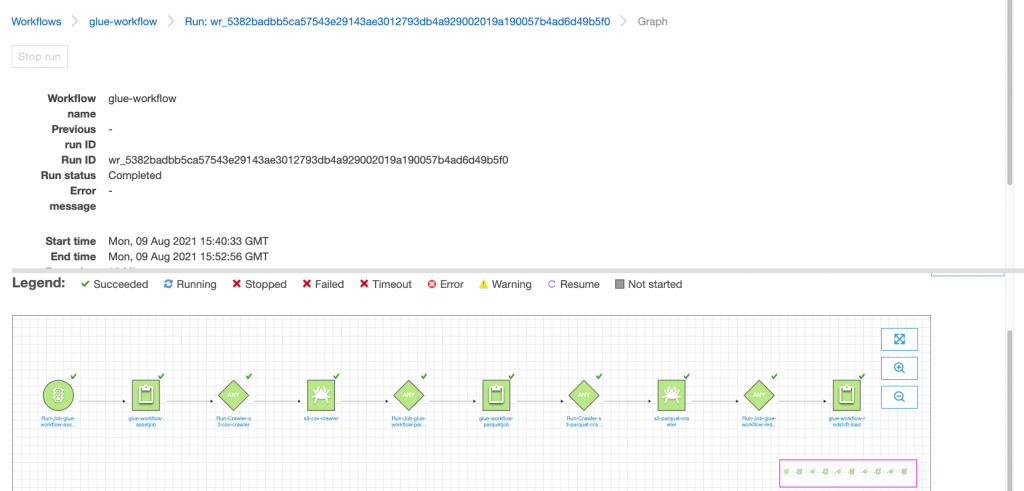
Figure 3. AWS Glue console showing the workflow as completed after the run
The workflow performs the following tasks:
- Prepares the ETL scripts by copying the files in the S3 asset bucket to a new folder and renames them with a more relevant name.
- Initiates a crawler to crawl the raw source data as csv files and adds tables to the Glue Data Catalog.
- Runs a Python script to perform some ETL tasks on the .csv files and converts them to parquet files.
- Crawls the parquet files and adds them to the Glue Data Catalog.
- Loads the parquet files into a DynamicFrame and runs an Amazon Redshift COPY command to load the data into the Amazon Redshift database.
After the workflow completes, you can query and perform analytics on the data that was populated in Amazon Redshift. Open the Amazon Redshift Query Editor and run a simple SELECT statement to query the covid_hiring_table which is the joined Covid-19 case data and hiring data (see Figure 4).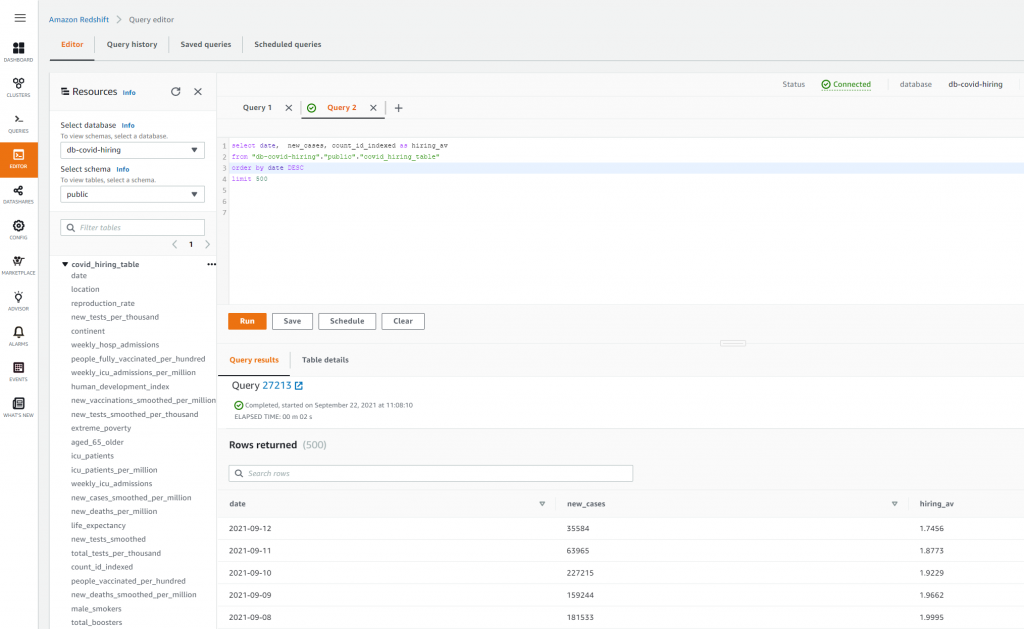
Figure 4. Amazon Redshift query editor showing the data that the workflow loaded into the Redshift tables
Cleaning up

- EFFICIENT PERFORMANCE: Equipped with 4GB...
- Powerful configuration: Equipped with the Intel...
- LIGHTWEIGHT AND ADVANCED - The slim case weighs...
- Multifunctional interface: fast connection with...
- Worry-free customer service: from date of...

- Powered by an Intel Core i5 13th Gen 13420H 1.5GHz...
- Equipped with an NVIDIA GeForce RTX 3050 6GB GDDR6...
- Includes 8GB of DDR4-3200 RAM for smooth...
- Features a spacious 512GB Solid State Drive for...
- Boasts a vibrant 15.6" FHD IPS Micro-Edge...

- Processor - Powered by 11 Gen i5-1145G7 Processor...
- Memory and Storage - Equipped with 16GB of...
- FHD Display - 15.6 inch (1920 x 1080) FHD display,...
- FEATURES - Intel Iris Xe Graphics – Audio by...
- Convenience & Warranty: 2 x Thunderbolt 4 with...
Last update on 2024-04-05 / Affiliate links / Images from Amazon Product Advertising API
Some resources, like S3 buckets and Amazon DynamoDB tables, must be manually emptied and deleted through the console to be fully removed. To clean up the deployment, delete all objects in the AWS CDK asset bucket in Amazon S3 by using the AWS console to empty the bucket, and then run cdk destroy –all to delete the resources the AWS CDK stacks created in your account. Finally, if you don’t plan on using AWS CloudFormation assets in this account in the future, you will need to delete the AWS CDK asset stack within the CloudFormation console to remove the AWS CDK asset bucket.
Conclusion
In this blog post, you learned how to automate the deployment of AWS Glue workflows using the AWS CDK. This further enhances your continuous integration and delivery (CI/CD) data pipelines by automating the deployment of the ETL jobs and AWS Glue workflow orchestration, providing an efficient, fast, and repeatable way to build and deploy AWS Glue workflows at scale.
Although AWS CDK primarily supports level 1 constructs for most AWS Glue resources, new constructs are added continually. See the AWS CDK API Reference for updates, prior to authoring your stacks, for AWS Glue level 2 construct support. You can find the code used in this blog post in this GitHub repository, and the AWS CDK in TypeScript reference to the AWS CDK namespace.
We hope this blog post helps enrich your work through the skills gained of automating the creation of Glue Workflows, enabling you to quickly build and deploy your own ETL pipelines and run analytical models that power your business.