
Over the last several years, enterprises have accumulated massive amounts of data. Data volumes have increased at an unprecedented rate, exploding from terabytes to petabytes and sometimes exabytes of data. Increasingly, many enterprises are building highly scalable, available, secure, and flexible data lakes on AWS that can handle extremely large datasets.
Source: Original Postress-this.php?">Build operational metrics for your enterprise AWS Glue Data Catalog at scale
After data lakes are productionized, to measure the efficacy of the data lake and communicate the gaps or accomplishments to the business groups, enterprise data teams need tools to extract operational insights from the data lake. Those insights help answer key questions such as:
- The last time a table was updated
- The total table count in each database
- The projected growth of a given table
- The most frequently queried table vs. least queried tables
In this post, I walk you through a solution to build an operational metrics dashboard (like the following screenshot) for your enterprise AWS Glue Data Catalog on AWS.

Solution overview
This post shows you how to collect metadata information from your data lake’s AWS Glue Data Catalog resources (databases and tables) and build an operational dashboard on this data.
The following diagram illustrates the overall solution architecture and steps.
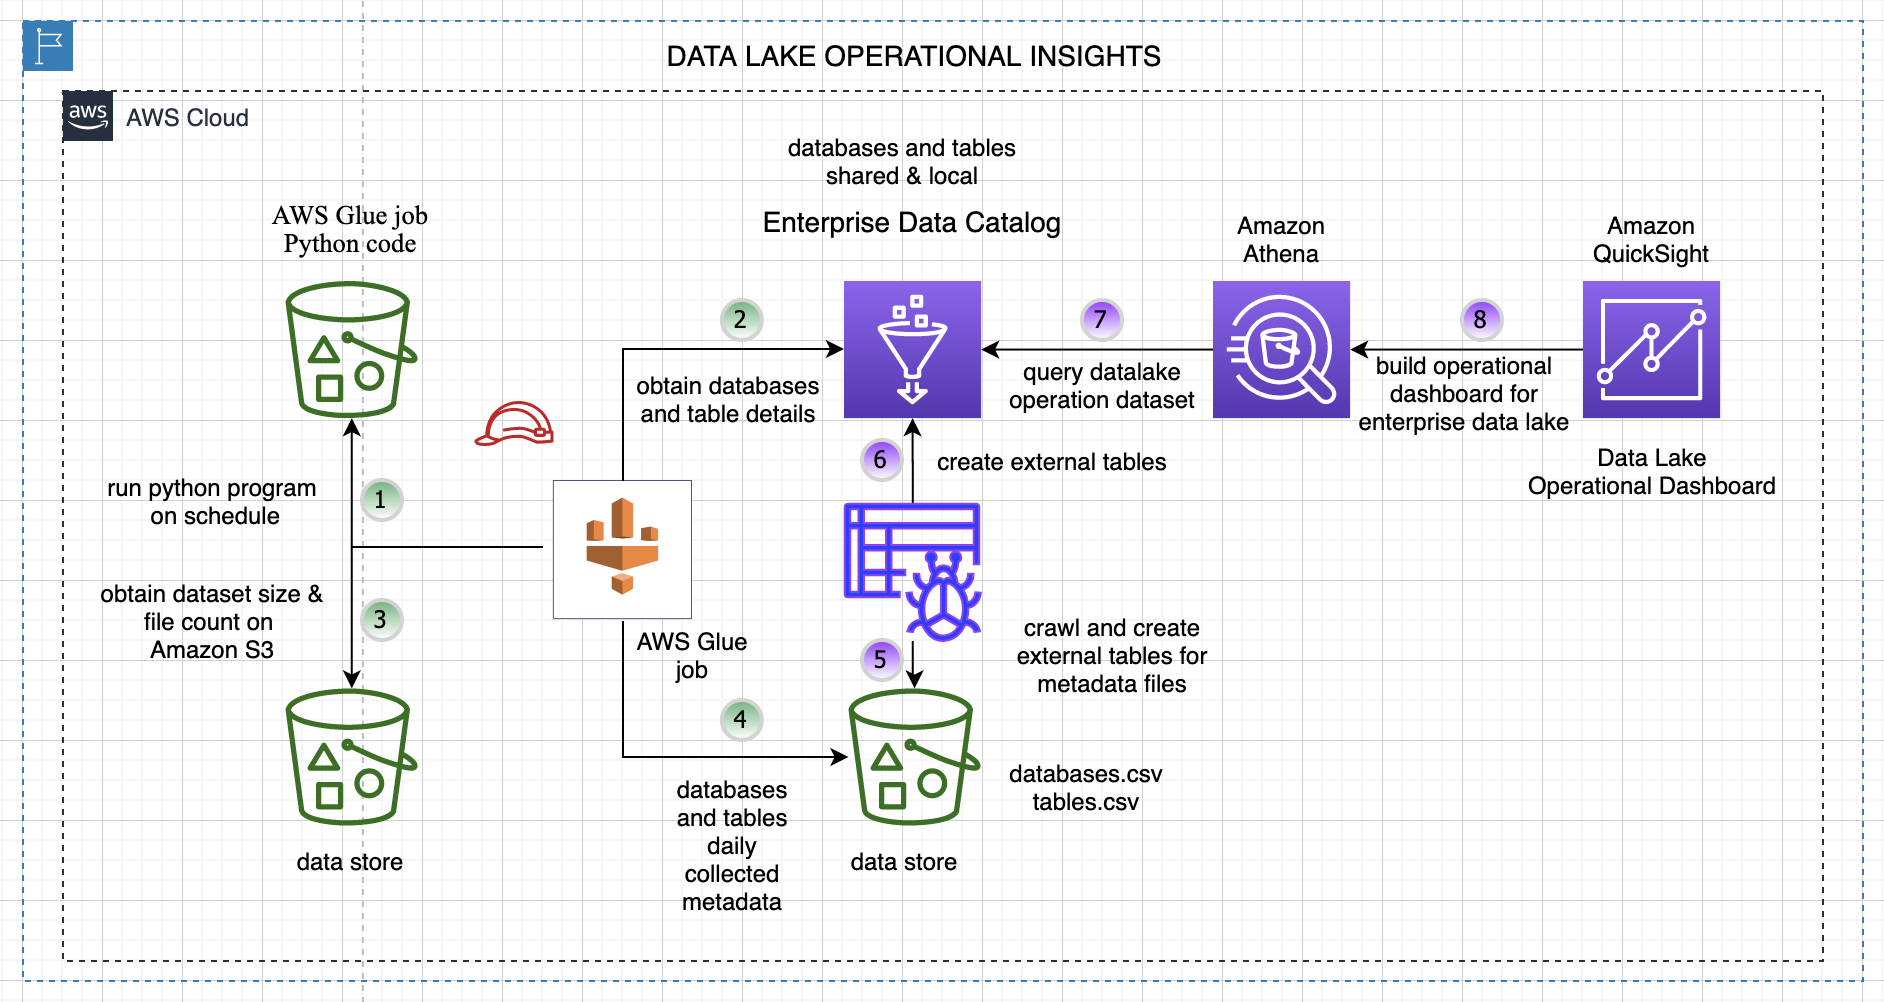
The steps are as follows:
- A data collector Python program runs on a schedule and collects metadata details about databases and tables from the enterprise Data Catalog.
- The following key data attributes are collected for each table and database in your AWS Glue Data Catalog.
| Table Data | Database Data |
| TableName | DatabaseName |
| DatabaseName | CreateTime |
| Owner | SharedResource |
| CreateTime | SharedResourceOwner |
| UpdateTime | SharedResourceDatabaseName |
| LastAccessTime | Location |
| TableType | Description |
| Retention | |
| CreatedBy | |
| IsRegisteredWithLakeFormation | |
| Location | |
| SizeInMBOnS3 | |
| TotalFilesonS3 |
- The program reads each table’s file location and computes the number of files on Amazon Simple Storage Service (Amazon S3) and the size in MB.
- All the data for the tables and databases is stored in an S3 bucket for downstream analysis. The program runs every day and creates new files partitioned by year, month, and day on Amazon S3.
- We crawl the data created in Step 4 using an AWS Glue crawler.
- The crawler creates an external database and tables for our generated dataset for downstream analysis.
- We can query the extracted data with Amazon Athena.
- We use Amazon QuickSight to build our operational metrics dashboard and gain insights into our data lake content and usage.
For simplicity, this program crawls and collects data from the Data Catalog for the us-east-1 Region only.
Walkthrough overview
The walkthrough includes the following steps:
- Configure your dataset.
- Deploy the core solution resources with an AWS CloudFormation template, and set up and trigger the AWS Glue job.
- Crawl the metadata dataset and create external tables in the Data Catalog.
- Build a view and query the data through Athena.
- Set up and import data into QuickSight to create an operational metrics dashboard for the Data Catalog.
Configure your dataset
We use the AWS COVID-19 data lake for analysis. This data lake is comprised of data in a publicly readable S3 bucket.
To make the data from the AWS COVID-19 data lake available in your AWS account, create a CloudFormation stack using the following template. If you’re signed in to your AWS account, the following link fills out most of the stack creation form for you. Make sure to change the Region to us-east-1. For instructions on creating a CloudFormation stack, see Get started.
This template creates a COVID-19 database in your Data Catalog and tables that point to the public AWS COVID-19 data lake. You don’t need to host the data in your account, and you can rely on AWS to refresh the data as datasets are updated through AWS Data Exchange.
For more information about the COVID-19 dataset, see A public data lake for analysis of COVID-19 data.
Your environment may already have existing datasets in the Data Catalog. The program collects the aforementioned attributes for those datasets as well, which can be used for analysis.
Deploy your resources
To make it easier to get started, we created a CloudFormation template that automatically sets up a few key components of the solution:
- An AWS Glue job (Python program) that is triggered based on a schedule
- The AWS Identity and Access Management (IAM) role required by the AWS Glue job so the job can collect and store details about databases and tables in the Data Catalog
- A new S3 bucket for the AWS Glue job to store the data files
- A new database in the Data Catalog for storing our metrics data tables
The source code for the AWS Glue job and the CloudFormation template are available in the GitHub repo.
You must first download the AWS Glue Python code from GitHub and upload it to an existing S3 bucket. The path of this file needs to be provided when running the CloudFormation stack.
After the stack is deployed successfully, you can check the resources created on the stack’s Resources tab.
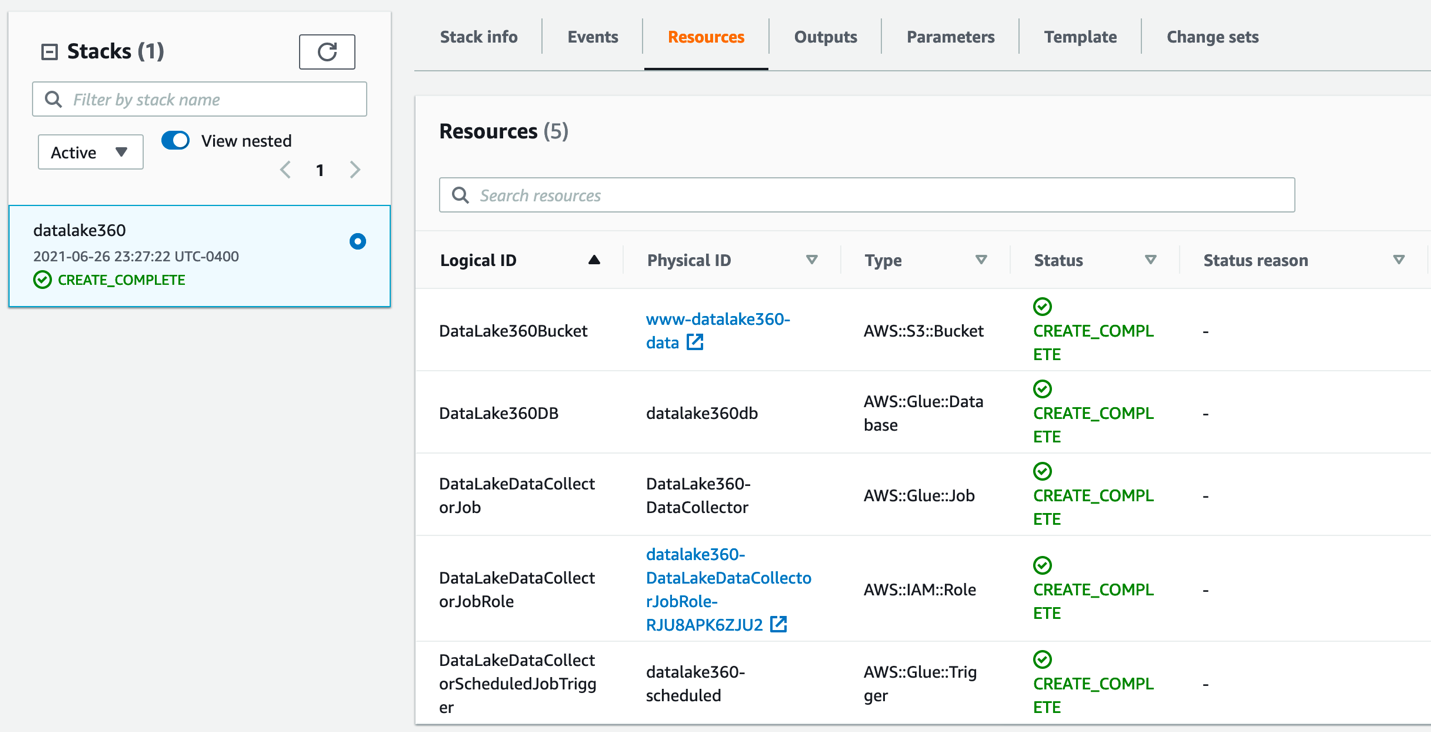
You can verify and check the AWS Glue job setup and trigger, which is scheduled as per your specified time.
Now that we have verified that the stack is successfully set up, we can run our AWS Glue job manually and collect key attributes for our analysis.
- On the AWS Glue console, choose AWS Glue Studio in the navigation pane.
- In the AWS Glue Studio Console, click on Jobs and select the
DataCollectorjob and Run the job.
The AWS Glue job collects data and stores it in the S3 bucket created for us through AWS CloudFormation. The job creates separate folders for database and table data, as shown in the following screenshot.

Crawl and set up external tables for the metrics data
Follow these steps to create tables in the database by using AWS Glue crawlers on the data stored on Amazon S3. Note that the database has been created for us using the CloudFormation stack.
- On the AWS Glue console, under Databases in the navigation pane, choose Tables.
- Choose Add tables.
- Choose Add tables using a crawler.
- Enter a name for the crawler and choose Next.
- For Add crawler, choose Create source type.
- Specify the crawler source type by choosing Data stores and choose Next.
- In the Add a data store section, for Choose a data store, choose S3.
- For Crawl data in, select Specified path.
- For Include path, enter the path to the
tablesfolder generated by the AWS Glue job:s3://<data bucket created using CFN>/datalake/tables/. - When asked if you want to create another data store, select No and then choose Next.
- On the Choose an IAM Role page, select Choose an Existing IAM Role.
- For IAM role, choose the IAM role created through the CloudFormation stack.
- Choose Next.
- On the Output page, for Database, choose the AWS Glue database you created earlier.
- Choose Next.
- Review your selections and choose Finish.
- Select the crawler you just created and choose Run crawler.
The crawler should take only a few minutes to complete. While it’s running, status messages may appear, informing you that the system is attempting to run the crawler and then is actually running the crawler. You can choose the refresh icon to check on the current status of the crawler.
- In the navigation pane, choose Tables.

- Function Test: Only printer printheads that have...
- Stable Performance: With stable printing...
- Durable ABS Material: Our printheads are made of...
- Easy Installation: No complicated assembly...
- Wide Compatibility: Our print head replacement is...
![United States Travel Map Pin Board | USA Wall Map on Canvas (43 x 30) [office_product]](https://m.media-amazon.com/images/I/41O4V0OAqYL._SL160_.jpg)
- PIN YOUR ADVENTURES: Turn your travels into wall...
- MADE FOR TRAVELERS: USA push pin travel map...
- DISPLAY AS WALL ART: Becoming a focal point of any...
- OUTSTANDING QUALITY: We guarantee the long-lasting...
- INCLUDED: Every sustainable US map with pins comes...
The table called tables, which was created by the crawler, should be listed.

Query data with Athena
This section demonstrates how to query these tables using Athena. Athena is a serverless, interactive query service that makes it easy to analyze the data in the AWS COVID-19 data lake. Athena supports SQL, a common language that data analysts use for analyzing structured data. To query the data, complete the following steps:
- Sign in to the Athena console.
- If this is your first time using Athena, you must specify a query result location on Amazon S3.
- On the drop-down menu, choose the
datalake360dbdatabase. - Enter your queries and explore the datasets.
Set up and import data into QuickSight and create an operational metrics dashboard
Set up QuickSight before you import the dataset, and make sure that you have at least 512 MB of SPICE capacity. For more information, see Managing SPICE Capacity.
Before proceeding, make sure your QuickSight account has IAM permissions to access Athena (see Authorizing Connections to Amazon Athena) and Amazon S3.
Let’s first create our datasets.
- On the QuickSight console, choose Datasets in the navigation pane.
- Choose New dataset.
- Choose Athena from the list of data sources.
- For Data source name, enter a name.
- For Database, choose the database that you set up in the previous step (
datalake360db). - For Tables, select databases.
- Finish creating your dataset..
- Repeat same steps to create a
tablesdataset.
Now you edit the databases dataset.
- From the datasets list, choose the
databasesdataset. - Choose Edit dataset.
- Change the
createtimefield type from string to date. - Enter the date format as
yy/MM/dd HH:mm:ss. - Choose Update.
- Similarly, change the tables dataset fields
createtime,updatetime, andlastaccessedtimeto the date type. - Choose Save and Publish to save the changes to the dataset.
Next, we add calculated fields for the count of databases and tables.
- For the
tablesdataset, choose Add calculation. - Add the calculated field
tablesCountasdistinct_count({tablename}. - Similarly, add a new calculated field
databasesCountasdistinct_count({databasename}.
Now let’s create a new analysis.
Let’s create our first visual for the count of number of databases and tables in our data lake Data Catalog.
- Create a new visual and add
databasesCountfrom the fields list.
This provides us with a count of databases in our Data Catalog.
- Similarly, add a visual to display the total number of tables using the
tablesCountfield.
Let’s create second visual for the total number of files on Amazon S3 and total storage size on Amazon S3.
- Similar to the previous step, we add a new visual and choose the
totalfilesons3andsizeinmbons3fields to display Amazon S3-related storage details.
Let’s create another visual to check which are the least used datasets.
Finally, let’s create one more visual to check if databases are shared resources from different accounts.
- Select the
databasesdataset. - We create a table visual type and add
databasename,sharedresource, anddescriptionfields.

- Rainbow Six Vegas (code game) / PC
- English (Publication Language)

- Battery LR1130 button battery,lens: optical...
- ABS anti-drop material,comfortable to hold,more...
- in daytime,you can shut it up by click the button...
- The eyepiece can be zoomed and zoomed,and the...
- Perfect for any type of task - Reading small -...

- Convenience & flexibility: 5 pockets throughout...
- Best travel gift for friend & family: Suitable for...
- Superior quality materials and comfort: Made with...
- Safe from pick-pocketing: Electronic...
- Organize most travel essentials: With 5 pockets,...
Now you have an idea of what types of visuals are possible using this data. The following screenshot is one example of a finished dashboard.

Clean up
To avoid ongoing charges, delete the CloudFormation stacks and output files in Amazon S3 that you created during deployment. You have to delete the data in the S3 buckets before you can delete the buckets.
Conclusion
In this post, we showed how you can set up an operational metrics dashboard for your Data Catalog. We set up our program to collect key data elements about our tables and databases from the AWS Glue Data Catalog. We then used this dataset to build our operational metrics dashboard and gained insights on our data lake.
About the Authors
Sachin Thakkar is a Senior Solutions Architect at Amazon Web Services, working with a leading Global System Integrator (GSI). He brings over 22 years of experience as an IT Architect and as Technology Consultant for large institutions. His focus area is on Data & Analytics. Sachin provides architectural guidance and supports the GSI partner in building strategic industry solutions on AWS