In the first post of this series, we discussed the need of a metadata management solution for organizations. We used DataHub as an open-source metadata platform for metadata management and deployed it using AWS managed services with the AWS Cloud Development Kit (AWS CDK).
In this post, we focus on how to populate technical metadata from the AWS Glue Data Catalog and Amazon Redshift into DataHub, and how to augment data with a business glossary and visualize data lineage of AWS Glue jobs.
Deploy DataHub using AWS managed services and ingest metadata from AWS Glue and Amazon Redshift:
|
Overview of solution
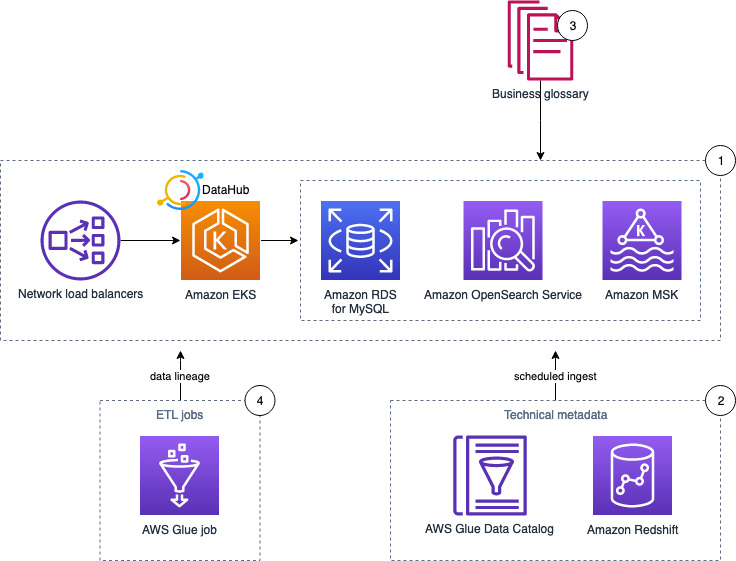
The following diagram illustrates the solution architecture and its key components:
- DataHub runs on an Amazon Elastic Kubernetes Service (Amazon EKS) cluster, using Amazon OpenSearch Service, Amazon Managed Streaming for Apache Kafka (Amazon MSK), and Amazon RDS for MySQL as the storage layer for the underlying data model and indexes.
- The solution pulls technical metadata from AWS Glue and Amazon Redshift to DataHub.
- We enrich the technical metadata with a business glossary.
- Finally, we run an AWS Glue job to transform the data and observe the data lineage in DataHub.

In the following sections, we demonstrate how to ingest the metadata using various methods, enrich the dataset, and capture the data lineage.
Pull technical metadata from AWS Glue and Amazon Redshift
In this step, we look at three different approaches to ingest metadata into DataHub for search and discovery.
DataHub supports both push-based and pull-based metadata ingestion. Push-based integrations (for example, Spark) allow you to emit metadata directly from your data systems when metadata changes, whereas pull-based integrations allow you to extract metadata from the data systems in a batch or incremental-batch manner. In this section, you pull technical metadata from the AWS Glue Data Catalog and Amazon Redshift using the DataHub web interface, Python, and the DataHub CLI.
Ingest data using the DataHub web interface
In this section, you use the DataHub web interface to ingest technical metadata. This method supports both the AWS Glue Data Catalog and Amazon Redshift, but we focus on Amazon Redshift here as a demonstration.
As a prerequisite, you need an Amazon Redshift cluster with sample data, accessible from the EKS cluster hosting DataHub (default TCP port 5439).
Create an access token
Complete the following steps to create an access token:
- Go to the DataHub web interface and choose Settings.
- Choose Generate new token.
- Enter a name (
GMS_TOKEN), optional description, and expiry date and time. - Copy the value of the token to a safe place.

Create an ingestion source
Next, we configure Amazon Redshift as our ingestion source.
- On the DataHub web interface, choose Ingestion.
- Choose Generate new source.
- Choose Amazon Redshift.
- In the Configure Recipe step, enter the values of
host_portanddatabaseof your Amazon Redshift cluster and keep the rest unchanged:
# Coordinates
host_port:example.something.<region>.redshift.amazonaws.com:5439
database: dev
The values for ${REDSHIFT_USERNAME}, ${REDSHIFT_PASSWORD}, and ${GMS_TOKEN} reference secrets that you set up in the next step.
- Choose Next.
- For the run schedule, enter your desired cron syntax or choose Skip.
- Enter a name for the data source (for example,
Amazon Redshift demo) and choose Done.
Create secrets for the data source recipe
To create your secrets, complete the following steps:
- On the DataHub Manage Ingestion page, choose Secrets.
- Choose Create new secret.
- For Name¸ enter
REDSHIFT_USERNAME. - For Value¸ enter
awsuser(default admin user). - For Description, enter an optional description.
- Repeat these steps for
REDSHIFT_PASSWORDandGMS_TOKEN.

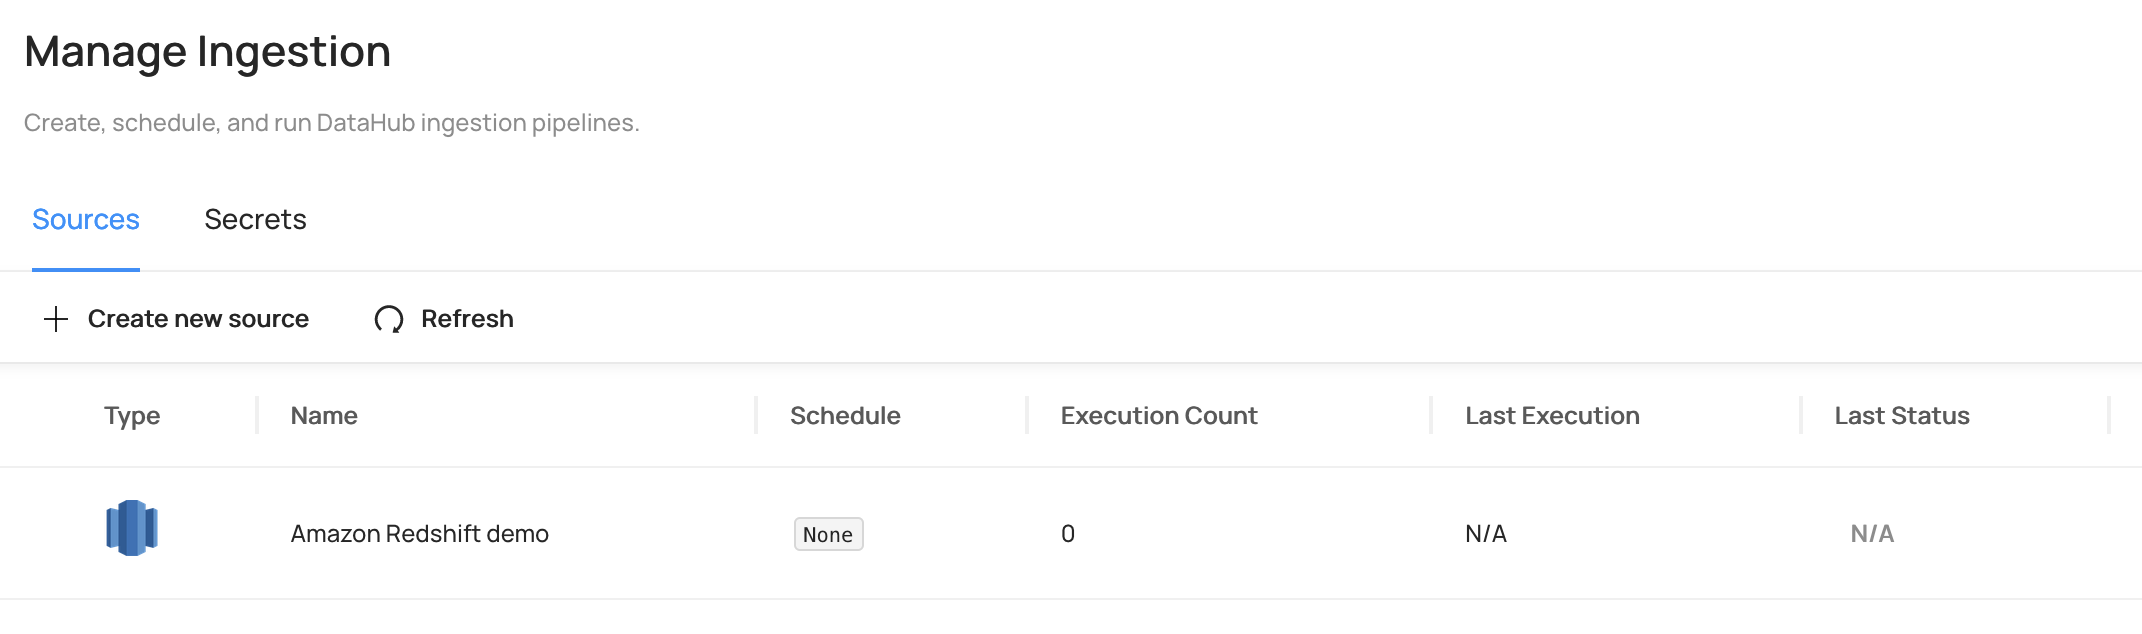
Run metadata ingestion
To ingest the metadata, complete the following steps:
- On the DataHub Manage Ingestion page, choose Sources.
- Choose Execute next to the Amazon Redshift source you just created.
- Choose Execute again to confirm.
- Expand the source and wait for the ingestion to complete, or check the error details (if any).

Tables in the Amazon Redshift cluster are now populated in DataHub. You can view these by navigating to Datasets > prod > redshift > dev > public > users.

You’ll further work on enriching this table metadata using the DataHub CLI in a later step.
Ingest data using Python code
In this section, you use Python code to ingest technical metadata to the DataHub CLI, using the AWS Glue Data Catalog as an example data source.
As a prerequisite, you need a sample database and table in the Data Catalog. You also need an AWS Identity and Access Management (IAM) user with the required IAM permissions:
{
    "Effect": "Allow",
    "Action": [
        "glue:GetDatabases",
        "glue:GetTables"
    ],
    "Resource": [
        "arn:aws:glue:$region-id:$account-id:catalog",
        "arn:aws:glue:$region-id:$account-id:database/*",
        "arn:aws:glue:$region-id:$account-id:table/*"
    ]
}
Note the GMS_ENDPOINT value for DataHub by running kubectl get svc, and locate the load balancer URL and port number (8080) for the service datahub-datahub-gms.

Install the DataHub client
To install the DataHub client with AWS Cloud9, complete the following steps:
- Open the AWS Cloud9 IDE and start the terminal.
- Create a new virtual environment and install the DataHub client:
# Install the virtualenv
python3 -m venv datahub
# Activate the virtualenv
Source datahub/bin/activate
# Install/upgrade datahub client
pip3 install --upgrade acryl-datahub
- Check the installation:
datahub versionIf DataHub is successfully installed, you see the following output:
DataHub CLI version: 0.8.44.4
Python version: 3.X.XX (default,XXXXX)- Install the DataHub plugin for AWS Glue:
pip3 install --upgrade 'acryl-datahub[glue]'Prepare and run the ingestion Python script
Complete the following steps to ingest the data:
- Download
glue_ingestion.pyfrom the GitHub repository. - Edit the values of both the source and sink objects:
from datahub.ingestion.run.pipeline import Pipeline

pipeline = Pipeline.create(
    {
        "source": {
            "type": "glue",
            "config": {
                "aws_access_key_id": "<aws_access_key>",
                "aws_secret_access_key": "<aws_secret_key>",
                "aws_region": "<aws_region>",
                "emit_s3_lineage" : False,
            },
        },
        "sink": {
            "type": "datahub-rest",
            "config": {
                "server": "http://<your_gms_endpoint.region.elb.amazonaws.com:8080>",
                 "token": "<your_gms_token_string>"
                },
        },
    }
)

# Run the pipeline and report the results.
pipeline.run()
pipeline.pretty_print_summary()
For production purposes, use the IAM role and store other parameters and credentials in AWS Systems Manager Parameter Store or AWS Secrets Manager.
To view all configuration options, refer to Config Details.
- Run the script within the DataHub virtual environment:
python3 glue_ingestion.pyIf you navigate back to the DataHub web interface, the databases and tables in your AWS Glue Data Catalog should appear under Datasets > prod > glue.

Ingest data using the DataHub CLI
In this section, you use the DataHub CLI to ingest a sample business glossary about data classification, personal information, and more.
As a prerequisite, you must have the DataHub CLI installed in the AWS Cloud9 IDE. If not, go through the steps in the previous section.
Prepare and ingest the business glossary
Complete the following steps:
- Open the AWS Cloud9 IDE.
- Download
business_glossary.ymlfrom the GitHub repository. - Optionally, you can explore the file and add custom definitions (refer to Business Glossary for more information).
- Download
business_glossary_to_datahub.ymlfrom the GitHub repository. - Edit the full path to the business glossary definition file, GMS endpoint, and GMS token:
source:
  type: datahub-business-glossary
  config:
    file: /home/ec2-user/environment/business_glossary.yml

sink:
  type: datahub-rest
  config:
    server: 'http://<your_gms_endpoint.region.elb.amazonaws.com:8080>'
    token:  '<your_gms_token_string>'
- Run the following code:
datahub ingest -c business_glossary_to_datahub.yml- Navigate back to the DataHub interface, and choose Govern, then Glossary.
You should now see the new business glossary to use in the next section.

- Function Test: Only printer printheads that have...
- Stable Performance: With stable printing...
- Durable ABS Material: Our printheads are made of...
- Easy Installation: No complicated assembly...
- Wide Compatibility: Our print head replacement is...
![United States Travel Map Pin Board | USA Wall Map on Canvas (43 x 30) [office_product]](https://m.media-amazon.com/images/I/41O4V0OAqYL._SL160_.jpg)
- PIN YOUR ADVENTURES: Turn your travels into wall...
- MADE FOR TRAVELERS: USA push pin travel map...
- DISPLAY AS WALL ART: Becoming a focal point of any...
- OUTSTANDING QUALITY: We guarantee the long-lasting...
- INCLUDED: Every sustainable US map with pins comes...

Enrich the dataset with more metadata
In this section, we enrich a dataset with additional context, including description, tags, and a business glossary, to help data discovery.
As a prerequisite, follow the earlier steps to ingest the metadata of the sample database from Amazon Redshift, and ingest the business glossary from a YAML file.
- In the DataHub web interface, browse to
Datasets > prod > redshift > dev > public > users. - Starting at the table level, we add related documentation and a link to the About section.
This allows analysts to understand the table relationships at a glance, as shown in the following screenshot.

- To further enhance the context, add the following:
- Column description.
- Tags for the table and columns to aid search and discovery.
- Business glossary terms to organize data assets using a shared vocabulary. For example, we define
useridin theUSERStable as an account in business terms. - Owners.
- A domain to group data assets into logical collections. This is useful when designing a data mesh on AWS.

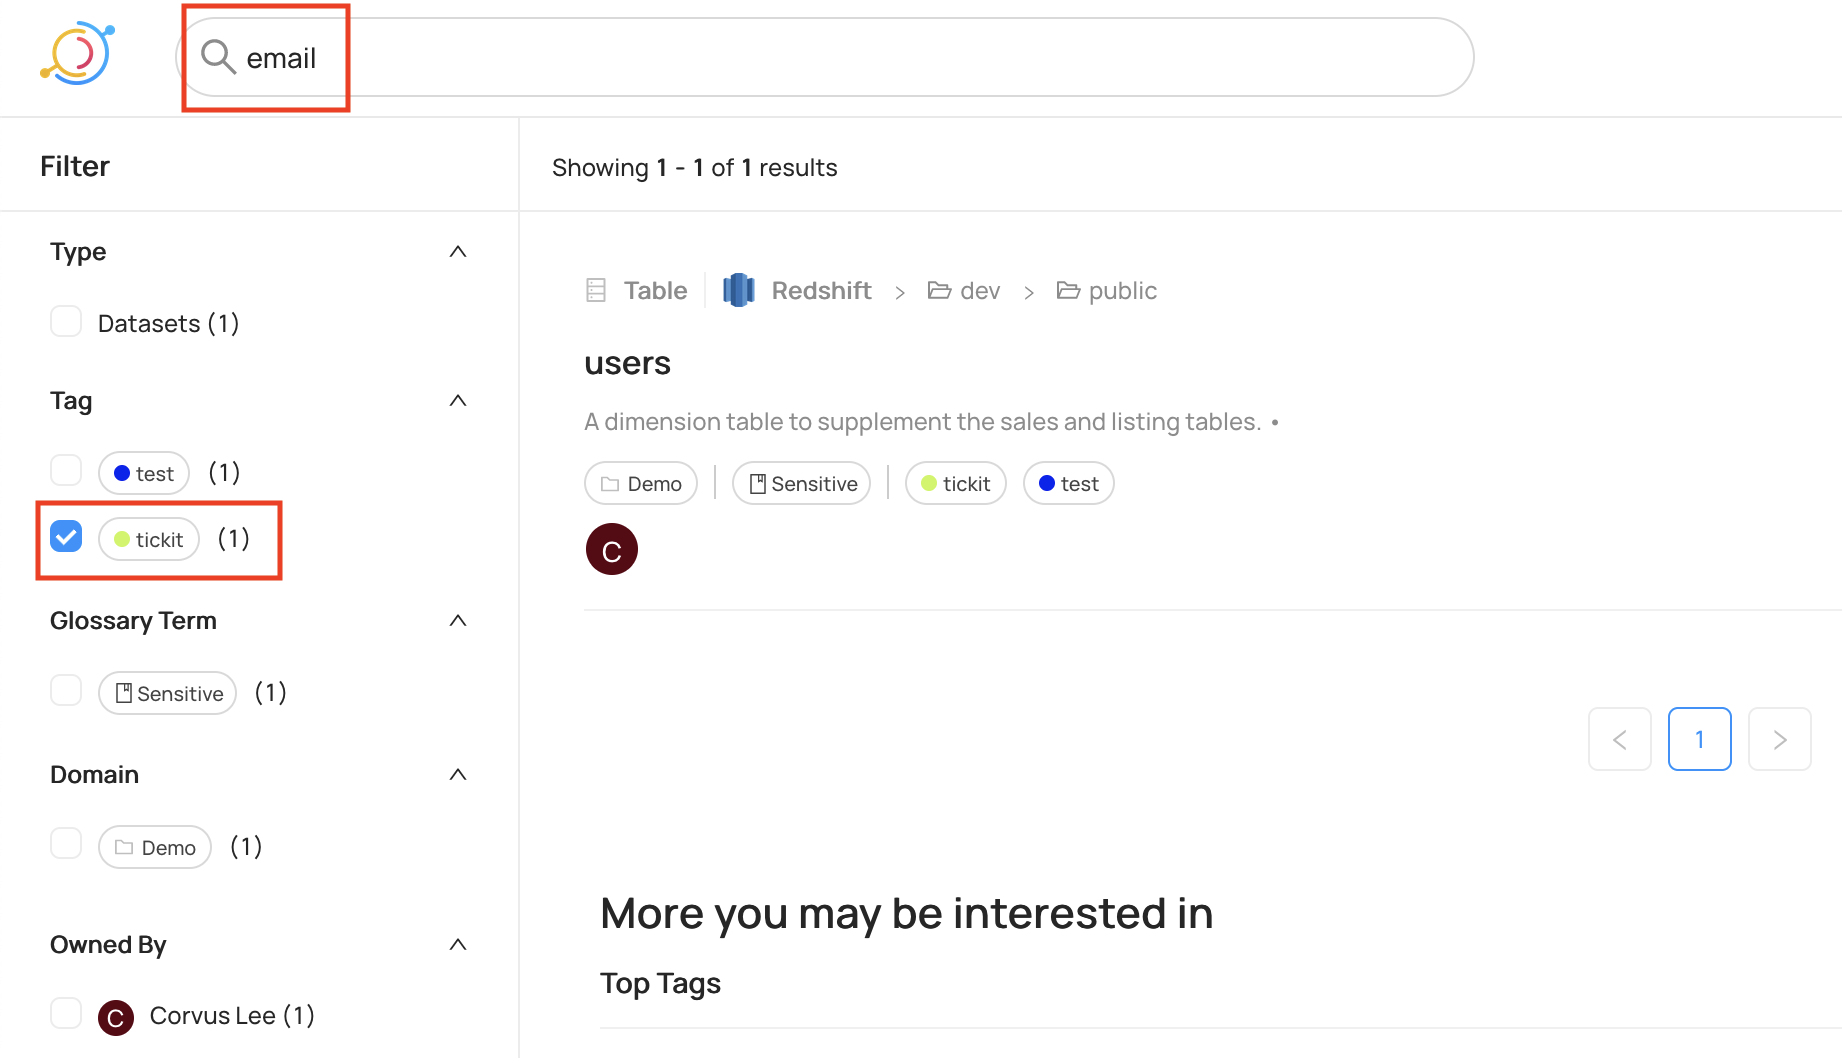
Now we can search using the additional context. For example, searching for the term email with the tag tickit correctly returns the USERS table.
We can also search using tags, such as tags:"PII" OR fieldTags:"PII" OR editedFieldTags:"PII".

In the following example, we search using the field description fieldDescriptions:The user's home state, such as GA.

Feel free to explore the search features in DataHub to enhance the data discovery experience.
Capture data lineage
In this section, we create an AWS Glue job to capture the data lineage. This requires use of a datahub-spark-lineage JAR file as an additional dependency.
- Download the NYC yellow taxi trip records for 2022 January (in parquet file format) and save it under
s3://<<Your S3 Bucket>>/tripdata/. - Create an AWS Glue crawler pointing to
s3://<<Your S3 Bucket>>/tripdata/and create a landing table calledlanding_nyx_taxiinside the databasenyx_taxi. - Download the
datahub-spark-lineageJAR file (v0.8.41-3-rc3) and store it ins3://<<Your S3 Bucket>>/externalJar/. - Download the log4j.properties file and store it in
s3://<<Your S3 Bucket>>/externalJar/. - Create a target table using the following SQL script.
The AWS Glue job reads the data in parquet file format using the landing table, performs some basic data transformation, and writes it to target table in parquet format.
- Create an AWS Glue Job using the following script and modify your
GMS_ENDPOINT,GMS_TOKEN, and source and target database table name. - On the Job details tab, provide the IAM role and disable job bookmarks.
- Add the path of
datahub-spark-lineage(s3://<<Your S3 Bucket>>/externalJar/datahub-spark-lineage-0.8.41-3-rc3.jar) for Dependent JAR path. - Enter the path of
log4j.propertiesfor Referenced files path.

The job reads the data from the landing table as a Spark DataFrame and then inserts the data into the target table. The JAR is a lightweight Java agent that listens for Spark application job events and pushes metadata out to DataHub in real time. The lineage of datasets that are read and written is captured. Events such as application start and end, and SQLExecution start and end are captured. This information can be seen under pipelines (DataJob) and tasks (DataFlow) in DataHub.
- Run the AWS Glue job.
When the job is complete, you can see the lineage information is being populated in the DataHub UI.


- Rainbow Six Vegas (code game) / PC
- English (Publication Language)

- Battery LR1130 button battery,lens: optical...
- ABS anti-drop material,comfortable to hold,more...
- in daytime,you can shut it up by click the button...
- The eyepiece can be zoomed and zoomed,and the...
- Perfect for any type of task - Reading small -...

- Convenience & flexibility: 5 pockets throughout...
- Best travel gift for friend & family: Suitable for...
- Superior quality materials and comfort: Made with...
- Safe from pick-pocketing: Electronic...
- Organize most travel essentials: With 5 pockets,...
The preceding lineage shows the data is being read from a table backed by an Amazon Simple Storage Service (Amazon S3) location and written to an AWS Glue Data Catalog table. The Spark run details like query run ID are captured, which can be mapped back to the Spark UI using the Spark application name and Spark application ID.
Clean up
To avoid incurring future charges, complete the following steps to delete the resources:
- Run
helm uninstall datahubandhelm uninstall prerequisites. - Run
cdk destroy --all. - Delete the AWS Cloud9 environment.
Conclusion
In this post, we demonstrated how to search and discover data assets stored in your data lake (via the AWS Glue Data Catalog) and data warehouse in Amazon Redshift. You can augment data assets with a business glossary, and visualize the data lineage of AWS Glue jobs.
About the Authors
Debadatta Mohapatra is an AWS Data Lab Architect. He has extensive experience across big data, data science, and IoT, across consulting and industrials. He is an advocate of cloud-native data platforms and the value they can drive for customers across industries.
Corvus Lee is a Solutions Architect for AWS Data Lab. He enjoys all kinds of data-related discussions, and helps customers build MVPs using AWS databases, analytics, and machine learning services.
Suraj Bang is a Sr Solutions Architect at AWS. Suraj helps AWS customers in this role on their Analytics, Database and Machine Learning use cases, architects a solution to solve their business problems and helps them build a scalable prototype.