Introduction
Customers that have decided to migrate their workloads from their on-premise VMware environments to
cloud and want to analyze and generate automated migration strategy recommendation patterns (based on the 7Rs) should look into implementing AWS Migration Hub Strategy Recommendations (Strategy Recommendations).
Strategy Recommendations is a free AWS tool that helps customers to plan migration and modernization initiatives by offering migration and modernization strategy recommendations for viable transformation paths for their applications.
Strategy Recommendations automates the manual process of analyzing each running application, its process dependencies, and its technical complexity. This reduces the time and effort spent on planning application migration and modernization and speeds up your business transformation on AWS.
This blog provides a simplified ‘step-by-step’ guide for the deployment and configuration of the AWS Migration Hub Strategy Recommendations service and its dependencies. This will help customers analyze their VMware workloads and identify optimization options.
Overview of the Solution
This blog assumes that the customer has an existing VMware environment in a data center that is used as the infrastructure for installing and running applications on virtual machines.
In this post, we will cover:
- How to install and configure the open virtual appliances (OVA) to collect data from the existing VMware environment in the data center.
- Configure the required AWS services to ingest the collected data and generate a report containing migration strategy recommendations.
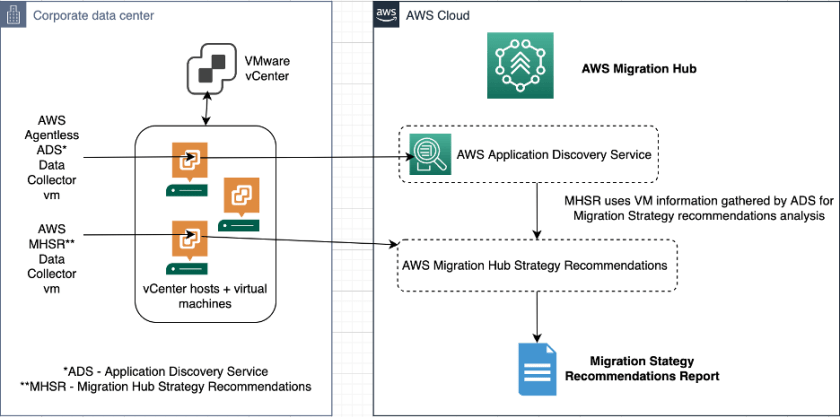
Figure 1 below provides an architectural overview of the 2 OVAs installed in the customer data center with the required access to the AWS services.

Figure 1. High Level Architectural Diagram required for generating the strategy recommendations report.
Pre-Requisites
The on-premise VMware environment has one of these VMware vCenter Server V6.0, V6,5, 6,7 or 7.x versions installed.
- VMware Tools is installed on all virtual machines that are part of the assessment.
- A network port group that allows HTTPS/443 connectivity to the AWS Application Discovery Service (ADS) control plane.
- The user responsible for deployment of the solution has VMware vCenter administrator access.
- A vCenter account is required for the AWS Discovery Connector virtual machine, which will allow it to connect to the VMware environment. You can find in the table below the permissions required for this account.
Privilege Name |
Description |
Effective on Object |
| Virtual machine.Guest Operations.Guest Operation Alias modification |
Allows virtual machine guest operations that involve modifying the alias for the virtual machine. | Virtual machines |
| Virtual machine.Guest Operations.Guest Operation Alias query |
Allows virtual machine guest operations that involve querying the alias for the virtual machine. | Virtual machines |
| Virtual machine.Guest Operations.Guest Operation Modifications |
Allows virtual machine guest operations that involve modifications to a guest operating system in a virtual machine, such as transferring a file to the virtual machine. No vSphere Client user interface elements are associated with this privilege. |
Virtual machines |
| Virtual machine.Guest Operations.Guest Operation Program Execution |
Allows virtual machine guest operations that involve running an application in the virtual machine. No vSphere Client user interface elements are associated with this privilege. |
Virtual machines |
| Virtual machine.Guest Operations.Guest Operation Queries |
Allows virtual machine guest operations that involve querying the guest operating system, such as listing files in the guest operating system. No vSphere Client user interface elements are associated with this privilege. |
Virtual machines |
Table 1. vCenter account with non-administrative privileges, required as pre-requisites.
For more information regarding vCenter account permissions, please refer to VMware Documentations.
You will also require an AWS Account and 3 non-administrative AWS users that are assigned the relevant AWS Identity and Access Management (IAM) permissions/policies as described in table 2 below. The usernames in the AWS IAM Users column provides example usernames. Please feel free to change the usernames during the creation of the users in your AWS account.
AWS IAM Users |
Attached |
Policy Description |
| MigrationHubAdminUser | AWSMigrationHubFullAccess | Grants the user access to the Migration Hub console, including AWS Application Discovery and Migration Hub Strategy Recommendations Services |
| AWSMigrationHubStrategyCollector | AWSMigrationHubStrategyCollector | Grants the user access the AWS MHSR service from the MHSR data collector installed in the VMware environment on-premise |
| ADSAgentlessDiscoveryUser | AWSAgentlessDiscoveryService | Grants the AWS Agentless Discovery Connector that is running in your VMware environment access to register, communicate with, and share connector health metrics with Application Discovery Service. |
Table 2. AWS non-administrative users required as pre-requisites.
Please refer to Creating an IAM Non-Administrative User guide for detailed instruction to create the user and attach the policies.
Deployment Process
Step 1: Download the Agentless Application Discovery Data Collector
The AWS Application Discovery Service is required by Strategy Recommendations to discover the VMware virtual machines (VMs) and capture system information and details of the network connections between systems. To download the AWS Discovery Connector Open Virtual Appliance (OVA), navigate to the AWS Application Discovery Service documentation section Download the Discovery Connector and press the link Discovery Connector OVA. A file called AWSDiscoveryConnector.ova will begin downloading to the local computer.
Step 2: Deploy the Agentless Application Discovery Data Collector
After downloading the AWSDiscoveryConnector.ova file, sign into the VMware’s vCenter vSphere client as a user with VMware Administrator privileges.
After VMware vSphere console opens, click on the ACTIONS -> Deploy OVF Template, as shown in Fig 2 below.
For more information regarding OVF and OVA file format, refer to VMware documentation.

Figure 2. Starting deployment of the AWS Discovery Connector OVA.
Click on the UPLOAD FILES button, browse to the location of the downloaded AWSDiscoveryConnector.ova, select the file and click Next, as illustrated in figure 3.

Figure 3. Select the download AWSDiscoveryConnector.ova file.
Select a name and folder to deploy the OVA as illustrated in the example in figure 4 below.

Figure 4. Select the virtual machine name and installation folder in VMware.
Select a compute resource as illustrated in the example in figure 5.

Figure 5. Select the compute resource to install the AWS Discovery Connector virtual machine.
Review the details on the Review details pane and verify template details by clicking Next as illustrated in figure 6 below.

Figure 6. Review template details.
Select the storage by clicking on the radio button next to the Name. In the example in figure 7 below, DS1 is highlighted once the radio button is selected. Ensure compatibility checks succeed before clicking on Next.

Figure 7. Select storage to deploy the AWS Discovery Connector OVA.
Select the destination network to deploy the OVA to by clicking on the dropdown menu under the destination Network column and selecting the relevant destination network. In the example in figure 8 below, VM Network is selected as the destination network.

Figure 8. Select the destination network to deploy the AWS Agentless Discovery Connector OVA.
Review the deployment and press Finish as illustrated in figure 9 below.

Figure 9: Deploying of the AWSDiscoveryConnector OVA.
Additional detailed instructions on how to deploy the OVA in VMware can be found in the AWS Application Discovery Service documentation – Deploy the Discovery Connector section.
Step 3: Configure the AWS Agentless Discovery Collector
Once the VM deployed successfully, power on the VM as illustrated in figure 10 below.
(Or open the context (right-click) menu for the deployed connector VM, in the vSphere client inventory tree and choose Power, Power On).

Figure 10. Power on the AWS Agentless Discovery Connector virtual machine.
Open the context (right-click) menu for the connector VM and choose Open Console. The console displays the IP address of the connector console illustrated in figure 11 below. Make note of the IP address, as you’ll need it in order to complete the connector setup process.

Figure11. IP address of the connector management website.
Open a web browser and type the following in the URL address bar: https://<ip_address>/, where “ip_address” is the IP address of the connector VM that you saved earlier. Select Get Started Now illustrated in figure 12.

Figure12. Welcome page of the connector management website.
The license agreement page will present to you to read. After reading the agreement, accept the license terms agreement by clicking on the checkbox illustrated in Figure 13.

Figure13. Accept the AWS License Agreement.
Create password for the AWS Agentless Discovery Connector console UI, confirm the password and click NEXT as illustrated in figure 14.

Figure 14. Creating a new password for the AWS Agentless Discovery Connector console.
The Network Info screen shows the IP address of the AWS Agentless Discovery connector. Allocated as well as the login credentials to the virtual machine as illustrated in figure 15.
(we will explain the process how to change that configuration later on in this blog post).

Figure 15. Network configuration information.
Configure Log Uploads and Upgrades by selecting the check boxes as illustrated in figure 16.

Figure 16. Configuring Log Uploads and Auto-upgrade option.
In Step 5 of the Discovery Connector Set Up, add the vCenter credentials and AWS credentials as shown in table 3 below and click NEXT. Refer to figure 23 for more details.
| Field | Value |
| vCenter Host | IP address or hostname of your VMware vCenter Server host |
| vCenter Username | Name of a local or domain user that the connector uses to communicate with vCenter. For domain users, use the form domain\username or username@domain |
| vCenter Password | Local or domain user password. |
| Ignore security certificate | Selected (Bypass SSL certificate validation with vCenter) |
| Configure where to publish data | Select to publish to a local file or to a specific AWS Regional endpoint. (If you select to publish to a local file, your Discovery Connector will not send data about your on-premise servers to AWS. However, the Discovery Connector will continue to send data about the connector itself to AWS). |
| AWS Access Key | IAM user information, that was created in the Pre-requisites section ADSAgentlessDiscoveryUser |
| AWS Secret Key |
Table 3. User details to complete setup of the AWS Agentless Discovery Connector.

Figure 17. Completing the AWS Discovery Connector Setup.
After completing the AWS Agentless Discovery Connector initial configuration, you can login to the connector via console and change option settings as described in figure 17.
Open the context menu (right-click) for the connector VM and choose Open Console. Log into the AWS Agentless Discovery connector type the command sudo setup.rb in the console window as shown in figure 18. A menu screen will be presented to you. Select 2 for network setting configuration and set the network options as required. If the virtual machine requires a static ip address, please follow the Configure a static IP address for the connector instructions.

Figure 18. Reconfigure network settings after initial login.
Step 4: Start Collecting Data from the Agentless Application Discovery Data Collector
Once the AWSDataCollector virtual machine has been deployed, open the console of the AWS account used to collect the data from the AWSDiscoveryConnector. Navigate to Migration Hub –> Discover –> Data collectors and select the Connectors tab in the middle window as illustrated in figure 19.

Figure 19. ADS Connector successfully collecting data from vCenter.
Verify the collection status is Collecting and if not, select the connector by clicking on the checkbox next to the connector name and click on Start data collection button. This will start the collection of data from the AWS Agentless Discovery Connector.
For more troubleshooting steps, please refer to the Troubleshooting Agentless Collector in the ADS documentation.
Step 5: Download the Migration Hub Strategy Recommendations Data Collector
Download the Migration Hub Strategy Recommendations OVA by navigating to Migration Hub –> Strategy and click on Download data collector. Refer to Figure 20.

Figure 20. Download data collector.
The download of the AWSMHubApplicationDataCollector.ova will begin.
Step 6: Deploy the Migration Hub Strategy Recommendations Data Collector
Once completed, deploy the MHSR collector in your VMware environment by following the same deployment process outlined in step 2 above “Deploy the Agentless Application Discovery Data Collector”
The virtual machine will require a minimum of 4 vCPUs, 4GB of RAM and 300GB of hard disk space.
Step 7 Configure the Migration Hub Strategy Recommendations Data Collector
Log into the AWSMHubApplicationDataCollector virtual machine by running the following command from a Linux terminal on the same network as the AWSMHubApplicationDataCollector:
ssh ec2-user@CollectorIPAddress
When prompted for a password, enter the default password that is listed in the MSHR documentation – Step 3: Sign in to the Strategy Recommendations collector section, “aq1@WSde3”. After successful login, it will prompt you to change the default password, as illustrated in Figure 21 below.

Figure 21. MHSR Data Collector replaces the default password.
Once you have changed the password, follow the steps in the setup the Strategy Recommendations collector to complete the setup as illustrated in figure 22.

Figure 22. Successful configuration of the MHSR Data Collector.
To verify that your collector and target servers are correctly setup for data collection, run the following command:
collector diag-check
Enter a single target server IP address. The following examples show the output of a successful setup.
Provide your test server IP address: IP address
—————————————————————
Start checking connectivity & credentials…
Connectivity and Credential Checks succeeded
—————————————————————
Start checking permissions…
Permission Check succeeded
—————————————————————
Start checking OS version…
OS version check succeeded
—————————————————————
For Linux:
Start checking Linux Bash installation…
Linux Bash installation check succeeded
For Windows:
Start checking Windows architecture type…
Windows Architecture Type Check succeeded
—————————————————————
All diagnostic checks complete successfully.
This server is correctly set up and ready for data collection.
The following example shows an error message that is displayed when your remote server credentials are incorrect.
Unable to authenticate the server credentials with IP address ${IPAddress}.
Ensure that your credentials are accurate and the server is configured correctly, and use the following command to reset incorrect credentials.
collector setup -remote-server-configurations
Proceed to the next step if all checks have succeeded, otherwise run the command
collector setup-remote-server-configurations to reset incorrect credentials.
And re-run collector diag-check to verify all checks were successful.
Step 8: View Migration Hub Strategy Recommendations reports
Prior to generating the recommendations, let’s verify the health of the MHSR service. To do this, log into the AWS console and navigate to the Migration Hub Service.
Select Data Sources from the submenu and verify the MHSR has a status of Healthy as illustrated in figure 23 below.

Figure 23. Verify MHSR Collector connected to AWS.
Then click on Recommendations under
click on Get Recommendations to start the generation of the report as illustrated in figures 24-25.

Figure 24. Generating the recommendations.

Figure 25. Report being successfully generated.
Once the data analysis has successfully completed, select the relevant recommendation or export the report in csv format to understand the details of the migration strategy recommendations.
Conclusion
In this blog post, we provided step-by-step guidance for deploying and configuring the Application Discovery Service Agentless Collector and Strategy Recommendations in a VMware environment.
This tool will help you choose and build accurate migration and modernization plans, as well as choosing the right tools and paths for your migration journey.
Additional Reading
Besides this blog, you can find the following additional resources helpful:
- Introducing AWS Migration Strategy Hub Recommendations.
- New Strategy Recommendations Service Helps Streamline AWS Cloud Migration and Modernization.
- AWS Cloud Operations and Migrations Blog.
- Analyze modernization incompatibilities using AWS Migration Hub Strategy Recommendations.
About the Authors
Micha Novak
Micha Novak is a Senior Specialist Solution Architect member of the EMEA Migration and modernization team. He works with customers to speed up their cloud migration journeys on to the AWS platform.
Ravin Mathoora
Ravin Mathoora is a Senior Solution Architect at AWS. He works with enterprise customers mainly in the manufacturing industry in the Nordics to migrate and modernize workloads, with sustainability in mind as a guiding design principle.
Enjoyed this article? Sign up for our newsletter to receive regular insights and stay connected.