The demand for web applications continues to explosive in today’s evolving digital landscape. However, the traditional process of building a web app often requires relevant coding expertise, which set up a barrier for those without programming backgrounds. Even though there are various web hosting services that provide templates for web developers, one has to make customization by adding unique functions, not to mention the complex debug environment.
But what if there was a solution that could empower anyone to create basic web applications effortlessly without knowing how to code and how to host? By leveraging the AI capability of large language models like GPT-4, such a solution becomes so simple to be implemented. By harnessing the potential of this application I called Text2WebApp or WebApp Generator, users can now create web applications in their own natural language, by describing the elements, functions, and appearance of an app, which eliminates the need for manual coding, and debugging, and enabling even those without in-depth programming knowledge to enter the realm of web app development.
In this article, we will dive into the development of this application, exploring how to put together Langchain, OpenAI, and Streamlit to create a useful assistant for web development.
Please note that although Python is commonly associated with AI and ML, the web development community heavily depends on JavaScript and Node.js. Therefore, our application will be prompted to generate a JavaScript-based web app.
1. Design Overview
Let’s take a look at the UI of this application to give you a sense of its visual effect.
a) Initial page
Users can simply type in their design preferences in the text area and hit the “Create!” button. In just a few seconds, the generated app displays on the left side, with functionality. Users can play around with it and see how it works! Oh, and if the result doesn’t quite hit the mark, it’s common in the LLM realm. Just give it another go and generate a new one. The source code will also be displayed below the user’s input and one can simply copy and paste it to own application.
b) Generated page
In this test, I ask the generator to create:
Social Media Dashboard: Develop a google-style dashboard app that displays social media metrics such as follower count, engagement rate, and post performance. Provide barchart for followers trend from May to Jul showing data from 500 to 5000. Use this logo for the account: https://about.twitter.com/content/dam/about-twitter/en/brand-toolkit/brand-download-img-1.jpg.twimg.1920.jpg.
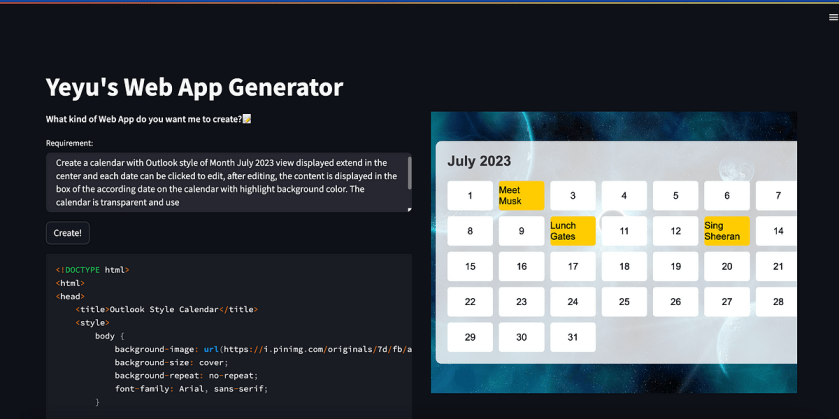
Another test is based on the requirement to create a calendar that:
Create a calendar with Outlook style of Month July 2023 view displayed extend in the center and each date can be clicked to edit, after editing, the content is displayed in the box of the according date on the calendar with highlight background color. The calendar is transparent and use https://i.pinimg.com/originals/7d/fb/a8/7dfba87e011e436340836f89e86fb613.jpg for background pictures.
The result looks quite mature:
To better understand the flow of information and actions within this application, let’s dive into the block diagram of its functions. Don’t worry, it’s very simple.
Block Diagram
The app design instruction is fed to the prompt template, constructing the complete query prompt to GPT-3.5-turbo or GPT-4 models. Following the instruction of the prompt, the language model generates HTML with embedded CSS and JavaScript code. The final step is to call the component API of Streamlit to execute this JavaScript code in an iFrame that interacts with users.
2. Code Walkthrough
Now, let’s step-by-step explore the code workflow that brings this Text2WebApp to life.
1) LLMChain
LLMChain, within the family of Langchain, is the most typical chain that enhances the capabilities of language models. Comprising a PromptTemplate and a language model (either a model or chat_model), an LLMChain operates by organizing the prompt template using the given input values, and optionally memory key values if accessible. It then forwards the structured prompt string to a language model and retrieves the model’s output as the final result.
Install the packages:
!pip install langchain openai
Import the modules and set up the OpenAI API key to the environment.
from langchain.chat_models import ChatOpenAI
from langchain import PromptTemplate, LLMChain
import os

os.environ["OPENAI_API_KEY"] = "{Your_OpenAI_Key}"
Define a prompt template that reserves the section of the user input. (Always the most important!)
prompt_webapp_template = """
    You are a web app developer using Javascript.
    Please generate a complete functional javascript app
    following user requirement "{text}".
    The js file and css file should be combined into one html file which can be directly run on server.
    If there is no CSS requirement specified, please add a Amazon style css in your response.
    The response should only include the content of html file.
    HTML:

    """
PROMPT_WEBAPP = PromptTemplate(template=prompt_webapp_template,
                               input_variables=["text"])
Create the chain webapp_chain with LLM and prompt template.
llm = ChatOpenAI(temperature=0.5)
webapp_chain = LLMChain(llm=llm, prompt=PROMPT_WEBAPP,verbose=True)
2) Streamlit
As same as some of my previous projects, we are going to keep using the convenient Streamlit toolset to build the web application for facilitating user input and various output interactions.
Install the package:
!pip install streamlit
Initial a default html usingst.session_state.html which is used to cache and transfer the text of HTML generated by the language model among web sessions.
import streamlit as st

init_html = """
<!DOCTYPE html>
<html>
<head>
    <title>Example</title>
    <style>
        h3 {
            color: yellow;
        }
    </style>
</head>
<body>
    <h3>Your APP will be displayed here.</h3>
</body>
</html>

"""
st.set_page_config(layout="wide")

if 'html' not in st.session_state:
    st.session_state.html = init_html
Create the widget of the columns to separate the user input area from the app display area. The left column contains the text_area for the user prompt, a button for activating the processing, and a code for wrapping the HTML source code. The right column calls the components API to display the HTML string in an iframe and make it interactive.
import streamlit.components.v1 as components

col1, col2 = st.columns([0.5, 0.5], gap='medium')

with col1:
    st.write("**What kind of Web App do you want me to create?**")
    st.text_area("Requirement: ", key='req')
    st.button("Create!", on_click=generate)
    st.code(st.session_state.html, language="typescript")

with col2:

    components.html(st.session_state.html, height=600, scrolling=True)
Define a function generate() to handle the on_click event of the button, so that when the user clicks the button, the LLMChain can be activated to generate the HTML text based on text in text_area then updating the st.session_state.html string for component demonstration in iFrame.
def generate():

    requirement = st.session_state.req
    if requirement != '':
        st.session_state.html = webapp_chain.run(requirement)
        print(st.session_state.html)
3. Conclusion
This is a very basic demo application to show you how to start your AI application development by using Langchain and Streamlit. With further development, they can be harnessed to create more robust and powerful applications suitable for commercial projects or personal assistants.
That’s it.
Hope you can find something useful in this article and thank you for reading!
Enjoyed this article? Sign up for our newsletter to receive regular insights and stay connected.