In an era where efficiency and quick access to information are paramount, imagine having a personal AI Assistant that understands and caters to your specific job role. Whether you’re in finance, marketing, or any other field, a custom-built AI Assistant can streamline your workload. This guide will show you, step by step, how to create a RAG-based ChatGPT backed assistant with a ChatGPT User Interface using VoiceFlow — a tool that simplifies the process, even if you’re not tech-savvy.
What is it?
Understanding AI Assistants An AI Assistant is a powerful tool that uses advanced algorithms like ChatGPT and RAG (Retrieval-Augmented Generation) to provide accurate and contextual responses. It’s like having a virtual colleague that assists with tasks, manages data, and provides information, all tailored to your specific professional needs. Think of ChatGPT but you can add your own custom business documents to the model.
The Ease of Building with VoiceFlow VoiceFlow is an intuitive platform designed for creating AI Assistants. Its key features are detailed on their Internal Operations Solutions and Platform Overview pages. VoiceFlow stands out for its user-friendly interface, allowing you to build a personalized assistant without coding skills.
Step 1
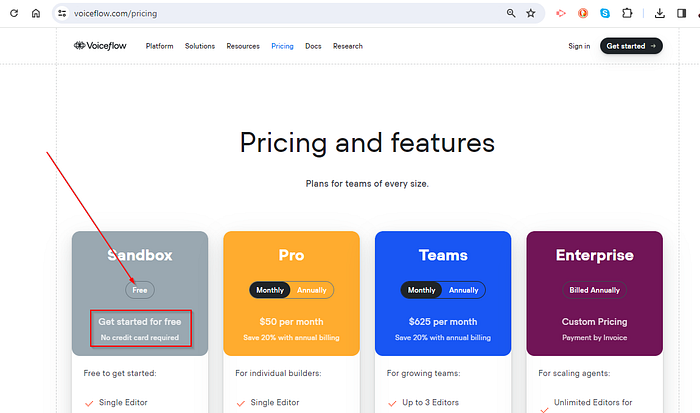
Getting Started with VoiceFlow Visit VoiceFlow’s Pricing Page to understand the free tier offered. Here’s the good news: no credit card is required to start, and you get a reasonable number of tokens and can create several AI Assistants. Note that access to ChatGPT-4 models is not included in the free tier.
Step 2
Creating Your VoiceFlow Account Signing up is the next step. Go to VoiceFlow’s Sandbox Signup Page and create your account. While you’ll automatically receive a “Pro” account for the first 14 days, this guide focuses on utilizing the free services.
Step 3
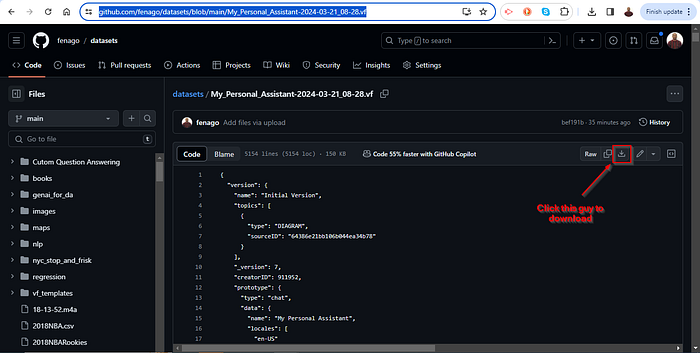
Downloading the VoiceFlow Template Your AI Assistant’s structure is just a download away. Grab the “My Personal Assistant” template from this GitHub Link. Remember where you save this file, as it’s the starting point of your AI journey.
Step 4
Importing Your Template into VoiceFlow With your account set and the template downloaded, log into VoiceFlow (go to your dashboard: https://creator.voiceflow.com/workspace/ ), and select ‘Import’ to bring in your template. Once uploaded, personalize it by clicking on the three dots and renaming your assistant.

Click on the three dots to rename your Assistant:

Finally, click on the Blue Designer Button that will take you to the Designer panel:

Step 5
Customizing in Designer View In VoiceFlow’s Designer View, select ‘Content’ and ‘Knowledge’ to upload documents relevant to your job. You can upload up to 50 documents, which will serve as the knowledge base for your assistant. Use the ‘Preview’ feature to converse with your documents, ensuring your assistant is well-informed.

Click the Preview Button and Talk to your documents. Pause and appreciate the value of this feature alone.

Step 6
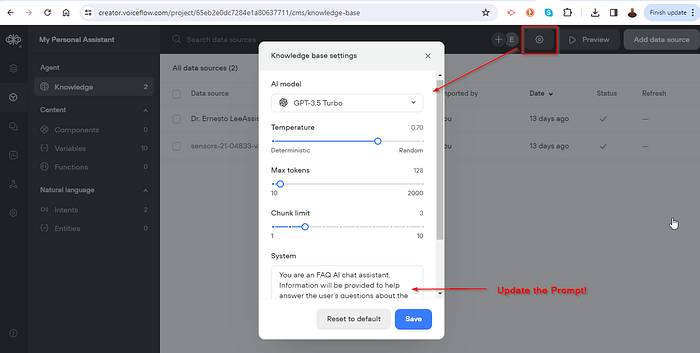
Setting Your System Prompt In the Knowledge View is crucial for defining how your assistant interacts in a way that’s consistent with your professional tone and requirements. The prompt is important. Follow this link for guidelines on how to architect a valid prompt: Original Post>
Step 7
Go back to the Designer View.
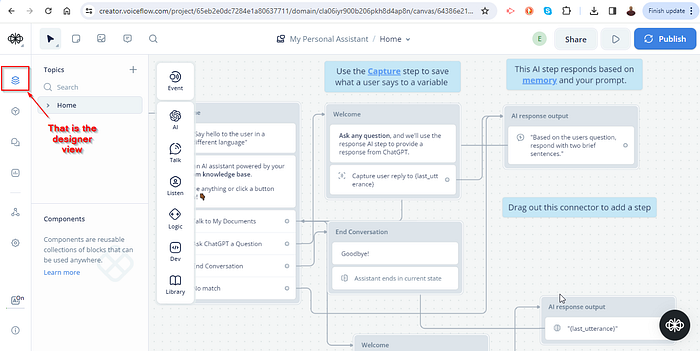
Training Your AI Assistant Now, hit the ‘Play’ button to train your model with the uploaded content. This process teaches your assistant how to respond accurately and relevantly to your professional queries.

Now Train:

Step 8
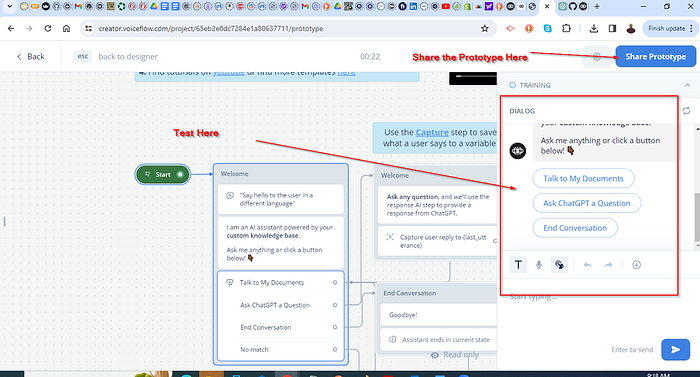
Testing and Sharing Your Assistant After training, it’s time to put your AI Assistant to the test. Run a test conversation and feel free to share the test link with colleagues for feedback.
- Function Test: Only printer printheads that have...
- Stable Performance: With stable printing...
- Durable ABS Material: Our printheads are made of...
- Easy Installation: No complicated assembly...
- Wide Compatibility: Our print head replacement is...
- PIN YOUR ADVENTURES: Turn your travels into wall...
- MADE FOR TRAVELERS: USA push pin travel map...
- DISPLAY AS WALL ART: Becoming a focal point of any...
- OUTSTANDING QUALITY: We guarantee the long-lasting...
- INCLUDED: Every sustainable US map with pins comes...
When you are finished Testing, click on the BACK button:

Step 9
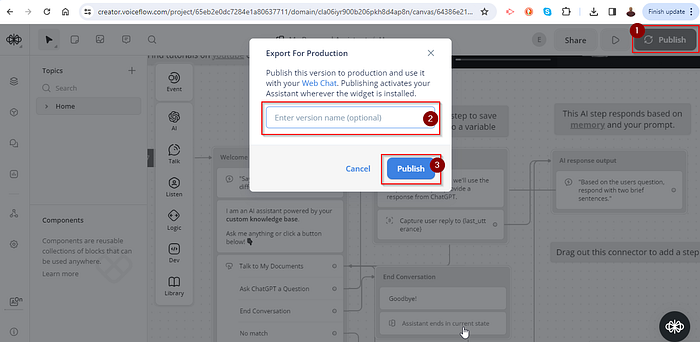
Publishing Your Assistant Once satisfied, click on ‘Publish’. VoiceFlow will provide you with a code. Copy this code into a text file and load it in a browser to bring your AI Assistant to life wherever you need it.
Copy this html and put it into any HTML file:

ADVANCED
Copy your project ID

- Open a new text file and name it MyAssistant.html.
- Copy this code into MyAssistant.html (and replace the Project ID)
<html>
  <!-- Add a div with the id 'flat-chat' -->
  <div id="flat-chat"></div>
<script type="text/javascript">
  (function(d, t) {
      var v = d.createElement(t), s = d.getElementsByTagName(t)[0];
      v.onload = function() {
        window.voiceflow.chat.load({
          verify: { projectID: 'REPLACE-ME' },
          url: 'https://general-runtime.voiceflow.com',
          versionID: 'production',
  render: {
  mode: 'embedded',
  target: document.getElementById('flat-chat'),
 },
 autostart: false
        });
      }
      v.src = "https://cdn.voiceflow.com/widget/bundle.mjs"; v.type = "text/javascript"; s.parentNode.insertBefore(v, s);
  })(document, 'script');
</script>
</html>
Save your file and then open it in a Web Browser and your interface will look like this:

Conclusion
In just 30 minutes, you’ve transformed the way you work by integrating a personalized AI Assistant into your daily routine. VoiceFlow’s user-friendly platform ensures that anyone, regardless of technical expertise, can enjoy the benefits of AI technology. Embrace this change and let your AI Assistant take your productivity to new heights!
Addendum
If you want to add this to a free website forever then follow these steps:
Now, head over to Google Sites to create your student portfolio site. Google Sites offers a user-friendly platform to design your website for free. Customize your site to reflect your personal brand — add your bio, achievements, projects, and any other relevant information.

Embedding Your AI Assistant
The unique feature of your site will be the embedded AI Assistant. To do this:
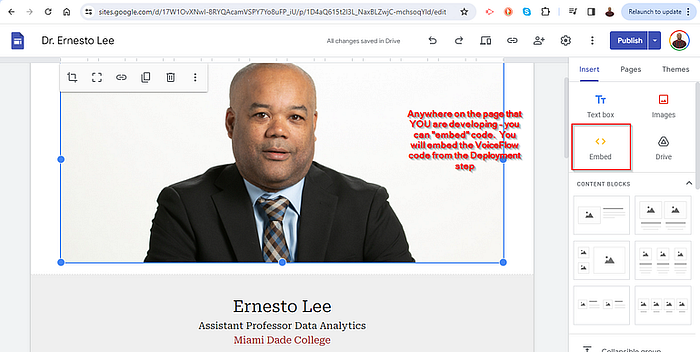
- In VoiceFlow, get the embed code for your AI project.
- On your Google Sites page, choose where you want to embed the AI.
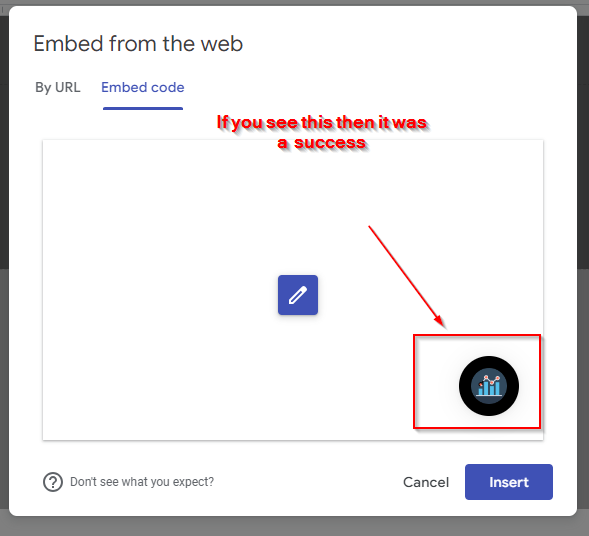
- Use the “Embed” option in the footer or any section of your choice.
- Paste the embed code, and voilà — your AI liquid resume is now part of your brand site!

- 100% official
- Very practical with multiple pockets
- Handle on pencil case for easy carrying
- Material: Polyester
- Dimensions: 26 x 14 x 8.5 cm
- FUNNY COIN&BAG: You will get a coin and jewelry...
- NOVELTY DESIGN: Perfect copy the original coins,...
- LUCKY POUCH: The feel of the flannelette bag is...
- SIZE: Fine quality and beautiful packing. Coin...
- PERFECT GIFT: 1*Coin with Exquisite Jewelry Bag....
Finally, publish your site:

and view the published site:

Step 4: Adding a Custom Domain Name (Optional)
For a more professional touch, consider adding a custom domain name to your Google Site. Follow these steps:
- Go to your Google Sites’ Settings.
- Click Custom domains.
- Click Start setup and enter your domain.
- If prompted to verify ownership, follow the instructions provided.
- Click Next and follow the on-screen instructions to connect to your domain registrar.
- Once done, it may take up to 48 hours for the changes to take effect.
Remember, you can connect up to five custom domains to one site. For detailed instructions, visit Google’s support page.


![United States Travel Map Pin Board | USA Wall Map on Canvas (43 x 30) [office_product]](https://m.media-amazon.com/images/I/41O4V0OAqYL._SL160_.jpg)


