
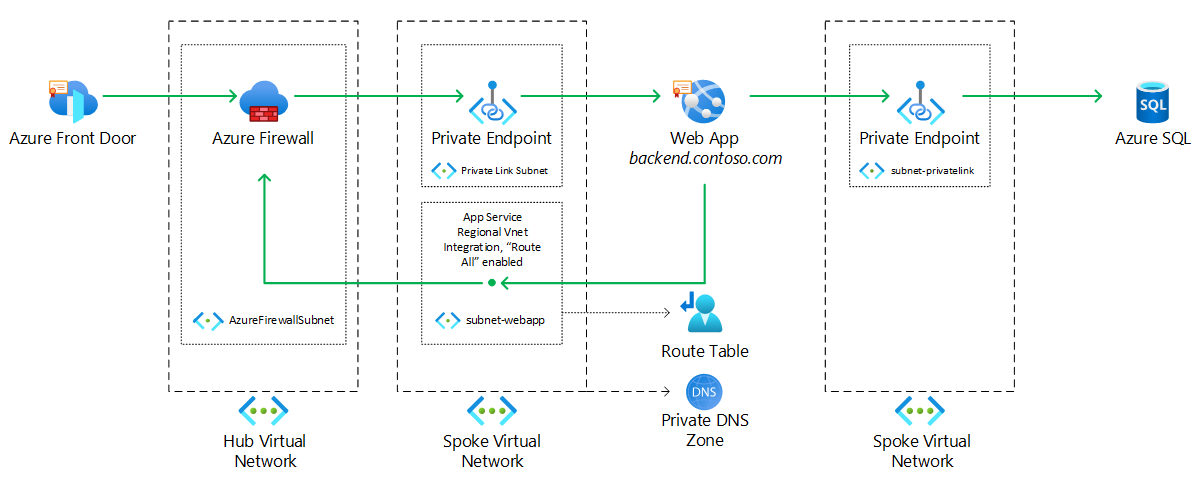
This article describes how to set up an Azure web app in a network environment that enforces strict policies for inbound and outbound network flows. In such cases, the web app can’t be directly exposed to the internet. Instead, all traffic needs to go through an Azure firewall or a third-party network virtual appliance.
The example shows a scenario in which a web app is protected with Azure Front Door and an Azure firewall. It connects with improved security to an Azure SQL database.
Potential use cases
These use cases have similar design patterns:
Architecture
Download a Visio file of this architecture.
- An Azure Front Door instance provides Azure Web Application Firewall features and terminates SSL connections from clients.
- A custom fully qualified domain name (FQDN) is chosen to represent the back-end web app and is mapped through CNAME or A DNS records to the public IP address of an Azure firewall or third-party network virtual appliance.
- A private endpoint for the web app is created in a virtual network subnet (subnet-privatelink in the example).
- The Azure firewall or third-party network virtual appliance is deployed in a virtual network (Hub Virtual Network in the example) and configured to perform destination NAT (DNAT) of incoming requests to the private IP address of the private endpoint associated with the web app.
- The wep app is assigned the custom FQDN through the domain verification ID property of the web app. This allows the custom FQDN already mapped to the public IP of the Azure firewall or third-party network virtual appliance to be reused with the web app without altering Domain Name System (DNS) name resolution and network flows.
- The web app connects to a virtual network subnet (subnet-webapp in the example) through regional VNet integration. The Route All flag is enabled, which forces all outbound traffic from the web app into the virtual network and allows the web app to inherit the virtual network’s DNS resolution configuration, including custom DNS servers and integration with private DNS zones used for private endpoint name resolution.
- A custom route table that’s attached to the web app subnet (subnet-webapp in the example) forces all outbound traffic that comes from the web app to go to the Azure firewall or third-party network virtual appliance.
- One or more private DNS zones link to the virtual network that contains the web app (Spoke Virtual Network in the example) to allow DNS resolution of PaaS resources deployed with private endpoints.
- A private endpoint for Azure SQL is created in a virtual network subnet (subnet-privatelink in the example). A corresponding DNS record is created on the matching private DNS zone.
- The web app can now be accessed only through Azure Front Door and Azure Firewall. It can also establish a connection to the Azure SQL instance through private endpoint, securing the communication over private IP only.
Components
Alternatives
- You can deploy the wep app to an internal App Service Environment to provide isolation from the public internet. This example uses a web app within App Service to reduce operating costs.
- You can replace Azure Front Door with an Azure application gateway if you also need to deploy the Web Application Firewall component of the solution behind a firewall or within a virtual network.
Considerations
The solution deploys an Azure Front Door instance, which terminates SSL connections from clients and provides a rich set of Web Application Firewall configurations. We recommend that you further lock down your applications to accept traffic coming only from your Azure Front Door instance. You can do this in several ways, depending on the network virtual appliance you’re using and your application configuration. Some options include:
- Configuring your Azure firewall or network virtual appliance to accept traffic only from the AzureFrontDoor.Backend Azure IP ranges.
- Configuring your network virtual appliance to integrate with Azure service tags.
- Configuring your application to accept traffic only from your Azure Front Door instance by validating request headers.
For more information, see How do I lock down the access to my backend to only Azure Front Door?.
The solution also uses an Azure SQL server that accepts traffic only through a private endpoint, locking down traffic that comes from external sources. The web app used in the solution is configured to ensure proper DNS resolution of private endpoints and allow secure communication with the SQL Server instance.
When you deploy resources that use private endpoints in your environments, it’s important to configure your DNS infrastructure properly. For more information, see Azure private endpoint DNS configuration.
Availability
Azure Front Door is a global service with built-in availability and redundancy and a high SLA.
Azure Firewall features built-in availability and a high SLA. You can deploy it to span multiple availability zones to increase the SLA. If you use a third-party or custom network virtual appliance, you can achieve the same SLA targets by configuring your deployment to use availability sets or availability zones.
Azure web apps support built-in availability. You can deploy them across multiple availability zones.
You can further increase the availability of the solution by spreading it across multiple Azure regions. You can accomplish this by deploying new instances of all components (except Azure Front Door) to other Azure regions and then configuring the original Azure Front Door instance with multiple back-end targets. If you use Azure SQL as your data store, you can then join multiple servers to an auto-failover group to enable transparent and coordinated failover of multiple databases.
See these reference architectures to learn about deploying highly available web applications in Azure and setting up multi-region SQL Server instances to work with private endpoints:
You can use Azure Monitor to monitor all components of this solution. You can use Monitor Log Analytics to monitor logs related to the web application firewall and network inspection rules of Azure Front Door and Azure Firewall. You can use Monitor Application Insights to monitor performance and availability and gain insights into your use of web applications.
Scalability
All components of the solution either provide transparent built-in scalability or expose a rich set of features, like Azure web app autoscale, for scaling the number of available instances.
Deploy this scenario
Prerequisites
- An Azure account. If you don’t have an Azure subscription, create a free account before you start.
- A publicly routable domain. Additionally, you must have permissions to create two DNS records in your public DNS zone.
- A valid SSL certificate to use for your web app.
Walkthrough
The solution is made up of several Bicep files that deploy the required infrastructure. You can download the files from GitHub.
The main.bicep file deploys the base infrastructure by using Bicep modules from these files:
network.bicepwebapp.bicepfirewall.bicepsql.bicepfrontdoor.biceproutetable.bicep
- Install Bicep and deploy
main.bicepby using either Azure PowerShell or Azure CLI. The Bicep file has preconfigured parameters for deploying all resources.For example, if you’re using Azure PowerShell:
New-AzResourceGroupDeployment -ResourceGroupName [resourceGroupName] -Name [frontDoorDeployment] -TemplateFile .\frontdoor.bicepYou’ll be asked to provide the
customBackendFqdnandsqladministratorLoginPasswordparameters upon deployment. - Copy and save the public IP address that’s assigned to the Azure firewall after deployment. You’ll need it in a later step. The IP is also provided as output of the deployment of
main.bicep.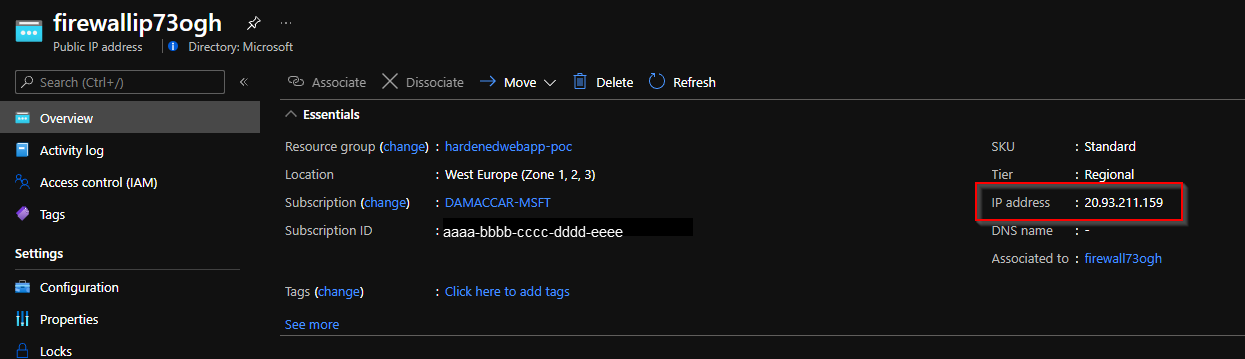
- Copy and save the custom domain verification ID of the web app that you just created. The custom domain verification ID is also provided as output of the deployment of
main.bicep. - Copy and save the name of the Azure SQL Server instance you just created. The FQDN of the server name is also provided as output of the deployment of
main.bicep.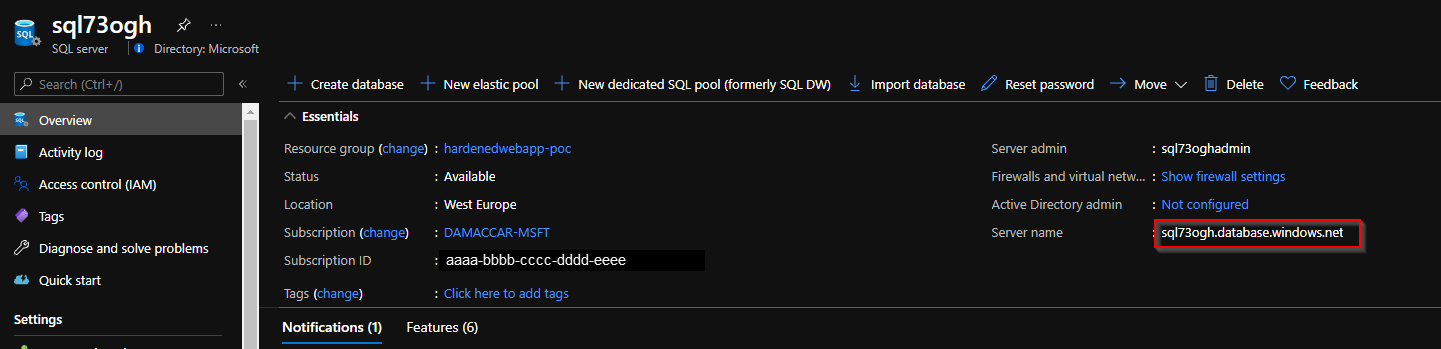
- Sign in to the website of your domain provider.
Note
Every domain provider has its own DNS records interface, so consult the provider’s documentation. Look for areas of the site labeled Domain Name, DNS, or Name Server Management.
You can often find the DNS records page by viewing your account information and then looking for a link such as My domains. Go to that page and look for a link that’s named something like Zone file, DNS records, or Advanced configuration.
- Create an A record with the public IP that you just obtained.
Here’s an example of a DNS records page after the A record is created:
- Create a TXT record with the custom domain verification ID of the web app you just deployed. Doing so allows you to reuse the custom FQDN record for which you just created an A record and add it to the web app in the following steps.
Create the TXT record in the format
asuid.<subdomain>. For example, if your custom FQDN isbackend.contoso.com, you’d create this record:asuid.backend.contoso.com TXT [DOMAIN VERIFICATION ID]For more information, see Tutorial: Map an existing custom DNS name to Azure App Service – Create the DNS records.
Here’s an example of a DNS records page after the TXT record is created:
- Map the custom domain to the web app that you just created. For more information, see Tutorial: Map an existing custom DNS name to Azure App Service – Get a domain verification ID.
- Upload an SSL certificate that matches your custom FQDN to your web app. For more information, see Tutorial: Secure a custom DNS name with a TLS/SSL binding in Azure App Service.
You should now be able to access your web app by using the public FQDN of the Azure Front Door instance.
Optional steps
If you want, you can also bind a custom FQDN domain to Azure Front Door and configure HTTPS for the custom domain.
- You can verify that connectivity from the web app to the Azure SQL Server instance is happening over a private channel by creating a virtual machine in the same virtual network that you used earlier in this procedure.
- Sign in to the virtual machine and go to
https://<web-app-name>.scm.azurewebsites.net. You access the Kudu diagnostic console from here. - Sign in. In the menu bar, select Debug console –> CMD.
- Enter the command
nameresolver <sql-name>.database.windows.net. Use the Azure SQL Server name you obtained in step 4 of this walkthrough.
You should see that the Azure SQL Server instance name is resolved with a private IP.
Here’s what DNS resolution of an Azure SQL Server instance looks like in the Kudu console:

- Sign in to the virtual machine and go to
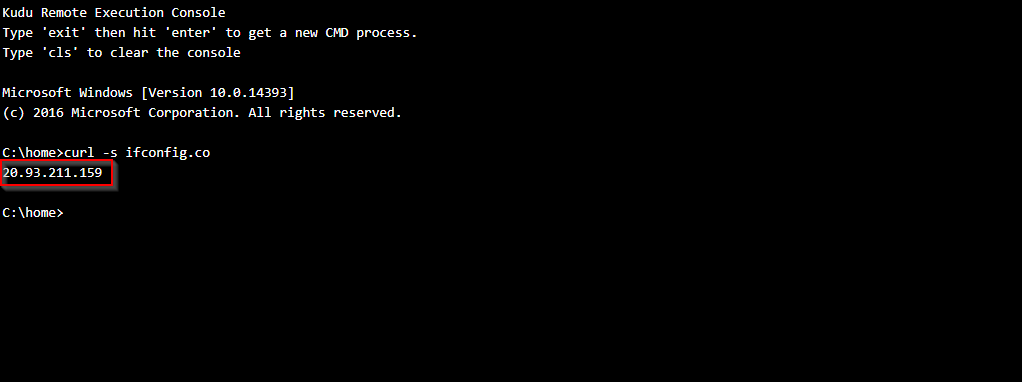
- You can also verify that outbound traffic from the web app goes through the Azure firewall. Enter this command in the Kudu console:
The output should match the public IP address of the Azure firewall that you obtained in step 2.
Here’s what it looks like in the Kudu console:
Pricing
The example scenario features a deployment within a hardened network environment. So an Azure firewall or third-party network virtual appliance most likely already exists in the target infrastructure.
The main consideration for the remaining infrastructure is the SKU of the App Service plan that hosts the web app. Private endpoints for web apps are available only in the Premium SKUs.
Use the Azure pricing calculator to estimate your costs. Here are two possible pricing estimates:
Next steps
Enjoyed this article? Sign up for our newsletter to receive regular insights and stay connected.