
https://aws.amazon.com/blogs/big-data/embed-amazon-quicksight-dashboards-in-salesforce/
Amazon QuickSight is a fast, cloud-powered, business intelligence (BI) service that makes it easy to deliver insights to everyone in your organization. With the QuickSight Enterprise edition, you can also embed the QuickSight dashboard into a webpage or your custom application.
Salesforce is an AWS Partner Network Advanced Technology Partner with the AWS DevOps Competency. If you’re using both Salesforce.com CRM and AWS, creating a single front end provides an enhanced experience for users who need to access information they need to take action on in Salesforce (such as updating opportunities, managing accounts and contacts, and logging activities) as well as large aggregated datasets from workloads running in AWS (such as prior purchase history, digital behavior data, and application usage). When using QuickSight within Salesforce, data doesn’t need to be replicated between AWS and Salesforce, which enables organizations to decouple data analytics and management roles from CRM user roles, while providing visibility across datasets.
Embedded QuickSight dashboards allow you to use the QuickSight serverless architecture and easily scale your insights with your growing user base, while ensuring you only pay for usage with the unique pay-per-session pricing model in QuickSight. Serverless architecture and pay-per-session pricing make it cost-effective for large-scale deployments. Quicksight Although data visibility is provided to users in your CRM, all data continues to reside in AWS and is secured using your existing policies. With QuickSight, applications can authenticate the dashboard users with any identity provider of choice (such as Active Directory, Amazon Cognito, or any SAML-based federated single sign-on provider that your organization uses) and act on behalf of the user to get access to QuickSight dashboard. When using QuickSight embedded analytics, you can allow temporary access to a dashboard with a single-use URL. In this solution, we use Salesforce’s named credential functionality to store credentials to generate a unique URL when a Salesforce user attempts to view the dashboard. This means that every user receives a secure, personalized dashboard while requiring no user-facing QuickSight-specific authentication. Dashboard embedding is available in QuickSight Enterprise edition in all supported Regions.
In this post, we demonstrate how we can embed a QuickSight dashboard within Salesforce to enable a unified customer experience.
Solution overview
This solution includes the following high-level steps, broken up into two main sections:
- Set up AWS:
- Create an AWS Identity and Access Management (IAM) user with QuickSight permissions to generate the embed URL.
- Create an IAM role for QuickSight via the AWS Command Line Interface (AWS CLI).
- Create a role-backed user in QuickSight via the AWS CLI.
- Retrieve the QuickSight dashboard URL.
- Test the URL.
- Approve the domain to allow embedded dashboards on a webpage.
- Set up Salesforce:
- Create named credentials to store your AWS user credentials.
- Create a controller for your Visualforce page.
- Create a Visualforce page.
- Embed the page on your Salesforce Layouts.
Prerequisites
Before getting started, make sure you complete the following prerequisites:
- Create a QuickSight dashboard.
- Share the dashboard with the IAM role-backed user or via QuickSight groups.
- Create a QuickSight user in any account (reader, author, or admin).
Credentials and user pricing
QuickSight offers Original Postricing/" target="_blank">user- or session-based consumption pricing. Because of this, you can perform just in-time provisioning of QuickSight users.
QuickSight billing charges are based on the number of users and sessions, and you only incur charges when dashboards are viewed. In this solution, we use multiple user entities to perform just-in-time provisioning of QuickSight users when a Salesforce user navigates to a page that features an embedded dashboard:
- AWS admin user – The initial user you sign in as to create all subsequent AWS and the IAM roles to create role-backed QuickSight users
- AWS API user – The credentials are created in IAM and have its API keys embedded in the Salesforce instance
- An IAM role – Used to create a role-backed user (in QuickSight) for all users created on behalf of the Salesforce.com application
- QuickSight users – Created each time a unique Salesforce.com user visits a QuickSight dashboard.
- Salesforce.com users – Users with logins to Salesforce.com that are visiting pages with embedded dashboards
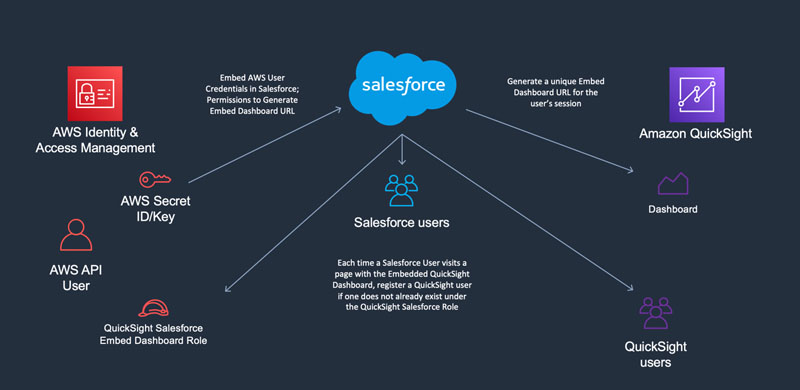
In this solution, Salesforce.com users don’t need to manage an additional set of credentials for QuickSight. A QuickSight user is automatically created for them, and their access is granted automatically through the embedded dashboard link that Salesforce retrieves from the QuickSight API.
Part 1: Set up AWS
To get started, we use the AWS admin user to configure the AWS API user, whose credentials we embed in the Salesforce instance where we intend to display the embedded dashboards. First, we set up the required permissions for the AWS API user to generate an embed URL and test the required steps in the AWS CLI before we perform the configuration in Salesforce.
Create an IAM user with QuickSight permissions
In this section, we create an IAM user with QuickSight permissions to generate the embed URL and perform just-in-time registration of the new Salesforce users. After we create a user for Salesforce to use programmatically when interacting with AWS services, we create an access key and make note of the ID and secret to use in a later step when setting up Salesforce.
Make sure the dashboard you want to embed is visible to all users in the account, or a specific group that you add your role-backed users to.

Copy the dashboard ID from the URL.

Add the following permissions required for generating a QuickSight embed URL and save the file to your local machine as policy.json
{
    "Version": "2012-10-17",
    "Statement": [
        {
            "Sid": "VisualEditor0",
            "Effect": "Allow",
            "Action": [
                "quicksight:GetDashboardEmbedUrl",
                "quicksight:RegisterUser",
                "quicksight:GetAuthCode"
            ],
            "Resource": "*"
        }
    ]
}
Create an IAM role for QuickSight
Next, we create an IAM role via the AWS CLI that we use to create role-backed users. This role doesn’t need permissions and isn’t assumed for this use case, but an assume role policy is required to create the role. See the following code:
echo '{"Version": "2012-10-17","Statement": [{"Effect": "Allow","Principal": {"AWS": "<your account ID>"},"Action": "sts:AssumeRole"}]}' > policy.json
aws iam create-role --role-name QuickSightEmbed --assume-role-policy-document file://policy.json
Create a role-backed User in QuickSight
QuickSight manages a separate table of users than IAM. Although you can invite IAM users in your AWS account to use QuickSight, for this post, we create individual credentials for each unique Salesforce user to access QuickSight dashboards. Any user you invite must have an email address.
A user must exist before you generate an embed URL. We use the sample code later in this post to have Salesforce automatically create a Quicksight user each time a Salesforce user visits a dashboard page. However, to validate the end-to-end flow before relying on an automated process, we need to manually create an IAM user to test that the process functions as expected.
For now, we create a QuickSight user via the following CLI command. Include the ARN and email address that you want to attach to your newly created user. Make sure this user has visibility or access to all the dashboards you wish to embed.
aws quicksight register-user --aws-account-id <ACCOUNT ID> --iam-arn "arn:aws:iam::1111111111:role/QuickSightEmbed" --user-role READER --session-name [email protected] --email [email protected] --identity-type IAM --namespace default Optionally, if you’re sharing dashboards to a specific group, you can run the following command to add your newly created user to a QuickSight group:
aws quicksight create-group-membership –member-name <insert-the-name-of-the-quicksight-user-you-previously-created> --group-name <insert-the-name-of-the-group> --aws-account-id <your-AWS-account-ID> --namespace defaultRetrieve the QuickSight dashboard URL
You can now run the get-dashboard-embed-url command to retrieve the QuickSight dashboard URL:
aws quicksight get-dashboard-embed-url \
--aws-account-id <your-aws-account-id> \
--dashboard-id <your-dashboard-id> \
--identity-type QUICKSIGHT
--user-arn arn:aws:quicksight:<your-aws-region>:<your-AWS-account-number>:user/default/QuickSightEmbed/[email protected]
Test using the URL
You can test the URL you generated in the previous step or host a front-end static page to initialize and load the dashboard. Documentation for the QuickSight Embedding SDK is available on the GitHub repo.
<!DOCTYPE html>
    <html>
    <head>
        <meta charset="UTF-8">
        <title>My Dashboard</title>
        <!-- Rehost the quicksight embedding library below on your web server -->
        <script type="text/javascript" src="https://unpkg.com/[email protected]/dist/quicksight-embedding-js-sdk.min.js"></script>
        <script type="text/javascript">
            function embedDashboard() {
                var containerDiv = document.getElementById("dashboardContainer");
                var params = {
                    url: "EMBED URL HERE FROM PREVIOUS STEP",
                    container: containerDiv,
                    parameters: {
                    //Include any parameters required for pre-filtering the dashboard
                    },
                    height: "700px",
                    width: "1000px"
                };
                var dashboard = QuickSightEmbedding.embedDashboard(params);
                dashboard.on('error', function(err) {console.log('dashboard error:', err)});
                dashboard.on('load', function() {});
            }
        </script>
    </head>
    <body onload="embedDashboard()">
        <div id="dashboardContainer"></div>
    </body>
    </html>
Approve the domain to allow embedded dashboards on a webpage
Salesforce may have several domains that you must approve in QuickSight so they allow embedded dashboards. Alternatively, you can find the domains relevant to your use case by navigating to your desired page and copying the URL. To allow your domain to use embedded dashboards on its websites, complete the following steps:
- On the QuickSight dashboard, on the user drop-down menu, choose Manage QuickSight.
- Choose Domains and Embedding.
- For Domain, enter your domain.
- Choose Add.

Part 2: Set up Salesforce
Now that we have validated the steps to generate and embed a QuickSight dashboard function, we configure the process to run in Salesforce when a user visits a page where the QuickSight dashboard has been embedded.
Create named credentials to store your AWS user credentials
Named credentials is a function of Salesforce.com and isn’t supported by AWS. Salesforce.com has developed functionality to store credentials and format callouts to the AWS API using the AWS Signature v4 signing process.
To create your named credentials, complete the following steps:
- Select AWS Signature Version 4 as the Authentication Protocol under Identity Type = Named Principal.
- Enter the AWS key ID and secret for the user you created earlier.
- Enter the appropriate Region and service name.
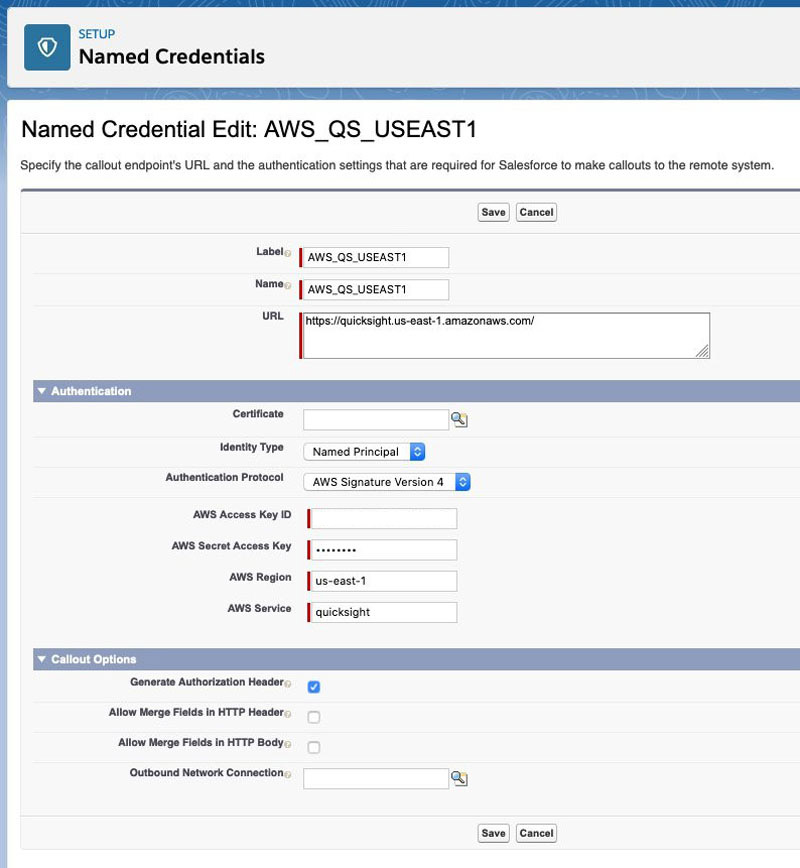
For more information about the endpoint you’re integrating with, see AWS service endpoints.
- Take note of the name of your named credential; you reference it in the code in your
apexclass in a later step.
Create a controller for your Visualforce page
In your Salesforce instance, navigate to Apex Classes in the Setup menu and create a new class.
In your class, invoke the Amazon QuickSight API, calling the RegisterUser and GetEmbedDashboardUrl action.

You can use the following sample code to generate the embed URL. Replace the parameters in the endpoint URL to include the correct parameters from your QuickSight instance (Salesforce named credential name, AWS account ID, QuickSight dashboard ID, and QuickSight user ARN).
public class AC_QS_getEmbedUrl{
        public String embedUrl {get; set;}
        public String userArn {get; set;}
        public final Contact contact;
        public AC_QS_getEmbedUrl(ApexPages.StandardController stdController) {
            contact = (Contact)stdController.getRecord();
            callout();
        }

        private void callout(){
            //First, we will get the active Salesforce user's email address in order to create a QuickSight user for each unique Salesforce User that will be viewing the dashboard. This provisioning will be done just in time, and will only create one Quicksight user for each unique Salesforce User ID.

            String userName = UserInfo.getUserName();
            User activeUser = [Select Email From User where Username = : userName limit 1];
            String userEmail = activeUser.Email;


            HttpRequest registerUser = new HttpRequest();
            String registerRequestBody = '{"IamArn" : "arn:aws:iam::<your-aws-account-id>:role/<your-quicksight-role> ","UserRole": "READER","SessionName" : "'+UserInfo.getUserId()+'","Email" : "'+userEmail+'","IdentityType" : "IAM"}';
            registerUser.setEndpoint('callout:<your-named-credential-name e.g., AWS_QS_USEAST1>/accounts/<your-aws-account-id>/namespaces/default/users');
            registerUser.setMethod('POST');
            registerUser.setHeader('Content-Type', 'application/json;charset=UTF-8');
            registerUser.setbody(registerRequestBody);
            Http http = new Http();
            HTTPResponse registrationResult = http.send(registerUser);
            AC_QS_getEmbedUrl regResponseData = (AC_QS_getEmbedUrl) System.JSON.deserialize(registrationResult.getBody(), AC_QS_getEmbedUrl.class);
            if(registrationResult.getStatus() == 'Conflict' || registrationResult.getStatus() == 'Created' ){
                //In either case, if the Quicksight user already exists, or needs to be created, we will proceed to generate the dashboard for that user.
                userArn = 'arn:aws:quicksight:<your-aws-region>: <your-aws-account-id>/:user/default/<your-quicksight-role-name> /'+UserInfo.getUserId();
                HttpRequest getEmbed = new HttpRequest();         getEmbed.setEndpoint('callout: :<your-named-credential-name e.g., AWS_QS_USEAST1>/accounts/<your-aws-account-id>/dashboards/<your-quicksight-dashboard-id>/embed-url?creds-type=QUICKSIGHT&user-arn='+EncodingUtil.urlEncode(userArn, 'UTF-8'));
                getEmbed.setMethod('GET');
                System.debug(getEmbed.getBody());
                HTTPResponse res = http.send(getEmbed);
                System.debug(res.getStatusCode());
                System.debug(res.getBody());

                AC_QS_getEmbedUrl embedResponseData  = (AC_QS_getEmbedUrl) System.JSON.deserialize(res.getbody(), AC_QS_getEmbedUrl.class);
                if(embedResponseData != null && embedResponseData.EmbedUrl != null){
                    embedUrl = (embedResponseData.EmbedUrl);
               }
            }
        }
    }
Create a Visualforce page
You now create a Visualforce page with the EmbedDashboardURL class as the page controller.
- In your Salesforce instance, navigate to Visualforce Pages and create a new page.
- Reference the controller you created earlier. This calls the QuickSight API server side before loading the Visualforce page.
- On the client side, the included QuickSight embedding JavaScript file initializes and injects the QuickSight dashboard that was generated by the page controller.
If desired, you can update the params variable in the embedDashboard function to resize the dashboard based on the size of the Salesforce page, pass filter parameters, hide or show the navigation buttons, perform event-triggered actions, or allow printing of the dashboard. For more information about the supported parameters, Amazon QuickSight Embedded Analytics.

The following sample code initiates the embedded dashboard on the front-end page:
<apex:page standardController="Contact" extensions="AC_QS_getEmbedUrl" showHeader="false" sidebar="false"> <h1>Quicksight Salesforce Embed Demo</h1><br/>
The current Contact: {!contact} <br/>
The "Id" URL Parameter: {!$CurrentPage.parameters.Id} <br/>
The QuickSightURL: <apex:outputText value="{!embedUrl}"/>
//Rehost the file below by uploading to Salesforce or another webserver before going live with this page.
<script src="https://unpkg.com/[email protected]/dist/quicksight-embedding-js-sdk.min.js"></script>
<script type="text/javascript">
function embedDashboard() {
var containerDiv = document.getElementById("dashboardContainer");
var params = {
url: "<apex:outputText value="{!embedUrl}"/>",
container: containerDiv,
parameters: {
ContactId: "{!contact}"
},
height: "700px",
width: "1000px" //Resize according to your page layout
};
var dashboard = QuickSightEmbedding.embedDashboard(params);
dashboard.on('error', function(err) {console.log('dashboard error:', err)});
dashboard.on('load', function() {});
}
</script>
<body>
<div id="dashboardContainer"></div>
</body>
<script type="text/javascript">
embedDashboard();
</script>
</apex:page>
Embed the page on your Salesforce Layouts
Depending on whether you’re using Salesforce Lightning Experience or Salesforce Classic, you take different steps to embed the page.
Classic
In Salesforce Classic, complete the following steps:
- In the navigation pane, choose Contacts, then Page Layouts.
- Locate your page in the Visualforce Pages section of the editor.
- Drag your component to your page.
The component only shows up on the Contact page layout due to the controller used on the Visualforce page. To enable this for other Salesforce objects, modify the Visualforce page code.

Lightning
If using Salesforce Lightning, follow Salesforce’s documentation for creating a lightning component. This post is not a comprehensive guide for creating a Lightning component in a production environment. For more information, see What Is the Lightning Component Framework? and Use Visualforce in Lightning Experience.
To quickly embed your Visualforce page in a Lightning component, complete the following steps:
- In Salesforce, launch the developer console.

- On the developer console, on the New menu, choose Lightning Component.

- Use the following example code replacing the URL with your Visualforce page URL:
<aura:component implements="force:appHostable,flexipage:availableForAllPageTypes,force:hasRecordId" access="global"> <iframe src="{! 'https://nicklo-aws-ce-dev-ed--c.visualforce.com/apex/AC_QS_EmbeddedPage?ContactId=' + v.recordId }" width="100%" height="500px;" frameBorder="0"/> </aura:component>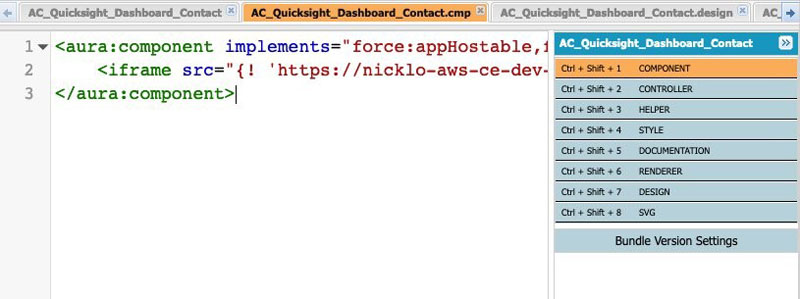
- In the Salesforce Lightning setup menu, choose Lightning App Builder and follow the instructions.
Your lightning component should be selectable as a component within a page layout.

Your final page should look like the following screenshot.

Summary
In this post, we demonstrated how to embed QuickSight dashboards in the Salesforce CRM platform. We began by creating the required IAM user for Salesforce to invoke the QuickSight API. On the Salesforce platform, we set up the named credentials that are later used on the Visualforce page. We then configured the Salesforce apex class to register a QuickSight user and registered the QuickSight user to generate the dashboard URL.
Our goal with this blog post is to demonstrate how Quicksight dashboards can be embedded into various platforms such as Salesforce. You can also embed Quicksight dashboards into your own applications, websites, and wikis without replicating any data between AWS and Salesforce. QuickSight is serverless and can automatically scale to tens of thousands of users without any infrastructure to manage or capacity to plan for. It is also the first BI service to offer pay-per-session pricing, where you only pay when your users access their dashboards or reports, making it cost-effective for large scale deployments.
We encourage you to explore this solution and customize it according to your use case. If you have any questions or suggestions, please leave a comment.
About the Authors
 Vijul Patel is a Partner Solutions Architect based in Toronto, Canada. He is passionate about helping partners and customers leverage AWS to accelerate their cloud migration journey.
 Nicholas Loek is a Partner Solutions Architect with AWS. In addition to helping AWS Partners leverage new services and design patterns, he is an enthusiast for experimenting and building new experiences in the areas of customer engagement, IoT, and serverless application architectures.
Enjoyed this article? Sign up for our newsletter to receive regular insights and stay connected.