Before you can create visuals and dashboards that convey useful information, you need to transform and prepare the underlying data. With AWS Glue DataBrew, you can now easily transform and prepare datasets from Amazon Simple Storage Service (Amazon S3), an Amazon Redshift data warehouse, Amazon Aurora, and other Amazon Relational Database Service (Amazon RDS) databases and upload them into Amazon S3 to visualize the transformed data in a dashboard using Amazon QuickSight or other business intelligence (BI) tools like Tableau.
DataBrew now also supports writing prepared data into Tableau Hyper format, allowing you to easily take prepared datasets from Amazon S3 and upload them into Tableau for further visualization and analysis. Hyper is Tableau’s in-memory data engine technology optimized for fast data ingest and analytical query processing on large or complex datasets.
In this post, we use DataBrew to extract data from Amazon Redshift, cleanse and transform data using DataBrew to Tableau Hyper format without any coding, and store it in Amazon S3.
Overview of solution
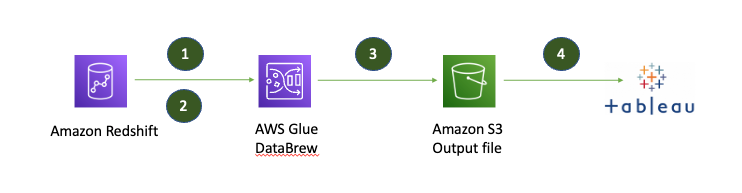
The following diagram illustrates the architecture of the solution.
The solution workflow includes the following steps:
- You create a JDBC connection for Amazon Redshift and a DataBrew project on the DataBrew console.
- DataBrew queries data from Amazon Redshift by creating a recipe and performing transformations.
- The DataBrew job writes the final output to an S3 bucket in Tableau Hyper format.
- You can now upload the file into Tableau for further visualization and analysis.
Prerequisites
For this walkthrough, you should have the following prerequisites:
- An AWS account
- An S3 bucket
- AWS Identity and Access Management (IAM) permissions for DataBrew (for more information, see Setting up IAM policies for DataBrew)
- An Amazon Redshift cluster
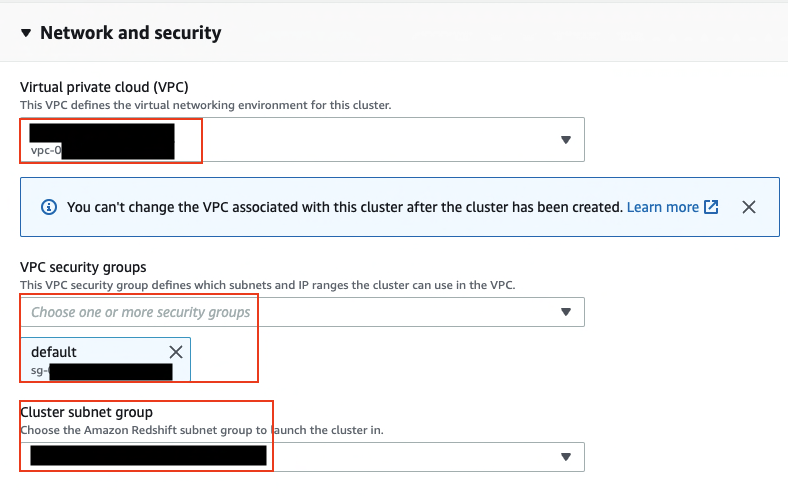
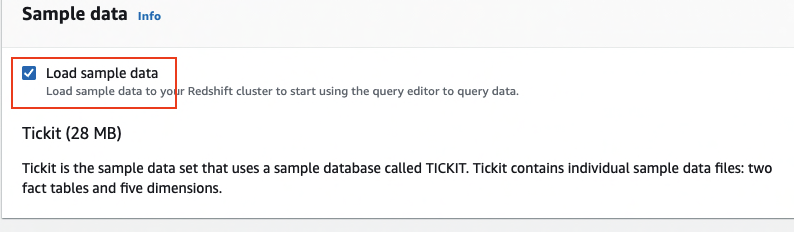
The following screenshots show the configuration for creating an Amazon Redshift cluster using the Amazon Redshift console with demo sales data. For more information about network security for the cluster, see Setting Up a VPC to Connect to JDBC Data Stores.

For this post, we use the sample data that comes with the Amazon Redshift cluster.
In this post, we only demonstrate how to transform your Amazon Redshift data to Hyper format; uploading the file for further analysis is out of scope.
Create an Amazon Redshift connection
In this step, you use the DataBrew console to create an Amazon Redshift connection.
- On the DataBrew console, choose Datasets.
- On the Connections tab, choose Create connection.
- For Connection name, enter a name (for example,
ticket-db-connection). - For Connection type, select Amazon Redshift.
- In the Connection access section, provide details like cluster name, database name, user name, and password.
- Choose Create connection.

Create your dataset
To create a new dataset, complete the following steps:
- On the DataBrew console, choose Datasets.
- On the Datasets tab, choose Connect new dataset.
- For Dataset name, enter
sales.

- For Connect to new dataset, select Amazon Redshift.
- Choose the connection you created (
AwsGlueDataBrew-tickit-sales-db-connection). - Select the public schema and sales table
- In the Additional configurations section, for Enter S3 destination, enter the S3 bucket you created as a prerequisite.
DataBrew uses this bucket to store the intermediate results.
- Choose Create dataset.

If your query is taking too much time, then add
LIMITclause in your Select statement.
Create a project using the dataset
To create a new project, complete the following steps:
- On the DataBrew console, choose Projects and choose Create project.
- For Project name, enter
sales-project. - For Attached recipe, choose Create new recipe.
- For Recipe name, enter
sales-project-recipe.

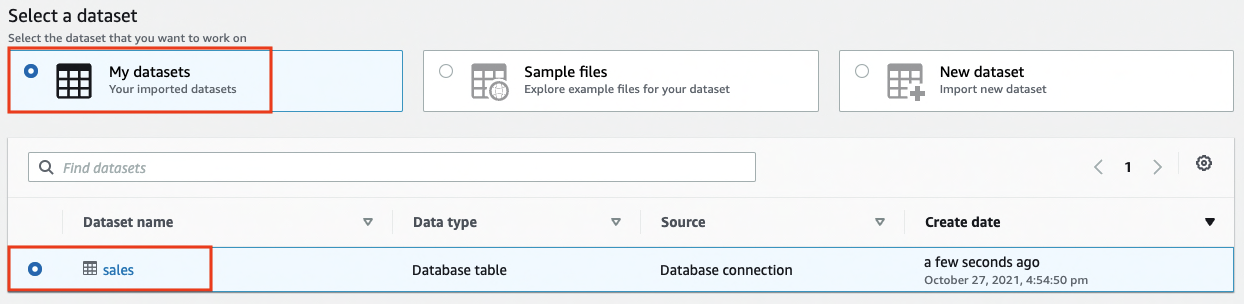
- For Select a dataset, select My datasets.
- Select the
salesdataset.
- Under Permissions, for Role name, choose an existing IAM role created during the prerequisites or create a new role.
- Choose Create project.

When the project is opened, a DataBrew interactive session is created. DataBrew retrieves sample data based on your sampling configuration selection.
When we connect a dataset to an Amazon Redshift cluster in your VPC, DataBrew provisions an elastic network interface in your VPC without a public IPV4 address. Because of this, you need to provision a NAT gateway in your VPC as well as an appropriate subnet route table configured for the subnets associated with the AWS Glue network interfaces. To use DataBrew with a VPC subnet without a NAT, you must have a gateway VPC endpoint to Amazon S3 and a VPC endpoint for the AWS Glue interface in your VPC. For more information, see Create a gateway endpoint and Interface VPC endpoints (AWS PrivateLink).
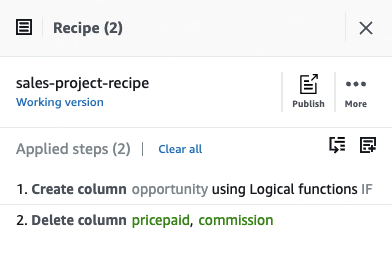
Build a transformation recipe
In this step, we perform some feature engineering techniques (transformations) to prepare our dataset and drop the unnecessary columns from our dataset that aren’t required for this exercise.
- On the DataBrew console, choose Column.
- Choose Delete.

- For Source columns, select the columns
pricepaidandcommissions. - Choose Apply.

Add a logical condition
With DataBrew, you can now use IF, AND, OR, and CASE logical conditions to create transformations based on functions. With this feature, you have the flexibility to use custom values or reference other columns within the expressions, and can create adaptable transformations for their specific use cases.
To add a logical condition to your transformation recipe, complete the following steps:
- On the DataBrew console, choose Conditions.
- Choose IF.

- For Matching conditions, select Match all conditions.
- For Source, choose the value
qtysold. - For Enter a value, select Enter a custom value and enter
2. - For Destination column, enter
opportunity. - Choose Apply.

The following screenshot shows the full recipe that we applied to our dataset.
Create the DataBrew job
Now that we have built the recipe, we can create and run the DataBrew recipe job.
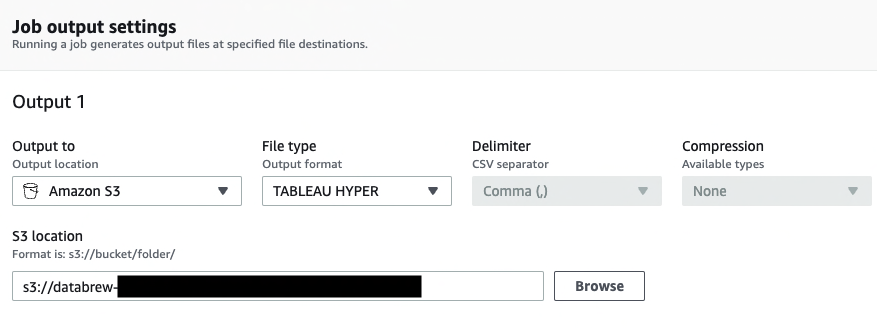
- On the project details page, choose Create job.
- For Job name, enter
sales-opportunities.

- We choose TABLEAU HYPER as the output format.
- For S3 location, enter the previously created S3 bucket.
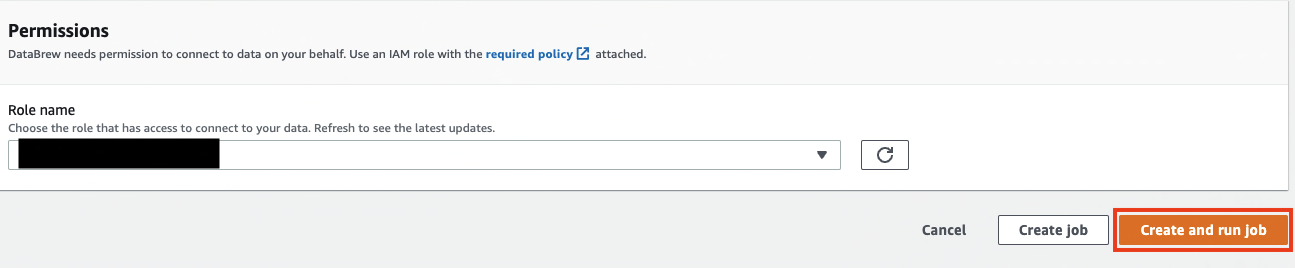
- For Role name, choose an existing role created during the prerequisites or create a new role.
- Choose Create and run job.
- Navigate to the Jobs page and wait for the
sales-opportunityjob to complete.
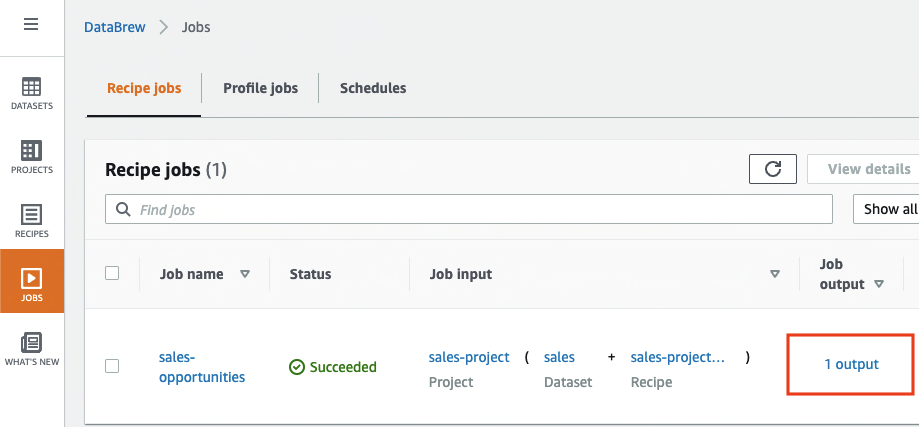
- Choose the output link to navigate to the Amazon S3 console to access the job output.

Clean up
To avoid incurring future charges, delete the resources you created:
- Amazon Redshift cluster
- Recipe job
- Job output stored in the S3 bucket
- IAM roles created as part of this exercise
- DataBrew project
sales-projectand its associated recipesales-project-recipe - DataBrew datasets
Conclusion
In this post, we showed you how to connect to an Amazon Redshift cluster and create a DataBrew dataset.
We saw how easy it is to get data from Amazon Redshift into DataBrew and apply transformations without any coding. We then ran a recipe job to convert this dataset to Tableau Hyper format file and store it in Amazon S3 for visualization using Tableau. Learn more about all the products and service integrations that AWS Glue DataBrew supports.
About the Authors
Nipun Chagari is a Senior Solutions Architect at AWS, where he helps customers build highly available, scalable, and resilient applications on the AWS Cloud. He is currently focused on helping customers leverage serverless technology to meet their business objectives.
Mohit Malik is a Senior Solutions Architect at
who specializes in compute, networking, and serverless technologies. He enjoys helping customers learn how to operate efficiently and effectively in the cloud. In his spare time, Mohit enjoys spending time with his family, reading books, and watching movies.
Enjoyed this article? Sign up for our newsletter to receive regular insights and stay connected.