
In software engineering, Continuous Integration (CI) and Continuous Delivery (CD) are two very important concepts. CI is when you integrate changes (new features, approved code commits, etc.) into your system reliably and continuously.
Source: Model training as a CI/CD system: Part I
CD is when you deploy these changes reliably and continuously. CI and CD both can be performed in isolation as well as they can be coupled.
A machine learning (ML) system is essentially a software system. So, to operate with such systems scalably we need CI/CD practices in place to facilitate rapid experimentation, integration, and deployment. Here are some scenarios:
- As an ML Engineer, you are likely to experiment with new model architectures to improve performance. How do you reliably integrate them into the system without breaking anything?
- Upon availability of new data, how do you automatically trigger new training runs so that your system can adapt to the recency of the data?
- How do you deploy the newly trained models to different environments such as staging, pre-production, and production?
Integrating a new model into the system is like adding a new feature. When operating at a large scale, the number of these new models can grow rapidly within a short period of time. This is why manual processes to deal with CI/CD are atypical. You can learn more about why having a resilient CI/CD system for your ML application is crucial for success from this excellent post.
In this two-part series blog post, we will present two different scenarios of CI/CD particularly from the perspectives of model training. In this first part, we will explore how to build a complete TFX project with prebuilt components, and how to run the pipeline on Vertex AI automatically in response to the changes of the codebase.
We will build on top of what we will learn in this post and extend that to automatically trigger runs based on different triggers. We will use Pub/Sub, Cloud Functions, and Cloud Scheduler along with TensorFlow Extended (TFX) and Vertex AI.
To comfortably understand this series of posts, we expect that you are already familiar with the basic MLOps terminologies, TFX, Vertex AI, and GitHub Actions.
Approach
In this section, we will introduce schematics of two workflows we want to develop so that we can develop a mental image of what’s to come.
In the first workflow, we want to do the following:
- Create a complete TFX pipeline project from TFX CLI.
- Modify some configurations to leverage Vertex AI, and set up a GitHub Action workflow to be triggered by detecting any changes in the tfx-pipeline directory which contains all the codebase for this project.
- When the GitHub Action gets executed, it will initiate a Cloud Build process.
- The initiated Cloud Build process clones the entire repository, builds a new docker image based on the changed codebase, pushes the docker image to the Google Container Registry(GCR), and submits the TFX pipeline to Vertex AI.
For managing the build process, we will use Cloud Build which is a serverless fully managed CI/CD system provided by Google Cloud Platform (GCP). Other alternatives include CircleCI, Jenkins, etc. We will also have the GitHub Action workflow monitor certain changes in the codebase so that it can initiate the above workflow automatically.
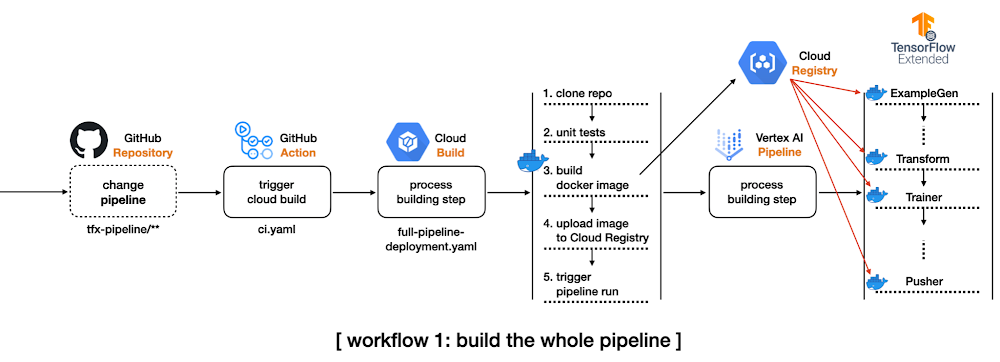
TFX pipeline consists of an array of components from ExampleGen to Pusher, and each component is run based on the same docker image. The first workflow shows how to build such docker images whenever the codebase changes. This is demonstrated in the main branch of this repository.
In the second workflow, we will shift gears slightly and incorporate the following changes:
- Separate the data preprocessing and modeling codes for TFX Transform and Trainer components respectively from the TFX pipeline project to an individual directory, modules. These modules will be stored in a GCS bucket as in the Cloud Build process.
- Modify the pipeline source code so that TFX Transform and Trainer components can refer to the modules in the GCS bucket. In this way, we don’t need to build a new docker image based on changes in the two modules.
- Set up another GitHub Action workflow to be triggered by detecting any changes in the modules directory.
- When the GitHub Action gets fired, it will initiate the other Cloud Build process.
- The initiated Cloud Build process clones the entire repository, copies the only files in the modules directory to the GCS bucket, and submits the TFX pipeline to Vertex AI.

The second workflow is demonstrated in the experiment-decoupling branch of this repository.
Implementation details
TFX based MLOps project consists of a number of components from ExampleGen for taking care of the input dataset to Pusher for storing or serving trained models for the production. It is non-trivial to understand how these components are interconnected and to see which configurations are available for each component.
In this section, we will show you how to use the TFX CLI tool that lets you start from a complete TFX based MLOps project template instead of building one from scratch by yourself.
Initial TFX project with TFX CLI
There are two template projects, taxi and penguin at the moment. We will use the taxi template for this post. The following TFX CLI shows how to generate a new TFX project based on the taxi template. You can specify which template to use in --model, the name of pipeline in --pipeline-name, and the path where to store the generated project in --destination-path.
After the CLI creates a template for us we can investigate its directory structure(Some minor files like caching, testing, __init__.py are omitted to save some space, but the most important files for understanding TFX pipeline are listed):
Giving full descriptions for each file and directory is out of scope of this post, but let’s quickly discuss the most important ones for the purpose of this post. kubeflow_v2_runner.py explicitly says that we want to run the pipeline on Kubeflow 2.x environment, and it has to be used to leverage Vertex AI as a backend orchestrator. The models directory provides a set of predefined modules for data preprocessing, modeling, and there are testing templates for each module as well. The pipeline.py defines how the TFX pipeline is constructed, and the configs.py is there for configuring all the parameters passed down to the TFX component.
If you want more details about the TFX CLI and what’s included in the template project, please refer to the official document of TFX CLI and the codelabs that we are working on.
Compile and build TFX project
There are two ways to run a TFX pipeline. The first option is to use the Python API directly from the source code. The method will be covered in the second blog post. In this blog post, we will explore the second option, using TFX CLI.
The tfx pipeline create command creates a new pipeline in the given orchestrator, and the underlying orchestrator can be selected via --engine. It is set to vertex since we want to run the pipeline in the Vertex AI platform, but you can choose other options such as kubeflow, local, airflow, and beam.
There are two more important flags, --pipeline-path and --build-image. The value for the first flag should be set to kubeflow_v2_runner.py provided by the template if your orchestrator is vertex or Kubeflow 2.x. If you plan to run the pipeline on Kubeflow 1.x or local environment, there are kubeflow_runner.py and local_runner.py as well.
The --build-image is an optional flag, and it has to be set when you want to build/update the custom TFX docker image. The image name can be modified via PIPELINE_IMAGE variable in pipeline/configs.py which manages all the configurations across the pipeline.
After the tfx pipeline create command, you can run the pipeline on Vertex AI platform with the other CLI command tfx run create. The value for the –pipeline_name should match to the pipeline name used in tfx template copy. You can change the name afterward via the PIPELINE_NAME variable in pipeline/configs.py, but you have to re-run the tfx pipeline create command in this case.
The base of the Vertex AI Platform is Kubeflow 2.x, but one of the main differences is that it is hosted in GCP as a serverless platform. That means we don’t have to manage the underlying GKE and Kubeflow infrastructure anymore. It is managed by Google entirely. Before Vertex AI, we needed to create and manage GKE clusters and install the Kubeflow platform on top of it ourselves.
The --project and --region flags clearly show how these changes are reflected. Without Vertex AI we had to set --endpoint where the Kubeflow is running, but we only let the TFX know where to run the pipeline without caring how.
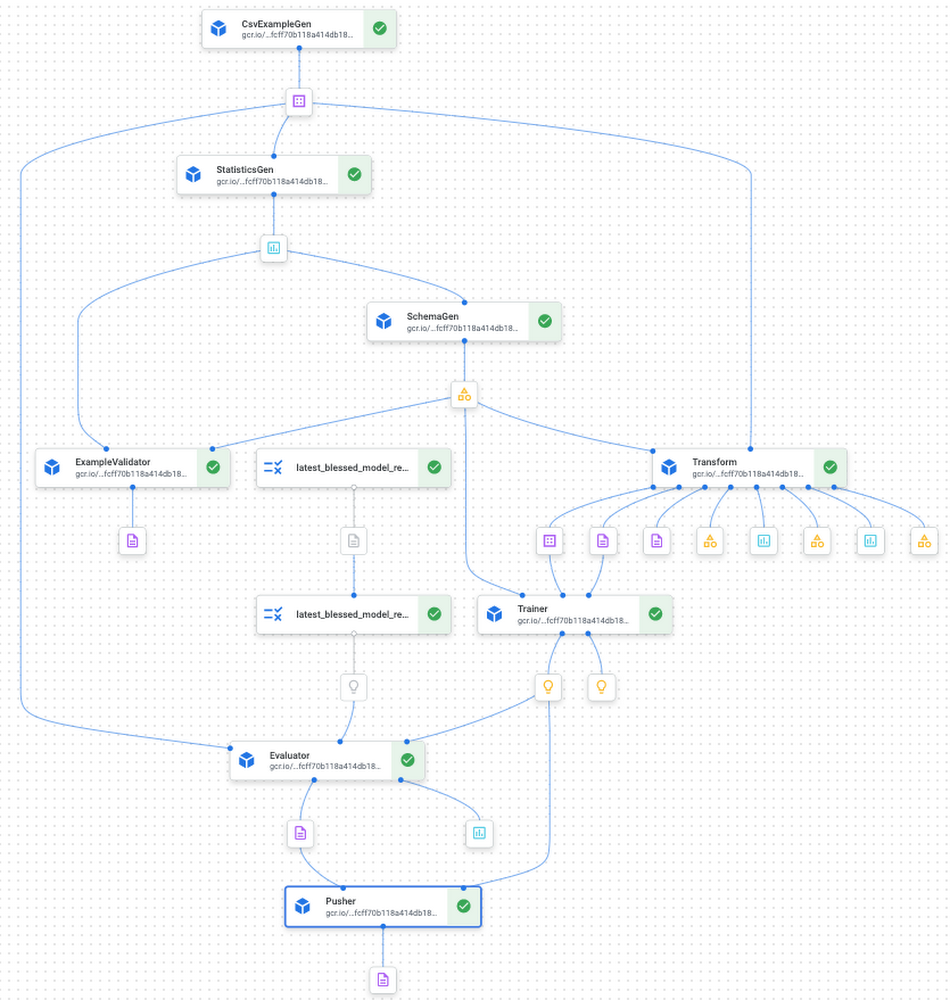
After the tfx run create command, if you visit the Vertex AI pipeline in the GCP console, you will see something similar to Figure 3. You can see that the template project provides a nice starting point with all the standard TFX components interconnected to deliver the MLOps pipeline without writing any code.
Setup GitHub Action and Cloud Build for the first workflow
The below YAML file defines a GitHub Action triggered by push event on the main branch:
The dorny/paths-filter GitHub Action lets us detect if there were any changes on a given path for the push. In this example, that path is specified as tfx-pipeline which means any changes of the code base defining the pipeline should set steps.tfx-pipeline-change.outputs.src to true.
If the steps.tfx-pipeline-change.outputs.src is true, the next step for submitting the Cloud Build can proceed. The Cloud Build specification is defined as below, and the environmental values beginning with $ symbol are injected via --substitutions.
It is somewhat hard to read at first, but if you read the Cloud Build spec carefully, you will notice that there are four steps, which are to clone the repository, run the unit tests based on the three *_test.py files under the models directory, run the tfx pipeline create command, and run the tfx run create command in sequential manner. The last two steps were described in the earlier section, Compile and build TFX project.
You might wonder why the docker image, 'gcr.io/gcp-ml-172005/cb-tfx' is used instead of the standard python image with the name: python instruction. The reason is the version of the Python provided by the standard python image is 3.9, and the latest TFX version only supports Python 3.8. Below is the Dockerfile to build cb-tfx docker file to enable the version of TFX above 1.0, kfp, and pytest which are required to run TFX CLI and unit tests.
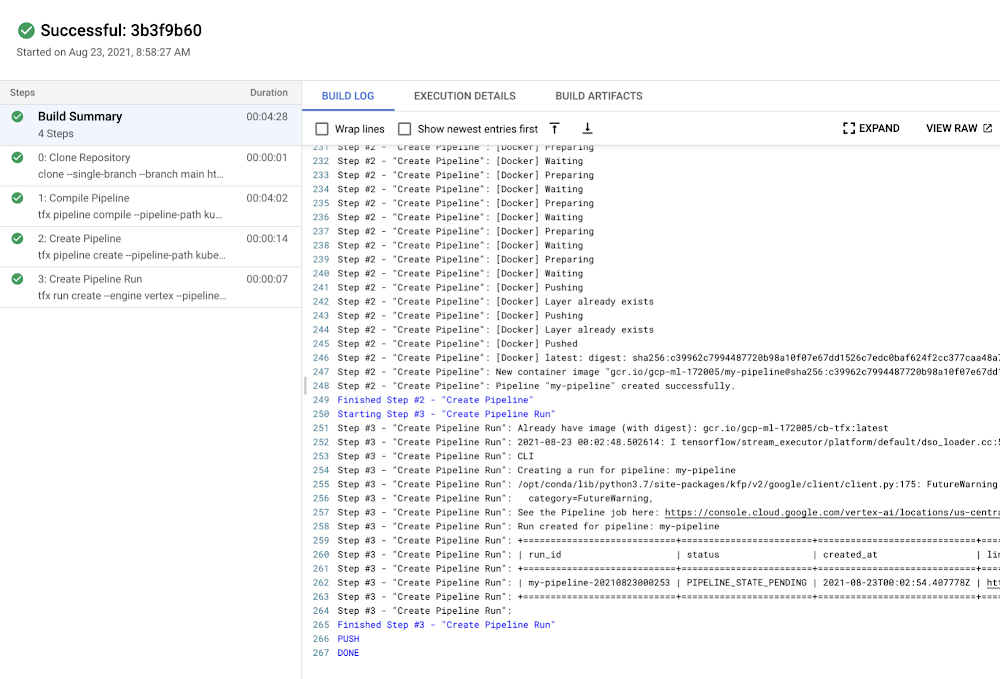
If you make any changes under the tfx-pipeline directory, you will see the Cloud Build process gets launched, and you can see the status from the Cloud Build dashboard in GCP console as in Figure 4.
We have built a whole CI/CD pipeline for MLOps projects with TFX. However, we can make an additional improvement. Since building a docker image every time could let the system spend more time and cost, avoiding this step is ideal whenever possible. Let’s see what we can do about this in the next section.
Decouple modules from the existing TFX project
In order to run the two standard TFX components, Transform and Trainer, we have to provide codes in separate files containing how to pre-process raw data and how to build and run the model. There are two options to do this.
The first option is to use run_fn and preprocessing_fn parameters for Trainer and Transform respectively, and the second option is to use module_file parameters for both components. The first option can be used when the files are included in the docker image, and we specify which function to trigger the action. For example, in the generated template project, run_fn is set as run_fn=models.run_fn. The second option also can be used when the files are included in the docker image as well, but the file should have a designated function name, run_fn and preprocessing_fn, and it will be recognized by the component.
However, one of the most important differences is that the files can be injected from the GCS bucket directly. In this case, we don’t have to include the files in the docker image but simply specify the GCS path to the modeul_file parameter.
In order to do that, we change the PREPROCESSING_FN and RUN_FN variables in configs.py like above. As you see we specify the GCS path where the files reside instead of the function name in the module.
Also, we have to include every function and variable in a single file since the GCS bucket is just a storage system that doesn’t know anything about the Python filesystem. Then we store the two files in separate directory modules.
One drawback of this way is that we have to pack everything inside a single file. For example, you can not have separate files for defining a model, training steps, signatures for serving, and so on. This harms some code management and readability, but you can avoid building a new docker image whenever these files are changed. So there is a trade-off.
Setup GitHub Action and Cloud Build for the second workflow
The original GitHub Action script should be modified to adapt this change like below. As you see, one more filter is defined on modules directory, and one more step to trigger the Cloud Build process when steps.change.outputs.modules is true is defined.
The original workflow to build a new docker image and launch the pipeline on Vertex AI When the pipeline itself gets modified is still handled. We added one more workflow that triggers the different Cloud Build process defined in separate file partial-pipeline-deployment.yamlif any changes are detected under the modules directory.
Below shows how partial-pipeline-deployment.yaml is defined:
We added one additional step in between Clone Repository andCreate Pipeline steps to copy files in modules directory to the designated GCS bucket. Also, as you might have noticed, the --build-image option flag in the tfx pipeline create command is removed since we don’t have to build a new docker image anymore.
Cost
Vertex AI Training is a separate service from Pipeline. We need to pay for the Vertex AI Pipeline individually, and it costs about $0.03 per pipeline run. The type of compute instance for each TFX component was e2-standard-4, and it costs about $0.134 per hour. Since the whole pipeline took less than an hour to be finished, we can estimate that the total cost was about $0.164 for a Vertex AI Pipeline run.
The cost of custom model training depends on the type of machine and the number of hours. Also, you have to consider that you pay for the server and the accelerator separately. For this project, we chose n1-standard-4machine type whose price is $0.19 per hour and NVIDIA_TESLA_K80 accelerator type whose price is $0.45 per hour. The training for each model was done in less than an hour, so it cost about $1.28 in total.
The cost of Cloud Build also depends on the type of machine and the number of hours to run. We have used the n1-highcpu-8 instance, and the job was done in an hour. In that case, the total cost for a Cloud Build run is about $0.016 per hour.
If we sum them up, the total cost for this project is approximately $1.46. Please refer to the official documents on the price: Vertex AI price reference, Original Postricing" target="_blank" rel="noreferrer noopener">Cloud Build price reference.
Conclusion
So far we have demonstrated three workflows. As the first step, we have shown how to use TFX CLI to create a complete TFX MLOps project, build a new docker image, and launch the pipeline on Vertex AI platform. In the second step, we have covered how to integrate GitHub Action and Cloud Build to build CI/CD systems to adapt to any changes in the codebase. Lastly, we have demonstrated how to decouple data preprocessing and modeling modules from the pipeline to avoid building a new docker image whenever possible.
This is good. But
- What if we wanted to maintain a schedule (which is usually dependent on the use-case) to trigger the pipeline runs on Vertex AI?
- What if we wanted a system such that during the experimentation phase whenever a new architecture is published as a Pub/Sub topic the same pipeline needs to be executed (but with different hyperparameters)?
Note that this is different from committing your code changes to GitHub and then triggering the execution from there. A developer might want to first experiment and commit the changes (model architecture, hyperparameters, etc.) that yielded the best results. In the second part of this blog post, we will tackle these scenarios and discuss relevant solutions.
Acknowledgements
We are grateful to the ML-GDE program that provided GCP credits for supporting our experiments. We sincerely thank Karl Weinmeister of Google for his help with the review.
Enjoyed this article? Sign up for our newsletter to receive regular insights and stay connected.