
Since 2020, Amazon Redshift has supported multi-factor authentication (MFA) to any SAML 2.0 compliant identity provider (IdP) in our JDBC and ODBC drivers. You can map the IdP user identity and group memberships in order to control authorization for database objects in Amazon Redshift. This simplifies administration by enabling you to manage user access in a central location, reducing the overhead of creating and maintaining users in the database in conjunction with the IdP.
Recently, we helped a customer who was building their data warehouse on Amazon Redshift and had the requirement of using
Azure Active Directory (Azure AD) as their corporate IdP with MFA. This post illustrates how to set up federation using Azure AD and AWS Identity and Access Management (IAM). Azure AD manages the users and provides federated access to Amazon Redshift using IAM.
Prerequisites
This post assumes that you have the following:
- An Azure AD account
- An Amazon Redshift cluster (for instructions, see Step 2: Create a sample Amazon Redshift cluster)
- Permissions for administering IAM identities and AWS Management Console access
- A database you want to permit access to (for this post, we use the default database
dev)
Solution overview
This post consists of the following three sections to implement the solution:
- Set up the Azure Enterprise non-gallery application using single sign-on (SSO) with SAML.
- Set up the IAM provider and roles, which includes the following steps:
- Create the SAML identity provider.
- Create an IAM role for access to the Amazon Redshift cluster.
- Create an IAM provider and an IAM role to use SAML-based federation.
- Test the SSO setup.
- Configure the JDBC client to use Azure AD user credentials using a browser to log in to the Amazon Redshift cluster. This post uses a JDBC client, but you can use the same setup to support ODBC clients.
Set up an Azure Enterprise application
To set up an Azure Enterprise application to control Amazon Redshift access, complete the following steps:
- Log in to Azure Portal and under Services, choose Enterprise applications.

- Choose New application.

- For Add an application, choose Non-gallery application.
- For Name¸ enter
Redshift. - Choose Add.

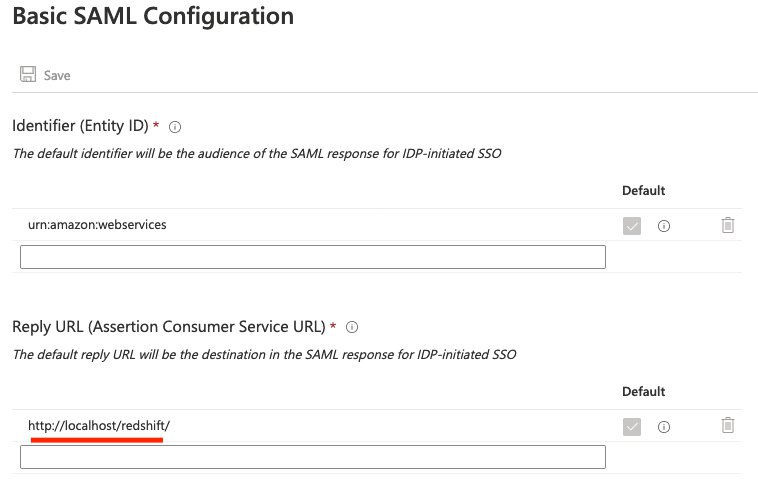
- For Identifier (Entity ID), enter a string (it’s not used in the flow by default).
- For ReplyURL, enter
http://localhost/redshift/.
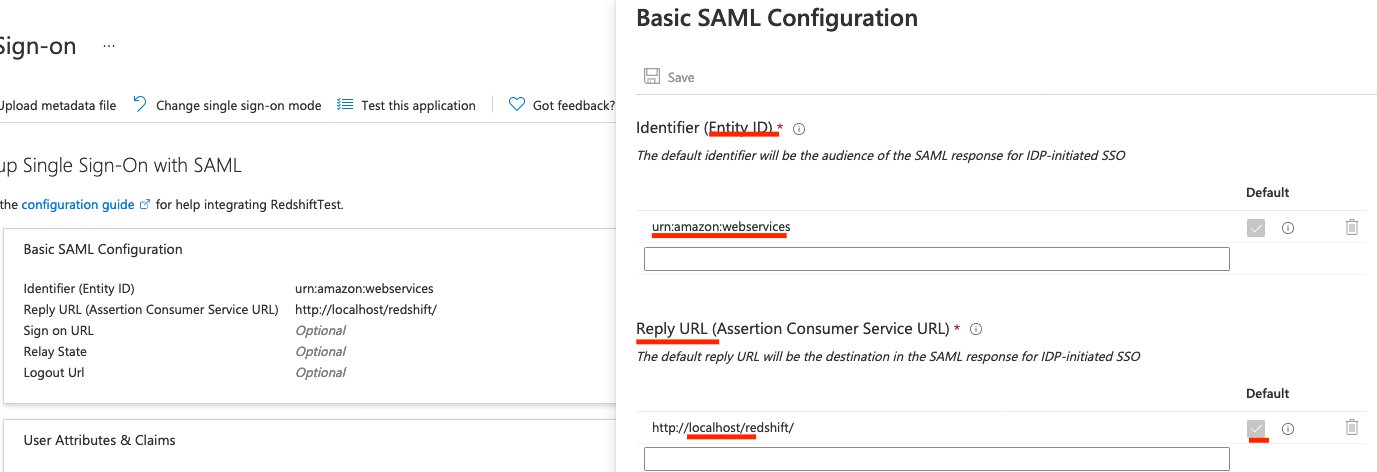
- Choose Add new claim.
- Configure your SAML claims as shown in the following table (for more information, see Configure SAML assertions for your IdP).
| Claim name | Value |
|---|---|
| Unique user identifier (name ID) | user.userprincipalname |
| https://aws.
amazon.com
/SAML/Attributes/Role |
arn:aws:iam::111122223333:role/AzureSSO,arn:aws:iam::111122223333:saml-provider/AzureADProvider |
| https://aws.amazon.com/SAML/Attributes/RoleSessionName | user.userprincipalname |
| https://redshift.amazon.com/SAML/Attributes/AutoCreate | "true" |
| https://redshift.amazon.com/SAML/Attributes/DbGroups | user.assignedroles |
| https://redshift.amazon.com/SAML/Attributes/DbUser | user.userprincipalname |

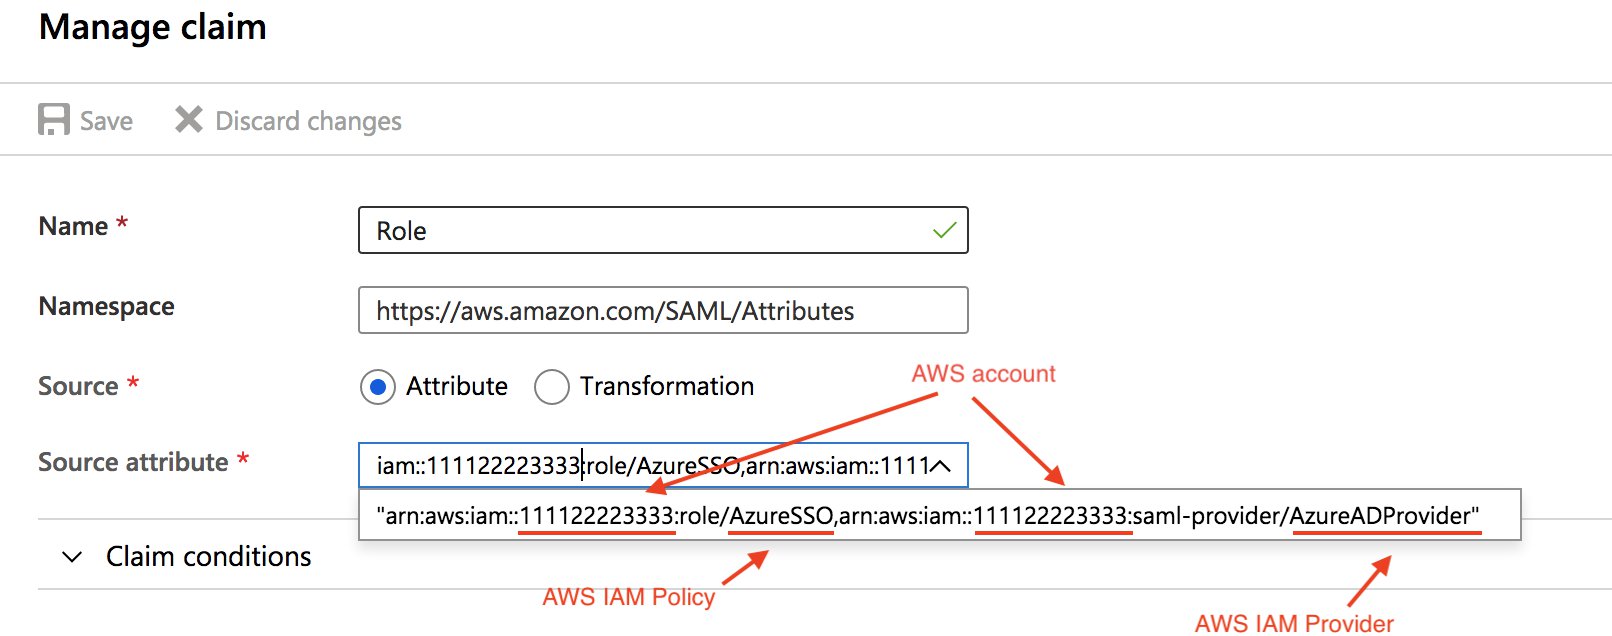
- In the Manage claim section, for Name, enter
Role. - For Source attribute, enter your source, which includes your AWS account ID, IAM policy, and IAM provider.
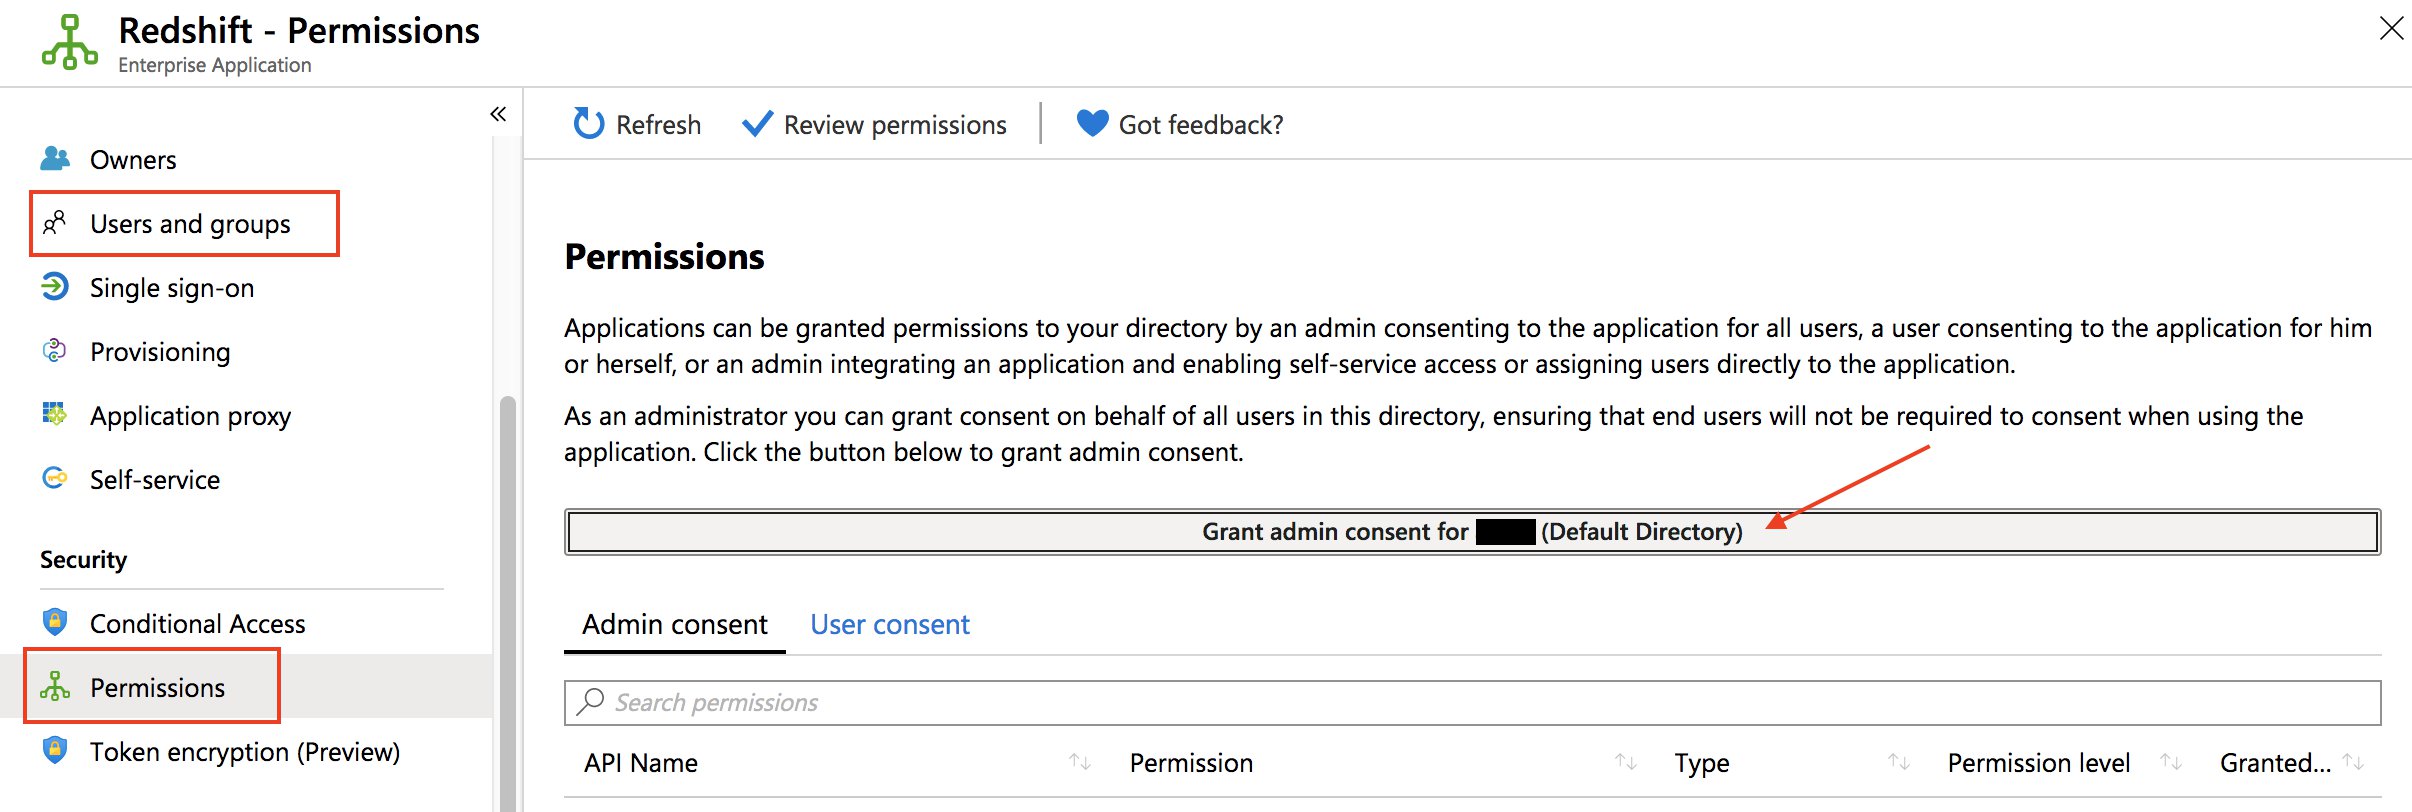
- On the Permissions page, add users or groups to your application (alternatively, grant universal admin consent for the entire organization).
- Download your federation metadata.
You need the metadata to configure the IAM IdP. Check your IdP for how to download this document, because every IdP handles this differently.
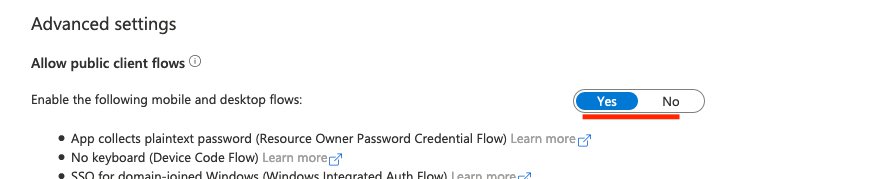
- On the App registration page, choose Authentication in the navigation pane.
- In the Mobile and desktop applications section, add
http://localhost/redshift/.

- For Enable the following mobile and desktop flows, choose Yes.
- On the Enterprise applications page, choose your application.
- In the Set up Single Sign-On with SAML section, choose Edit.

- Confirm the reply URL.
- On the Users and groups page, add the necessary role or group.

Set up IAM to allow Azure AD users to access Amazon Redshift
In this section, you configure IAM to allow Azure AD users to access Amazon Redshift resources and get temporary credentials.
- Sign in to the AWS Management Console as the admin account.
- On the IAM console, choose Identity providers in the navigation pane.
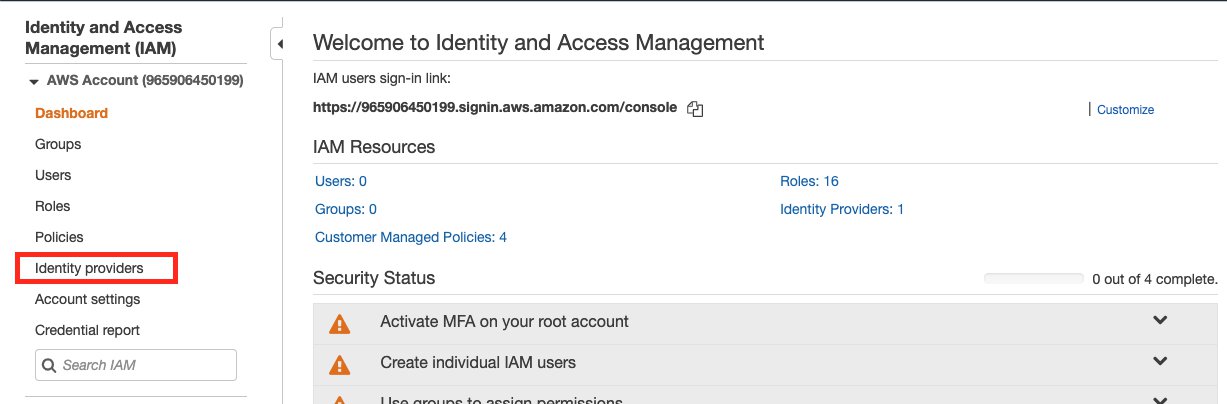
- Choose Create Provider.

- For Provider Type, choose SAML.
- For Provider name, enter a name for your provider.
- For Metadata Document, choose the file you downloaded or saved from your IdP.

- Choose Next Step.
- Choose Create.
Now you set up your policy. For detailed instructions, see Federate Database User Authentication Easily with IAM and Amazon Redshift.
- On the IAM console, choose Policies in the navigation pane.
- Choose Create policy.
You’re directed to the Create policy page, where you can choose the Visual editor tab for step-by-step policy creation or the JSON tab to edit the policy in one step.
- For this post, choose the JSON tab.

- In the text box, enter the following code:
{
    "Version": "2012-10-17",
    "Statement": [
        {
            "Effect": "Allow",
            "Action": "redshift:GetClusterCredentials",
            "Resource": [
                "arn:aws:redshift:us-west-1:your-account-number:dbname:cluster-identifier/dev",
                "arn:aws:redshift:us-west-1:your-account-number :dbuser:cluster-identifier/${redshift:DbUser}",
                "arn:aws:redshift:us-west-1:your-account-number :cluster:cluster-identifier"
            ],
            "Condition": {
                "StringEquals": {
                    "aws:userid": "unique role ID:${redshift:DbUser}@companyemail.com"
                }
            }
        },
        {
            "Effect": "Allow",
            "Action": "redshift:CreateClusterUser",
            "Resource": "arn:aws:redshift:us-west-1:your-account-number:dbuser:cluster-identifier/${redshift:DbUser}"
        },
        {
            "Effect": "Allow",
            "Action": "redshift:JoinGroup",
            "Resource": "arn:aws:redshift:us-west-1:your-account-number:dbgroup:cluster-identifier/db_group"
        },
        {
            "Effect": "Allow",
            "Action": [
                "redshift:DescribeClusters",
                "iam:ListRoles"
            ],
            "Resource": "*"
        }
    ]
}
In the preceding code, provide the following information:
- The Region of your cluster (for this post, we use
us-west-1). - The account number your cluster is on.
- The Amazon Redshift cluster you want to grant users permission to (you can also enter
*for all clusters under that account). - Your database name (for this post, we use
dev; you can also enter*to allow access to all databases). - The unique ID of the IAM role you created (you can get this by running
aws iam get-role --role-nameYour_Role_Name in the terminal). - Your tenant or company email.
- The database group you want to assign users to.
${redshift:DbUser}is replaced with whatever your IdP (Azure) specified for the SAMLDbUserfield for the user.
The first statement allows users to grab temporary credentials from the cluster if:
- It’s on the specified cluster, in the correct account, in the Region specified.
- The
dbnamethe user is trying to connect to isdev. - The user trying to connect matches the
DbUserspecified in Azure. - The user is under the role specified by the unique role ID with the IAM account under your company’s email.
This all depends on your setup with IdP (Azure) configuration. If your employee’s email is [email protected], you need to set ${redshift:DbUser} to the super field that matches to the employee’s username johndoe and set the AWS SAML RoleSessionName field to be the super field that matches the employee’s email [email protected] to make this condition work.
If you set ${redshift:DbUser} to be the employee’s email, remove the @companyemail.com in the example code to match the RoleSessionName.
If you set the RoleSessionId to be just the employee’s username, remove the @companyemail.com in the example code to match the RoleSessionName.
In the Azure setup instructions, ${redshift:DbUser} and RoleSessionName are both set to the employee’s email, so you should remove @companyemail.com in the preceding code if you’re following these instructions closely. This post creates the user’s database username under their email and signs them in to AWS under this email.
The second statement allows users to create a database username under the specified conditions. In the preceding code, it restricts creation to ${redshift:DbUser}.
The third statement specifies what groups the user can join.
The final statement specifies what actions the user can perform on the resources. In the preceding code, users can call DescribeClusters to get cluster information, and IAM ListRoles to check which roles the user can assume. “Resource: “*” applies the preceding actions to any Amazon Redshift cluster the user has access to.
- Choose Review policy.
- For Name¸ enter a name for your policy.
- For Description, enter an optional description.
- For Summary, review your policy components and make sure to resolve any warnings or errors.

- Choose Create policy.
Lastly, we create the IAM role.
- In the navigation pane, choose Roles.

- Choose Create role.

- For Select type of trusted entity, choose SAML 2.0 federation.
- For SAML provider, choose the provider you created (for this post,
AzureTest). - For Attribute, leave at the default (
SAML:aud). - For Value¸ enter
http://localhost/redshift/.

- Choose Next: Permissions.
- Under Attach permissions policies, search for and select the policy you created.
- Under Set permissions boundary¸ you can set advanced controls for user permissions (for this post, we don’t make any changes).

- Choose Next: Tags.
- Under Add tabs (optional), you can add key-value tags to better organize, track, or control access for this role. For this post, we don’t add any tags.
- Choose Next: Review.
- For Role name, enter a name for your role.
- For Role description, enter an optional description.
- For Trusted entities, verify the ARN of the provider you specified earlier is correct.
- For Permissions boundary, verify that the settings you specified earlier (if any) are correct.
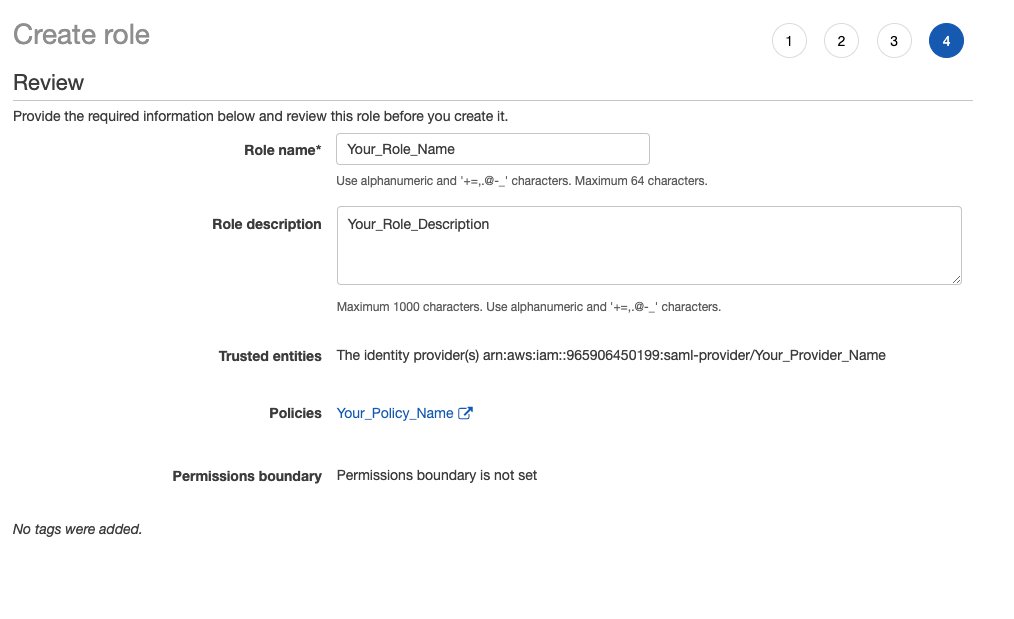
- Choose Create role.
If you haven’t already, you’re now ready to create the Amazon Redshift cluster for the Azure AD users to connect to.
Connect through JDBC and run queries
You can use any application that can take in a JDBC driver to connect using Azure SSO, or even use a language like Java to connect using a script. For this post, we use SQL Workbench/J, which is a common application to connect to JDBC and run queries.
- Install SQL Workbench/J if not already installed.
- Start SQL Workbench/J.
- On the Select Connection Profile page, choose the Add profile group icon.
Adding a folder is optional but helps keep things organized.
- Name your folder (for this post,
AzureAuth).

- Choose the New connection profile icon.
Creating a new profile in your profile group is optional but helps keep things organized.
- Name your profile (for this post,
Azure).

- Choose Manage Drivers.

- Choose Amazon Redshift.
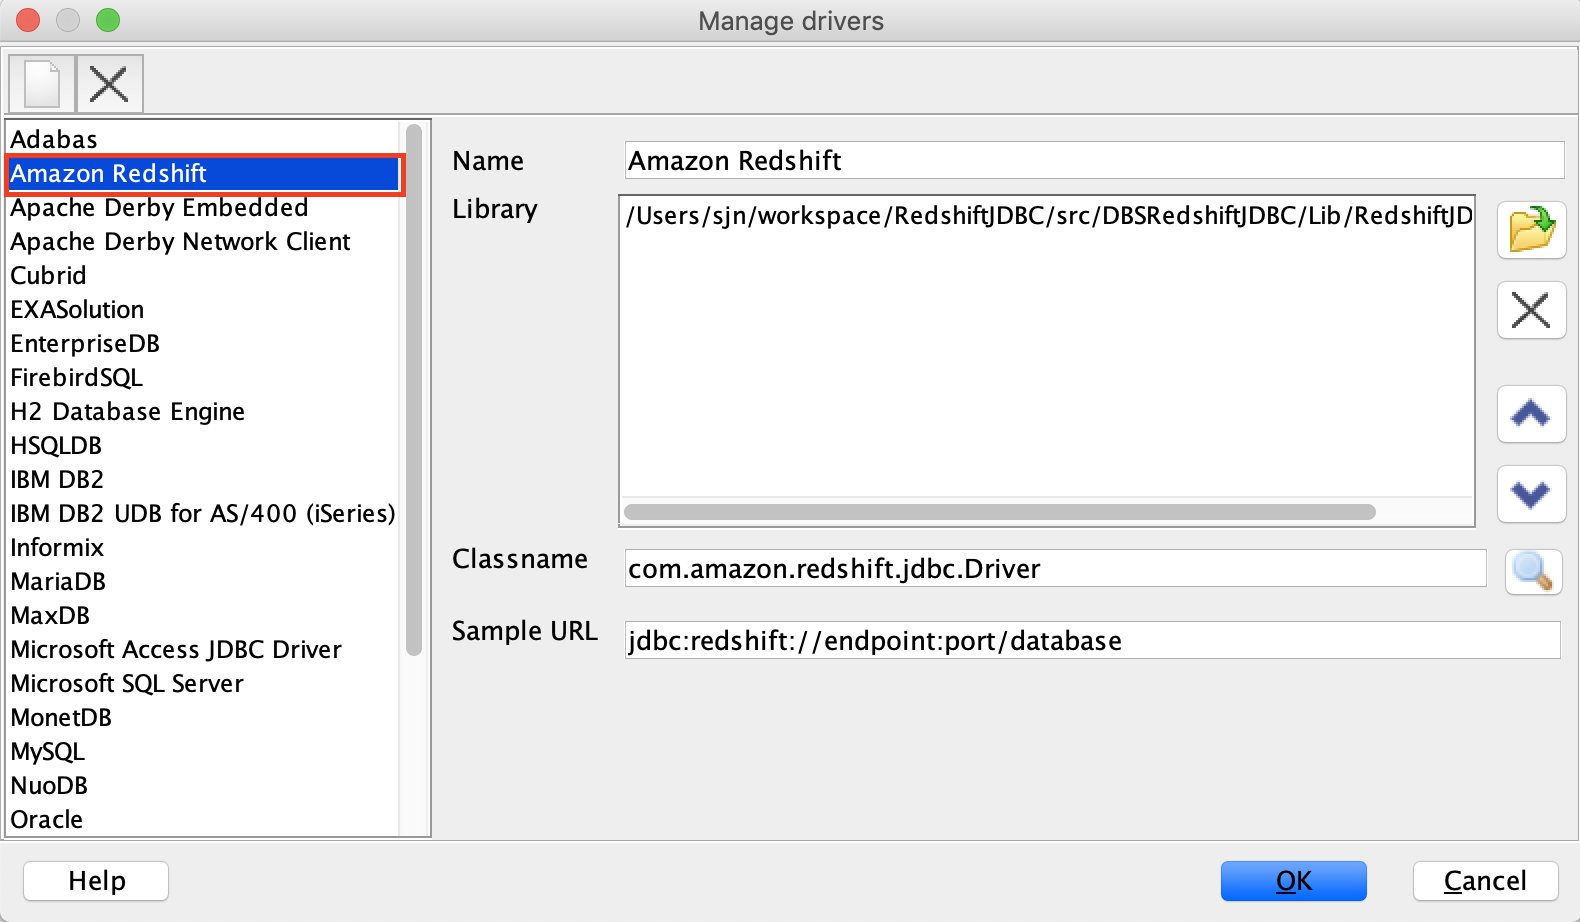
- Choose the Open folder icon.
- Choose the JDBC JAR file.
- Choose OK.

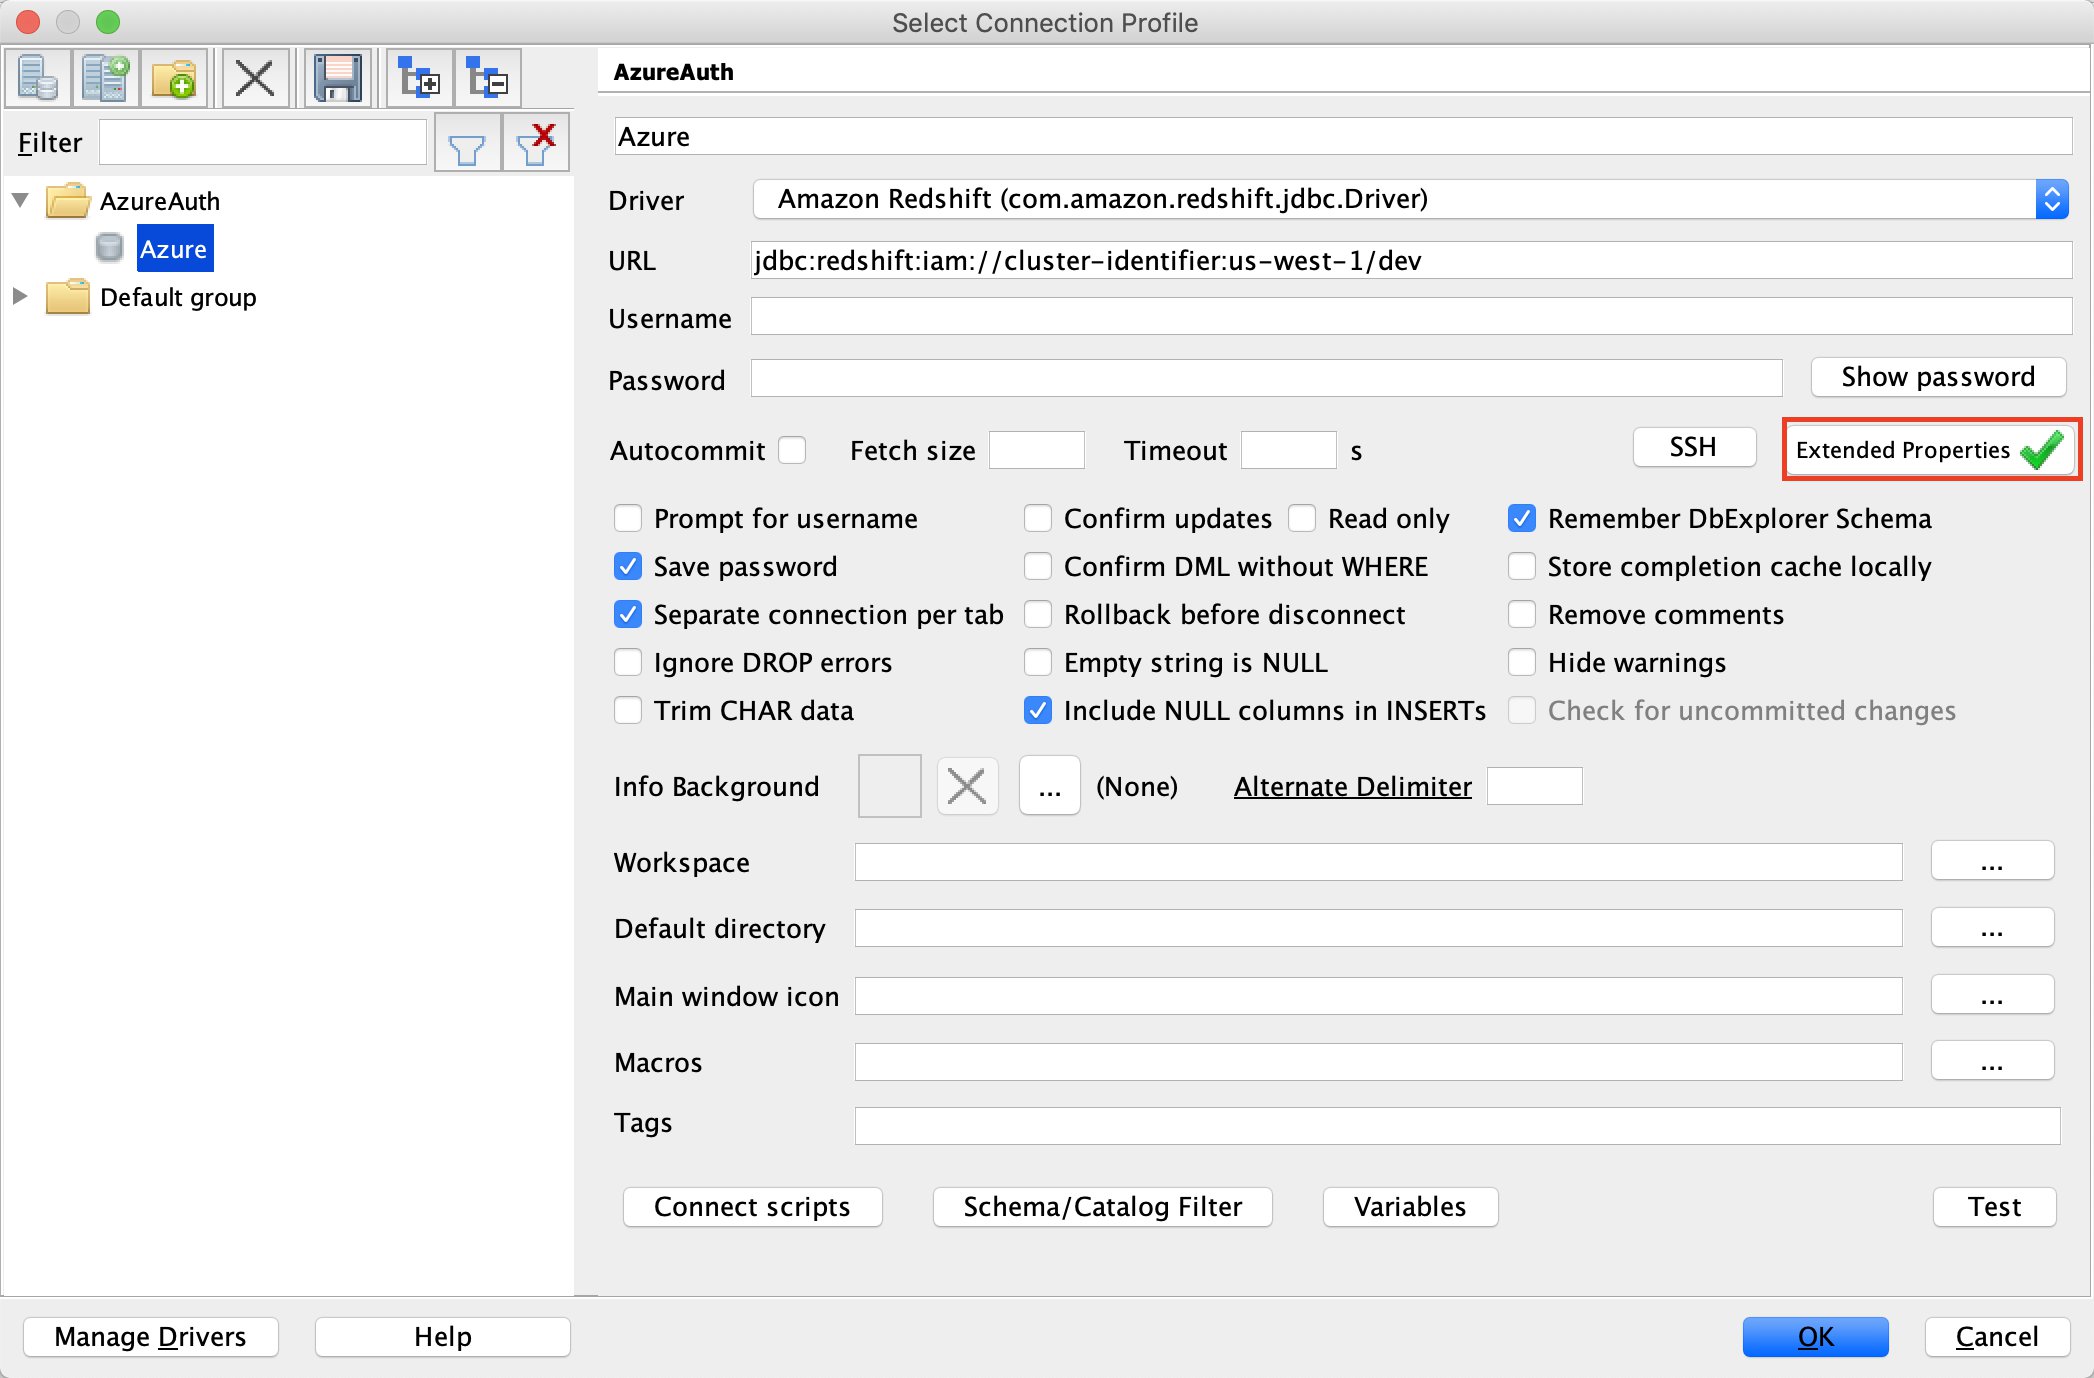
- On the Select Connection Profile page, for Driver, choose Amazon Redshift (com.amazon.redshift.jdbc.Driver).
- For URL, enter the IAM JDBC URL with your cluster identifier, Region, and database name (for example,
jdbc:redshift:iam://cluster-identifier:us-west-1/dev).

Alternatively, you can use the format jdbc:redshift:iam://<cluster-dns-here>:<cluster-port>/<your-DB-name-here>.
- Choose Extended Properties.
- Choose the Create new entry icon.
- Enter the following information:
- Property
plugin_namewith valuecom.amazon.redshift.plugin.BrowseAzureCredentialsProvider. This tells the driver what authentication method to choose. This should always be set tocom.amazon.redshift.plugin.BrowserAzureCredentialsProvider. - Property
idp_tenantwith the value of your IdP tenant. This is the tenant name of your company configured on your IdP (Azure). This value can either be the tenant name or the tenant unique ID with hyphens (preferred). If you use a tenant name, it could cause uncertainty when setting up the application. - Property
client_idwith the value of your application client ID. This is the client ID with hyphens of the Amazon Redshift application you created when setting up your Azure SSO configurations.
- Property
- Choose OK.

- On the Select Connection Profile page, leave everything else at the default values and choose OK.

The driver opens the default browser with the SSO sign-in page.

After you sign in, you’re redirected to localhost with a success message.

Troubleshooting
If something goes wrong, logging is the first call to start an investigation.
You can add an extended property with the following code:
DSILogLevel=6
LogPath=<any existing directory>
Alternatively, use a connection string:
jdbc:redshift://<cluster_url>:<port>/<db>?DSILogLevel=6&LogPath=<any existing directory>

For an Unauthorized exception, check your authentication in Azure Portal, under Mobile and desktop applications.

For a PKX exception, first try to use the ssl=false extended property. The vanish exception means that the problem is in the SSL certificate between the cluster and client. If so, first try to use the latest driver and check if your cluster version is old. Then run your application with the “-Djavax.net.debug=all” key for JVM. This shows all the TLS traffic. Make sure the certification is there.

For the exception SAML error: Not authorized to perform sts:AssumeRoleWithSAML, you need to edit the IAM role trust relationship.
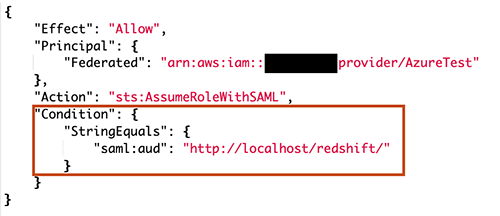
Change "StringEquals" to "StringLike" : { "saml:aud": "*" }, then save it and try again. Also check that saml:aud and replyURL in Azure are exactly the same. If they’re different, authentication fails and causes the same error.
Summary
Amazon Redshift makes it easy to integrate with third-party identity providers to provide centralized user management. In this post, we showed how to configure the Amazon Redshift browser-based plugin to use multi-factored authentication with Microsoft Azure Active Directory. You can follow these same steps to work with your SAML 2.0 compliant identity provider of choice.
About the Authors
Ilesh Garish is a Software Development Engineer at AWS. His role is to develop connectors for Amazon Redshift. Prior to AWS, he built database drivers for the Oracle RDBMS, TigerLogic XDMS, and OpenAccess SDK. He worked in the database internal technologies at San Francisco Bay Area startups.
Brandon Schur is a Senior Database Engineer at AWS. He focuses on performance tuning for MPP databases, drivers & connectivity, and integrations with AWS services and partners.
Enjoyed this article? Sign up for our newsletter to receive regular insights and stay connected.